
GCP—Configuring an Internal Load Balancer
Internal Load Balancer
Google Cloud offers Internal Load Balancing for your TCP/UDP-based traffic. Internal Load Balancing enables you to run and scale your services behind a private load balancing IP address that is accessible only to your internal virtual machine instances.
In this lab, we create two managed instance groups in the same region. Then we configure and test an internal load balancer with the instances groups as the backends.
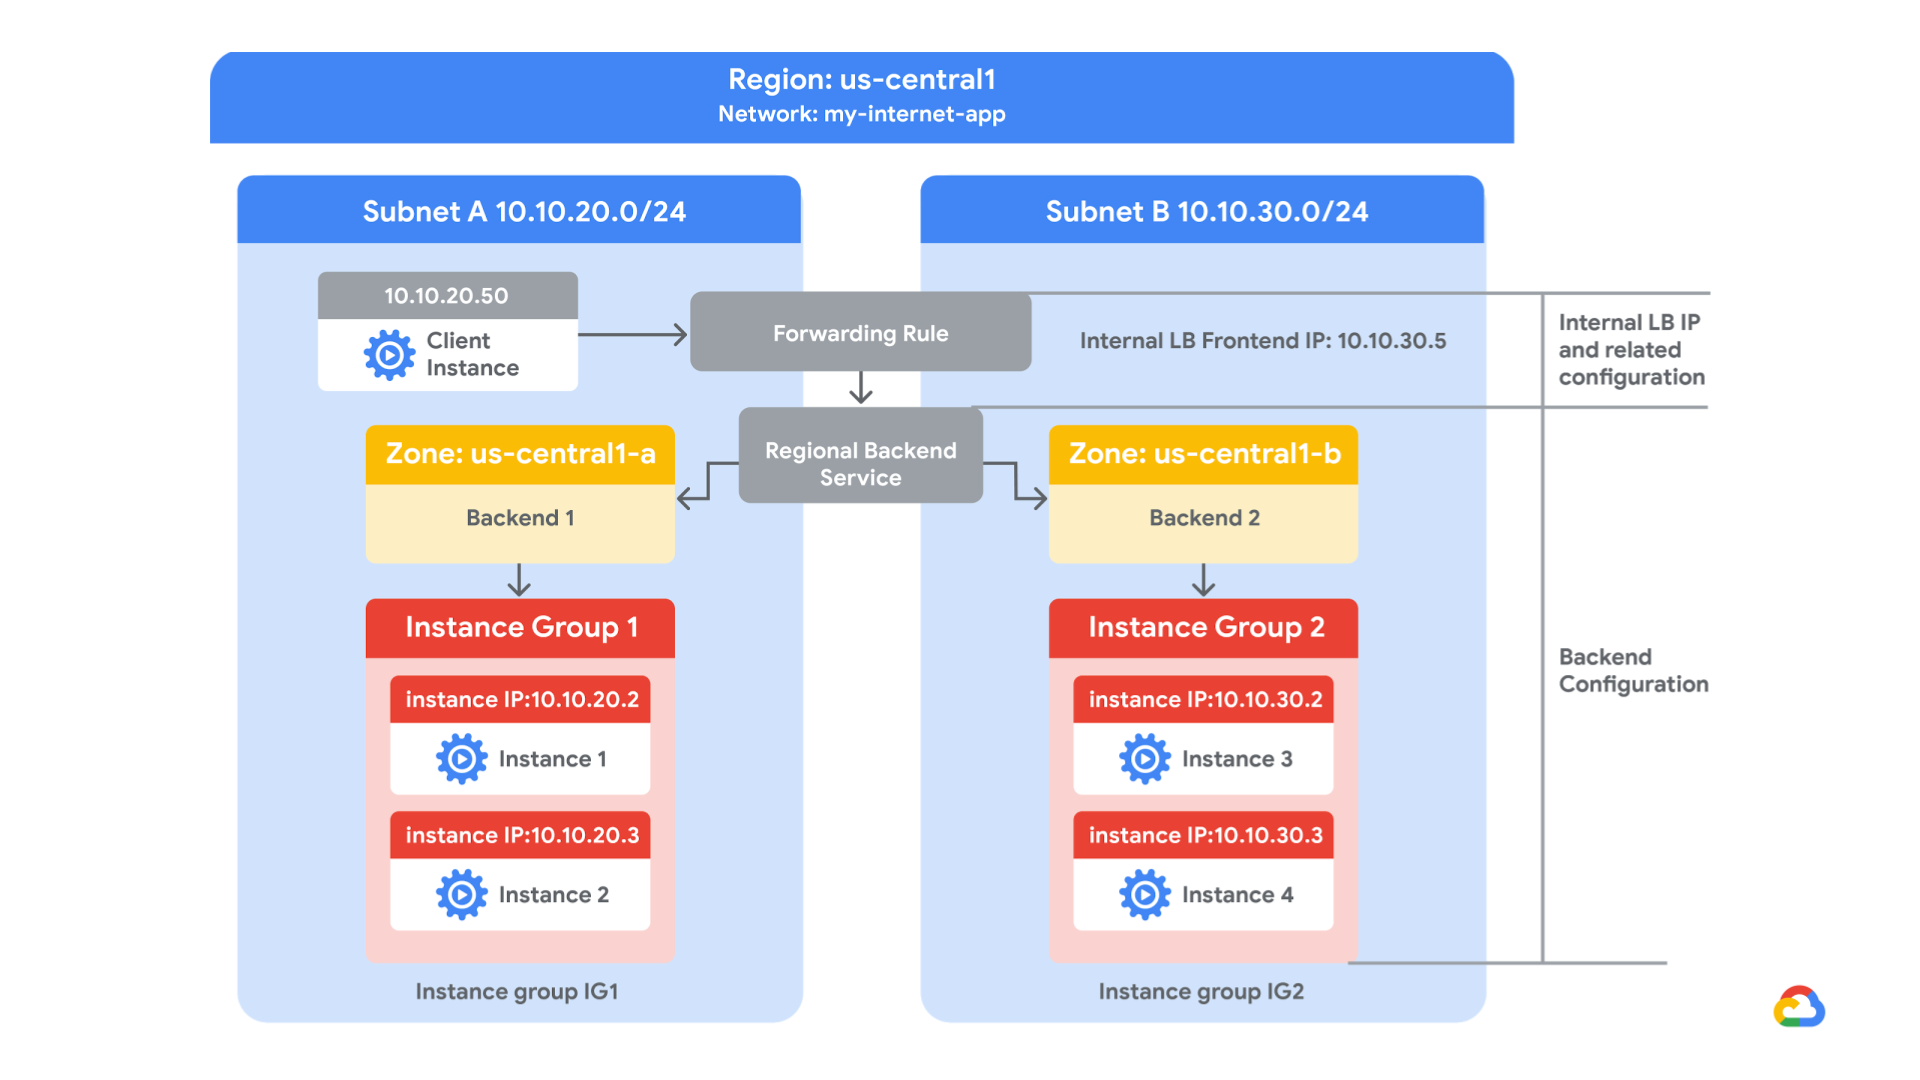 Image courtesy: Google Cloud Platform
-
Create internal traffic and health check firewall rules
-
Create a NAT configuration using Cloud Router
-
Configure two instance templates
-
Create two managed instance groups
-
Configure and test an internal load balancer
Task 1. Configure internal traffic and health check firewall rules.
Configure firewall rules to allow internal traffic connectivity from sources in the 10.10.0.0/16 range. This rule allows incoming traffic from any client located in the subnet.
Health checks determine which instances of a load balancer can receive new connections. For HTTP load balancing, the health check probes to your load-balanced instances come from addresses in the ranges 130.211.0.0/22 and 35.191.0.0/16. Your firewall rules must allow these connections.
Explore the my-internal-app network
The network my-internal-app with subnet-a and subnet-b and firewall rules for RDP, SSH, and ICMP traffic have been configured.
gcloud compute --project=qwiklabs-gcp-01-9f7578e85385 firewall-rules create fw-allow-lb-access --direction=INGRESS --priority=1000 --network=my-internal-app --action=ALLOW --rules=all --source-ranges=10.10.0.0/16 --target-tags=backend-service
gcloud compute --project=qwiklabs-gcp-01-9f7578e85385 firewall-rules create fw-allow-health-checks --direction=INGRESS --priority=1000 --network=my-internal-app --action=ALLOW --rules=tcp:80 --source-ranges=130.211.0.0/22,35.191.0.0/16 --target-tags=backend-service
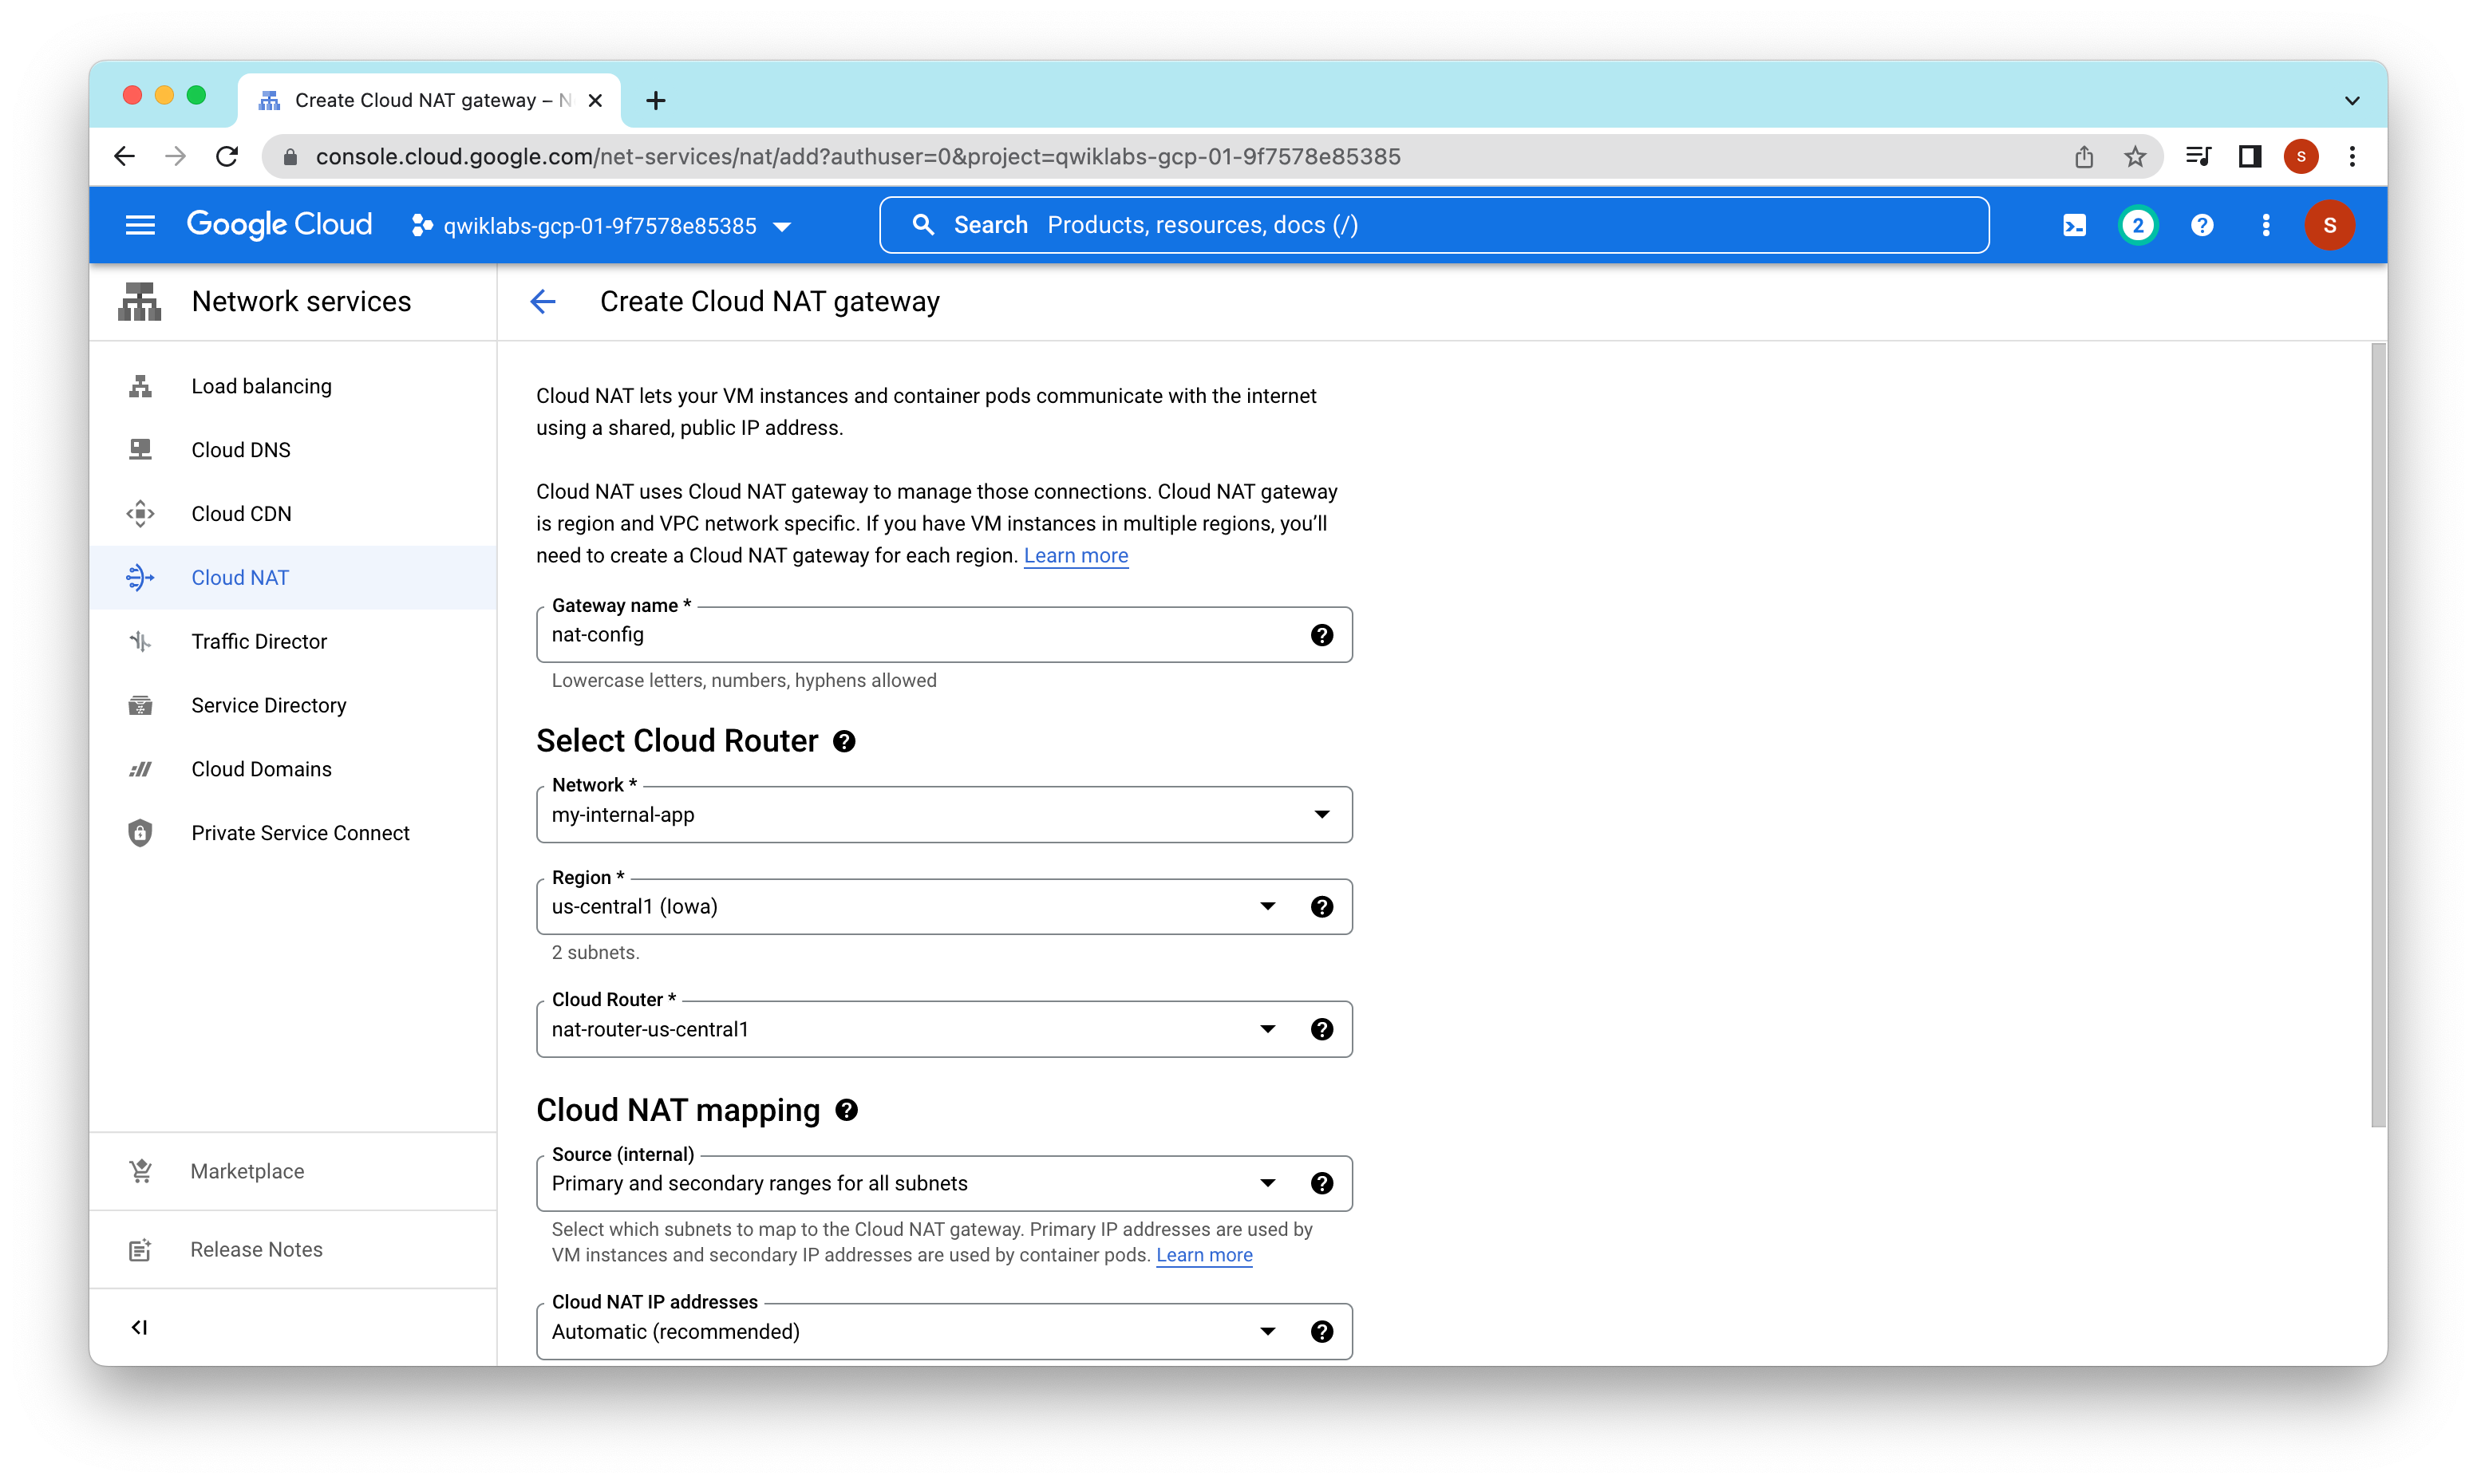
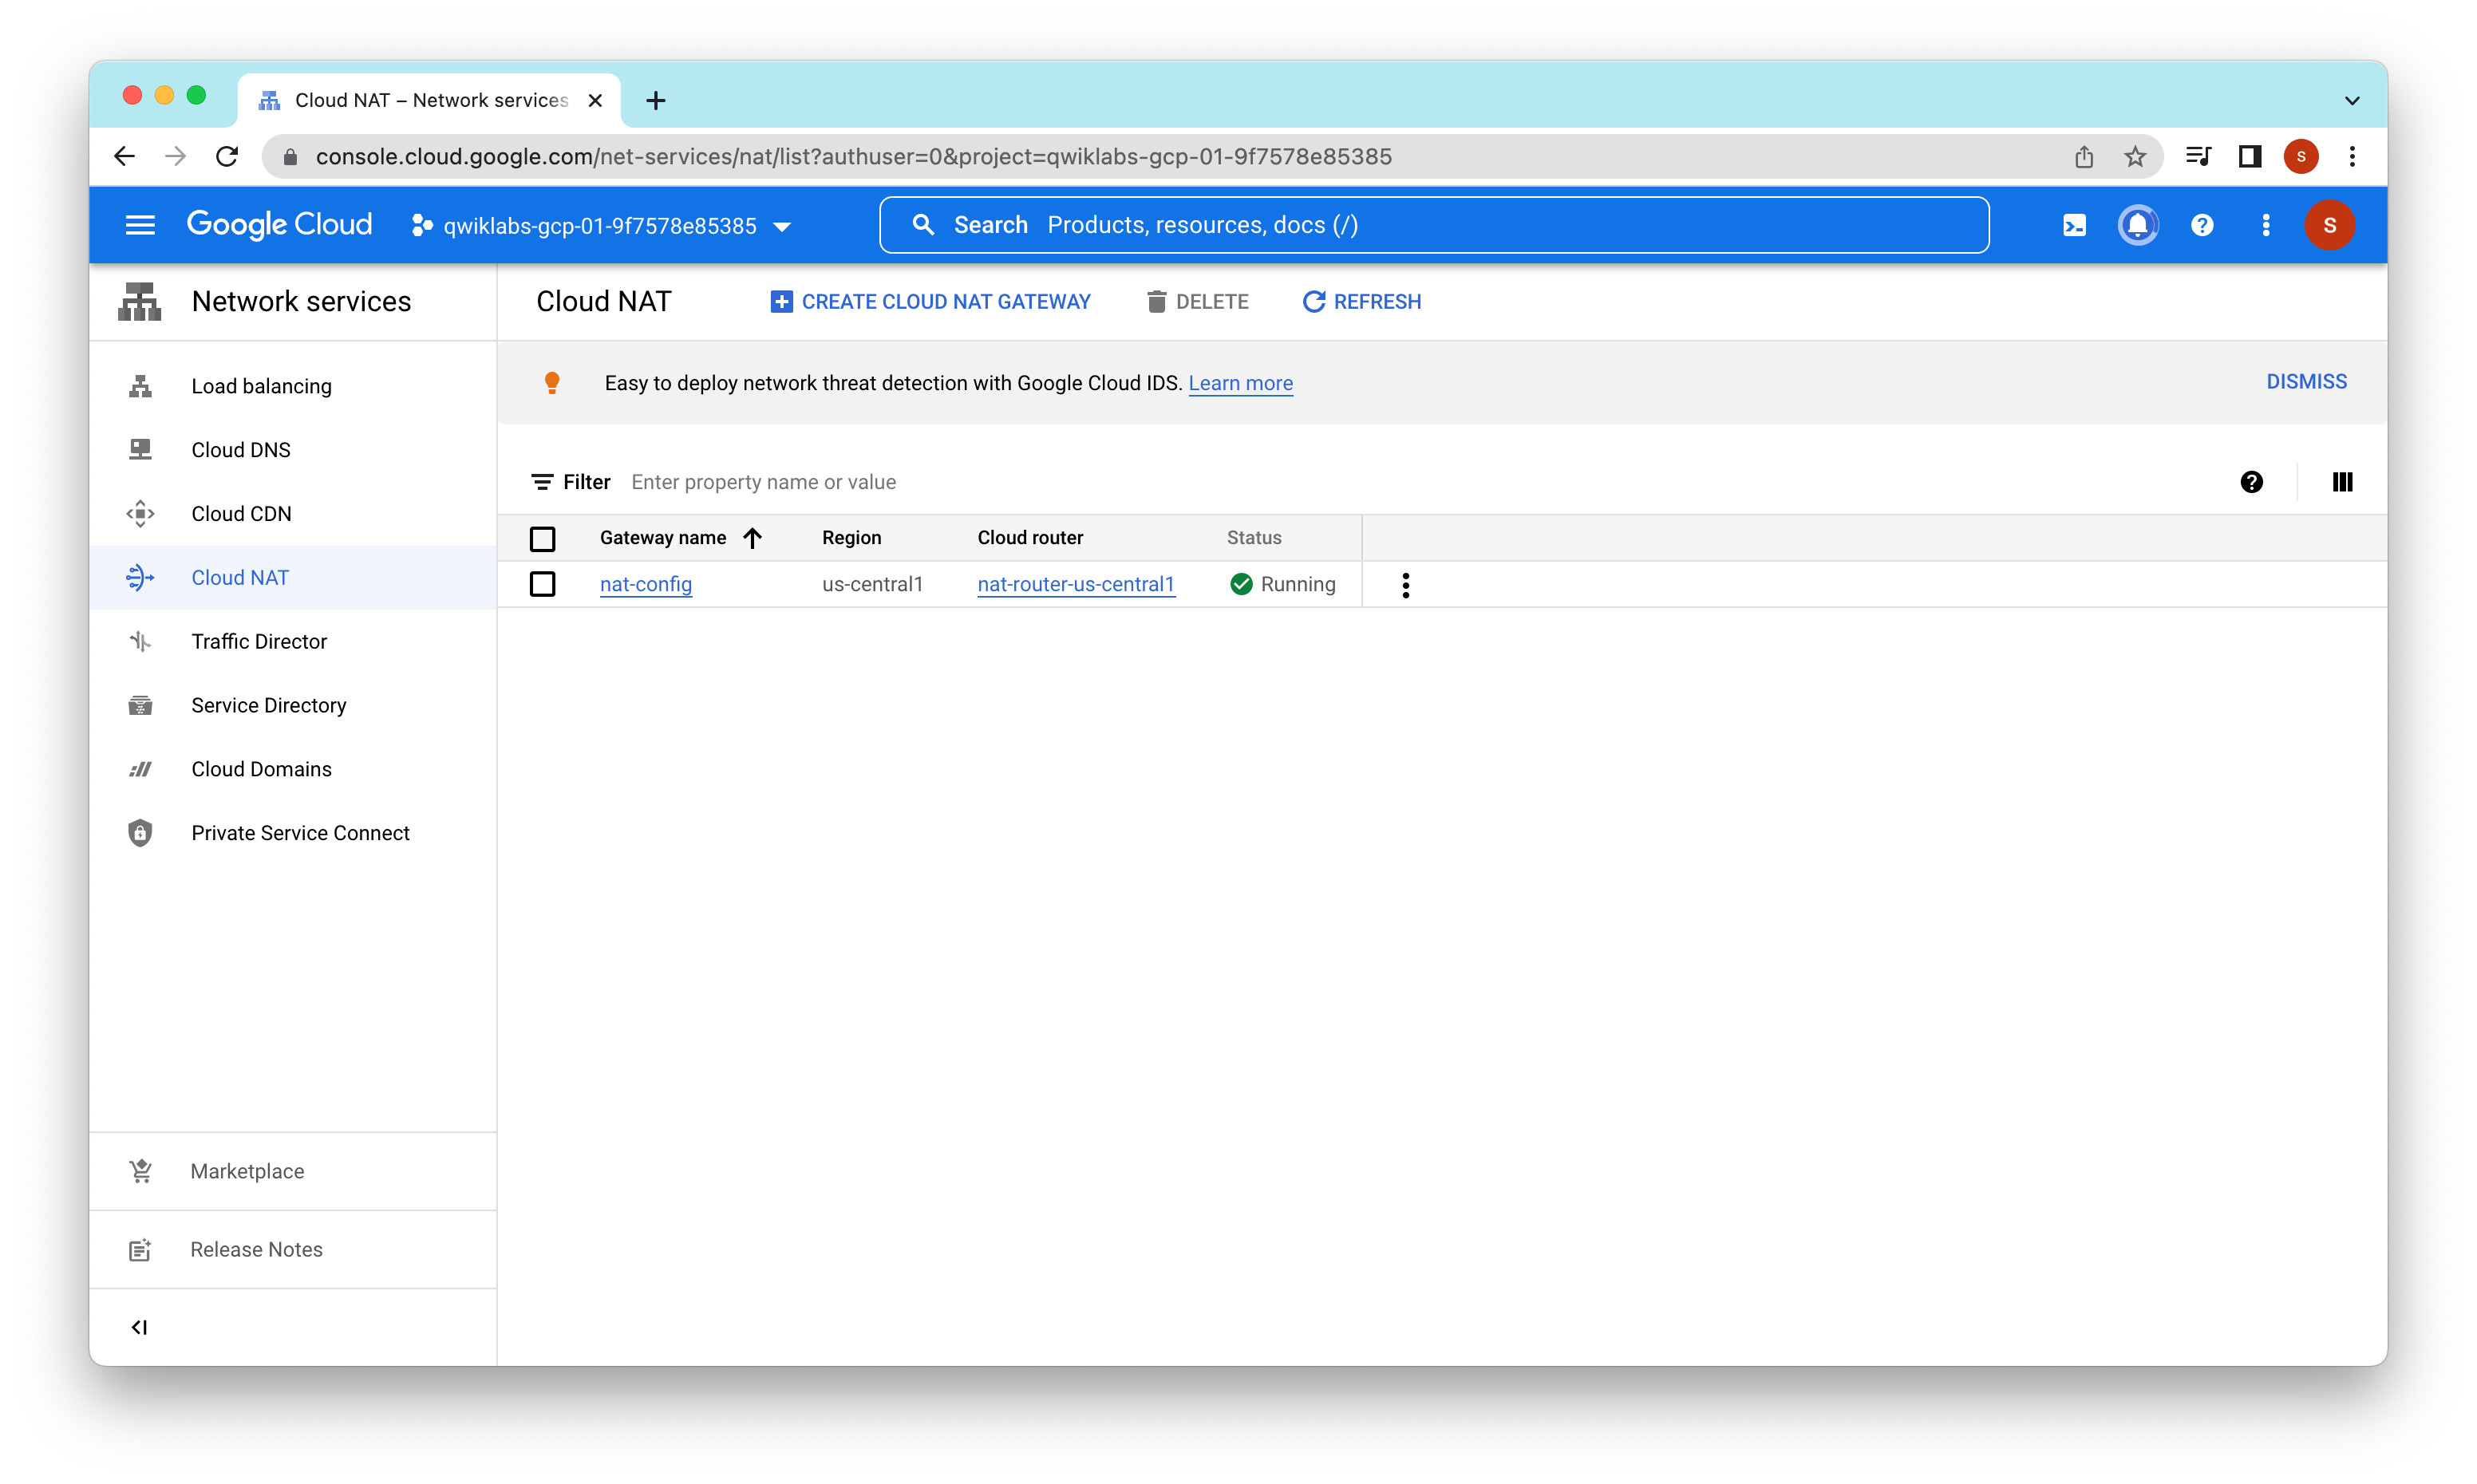
Task 2: Create a NAT configuration using Cloud Router
The Google Cloud VM backend instances that we setup in Task 3 will not be configured with external IP addresses.
Instead, we will setup the Cloud NAT service to allow these VM instances to send outbound traffic only through the Cloud NAT, and receive inbound traffic through the load balancer.
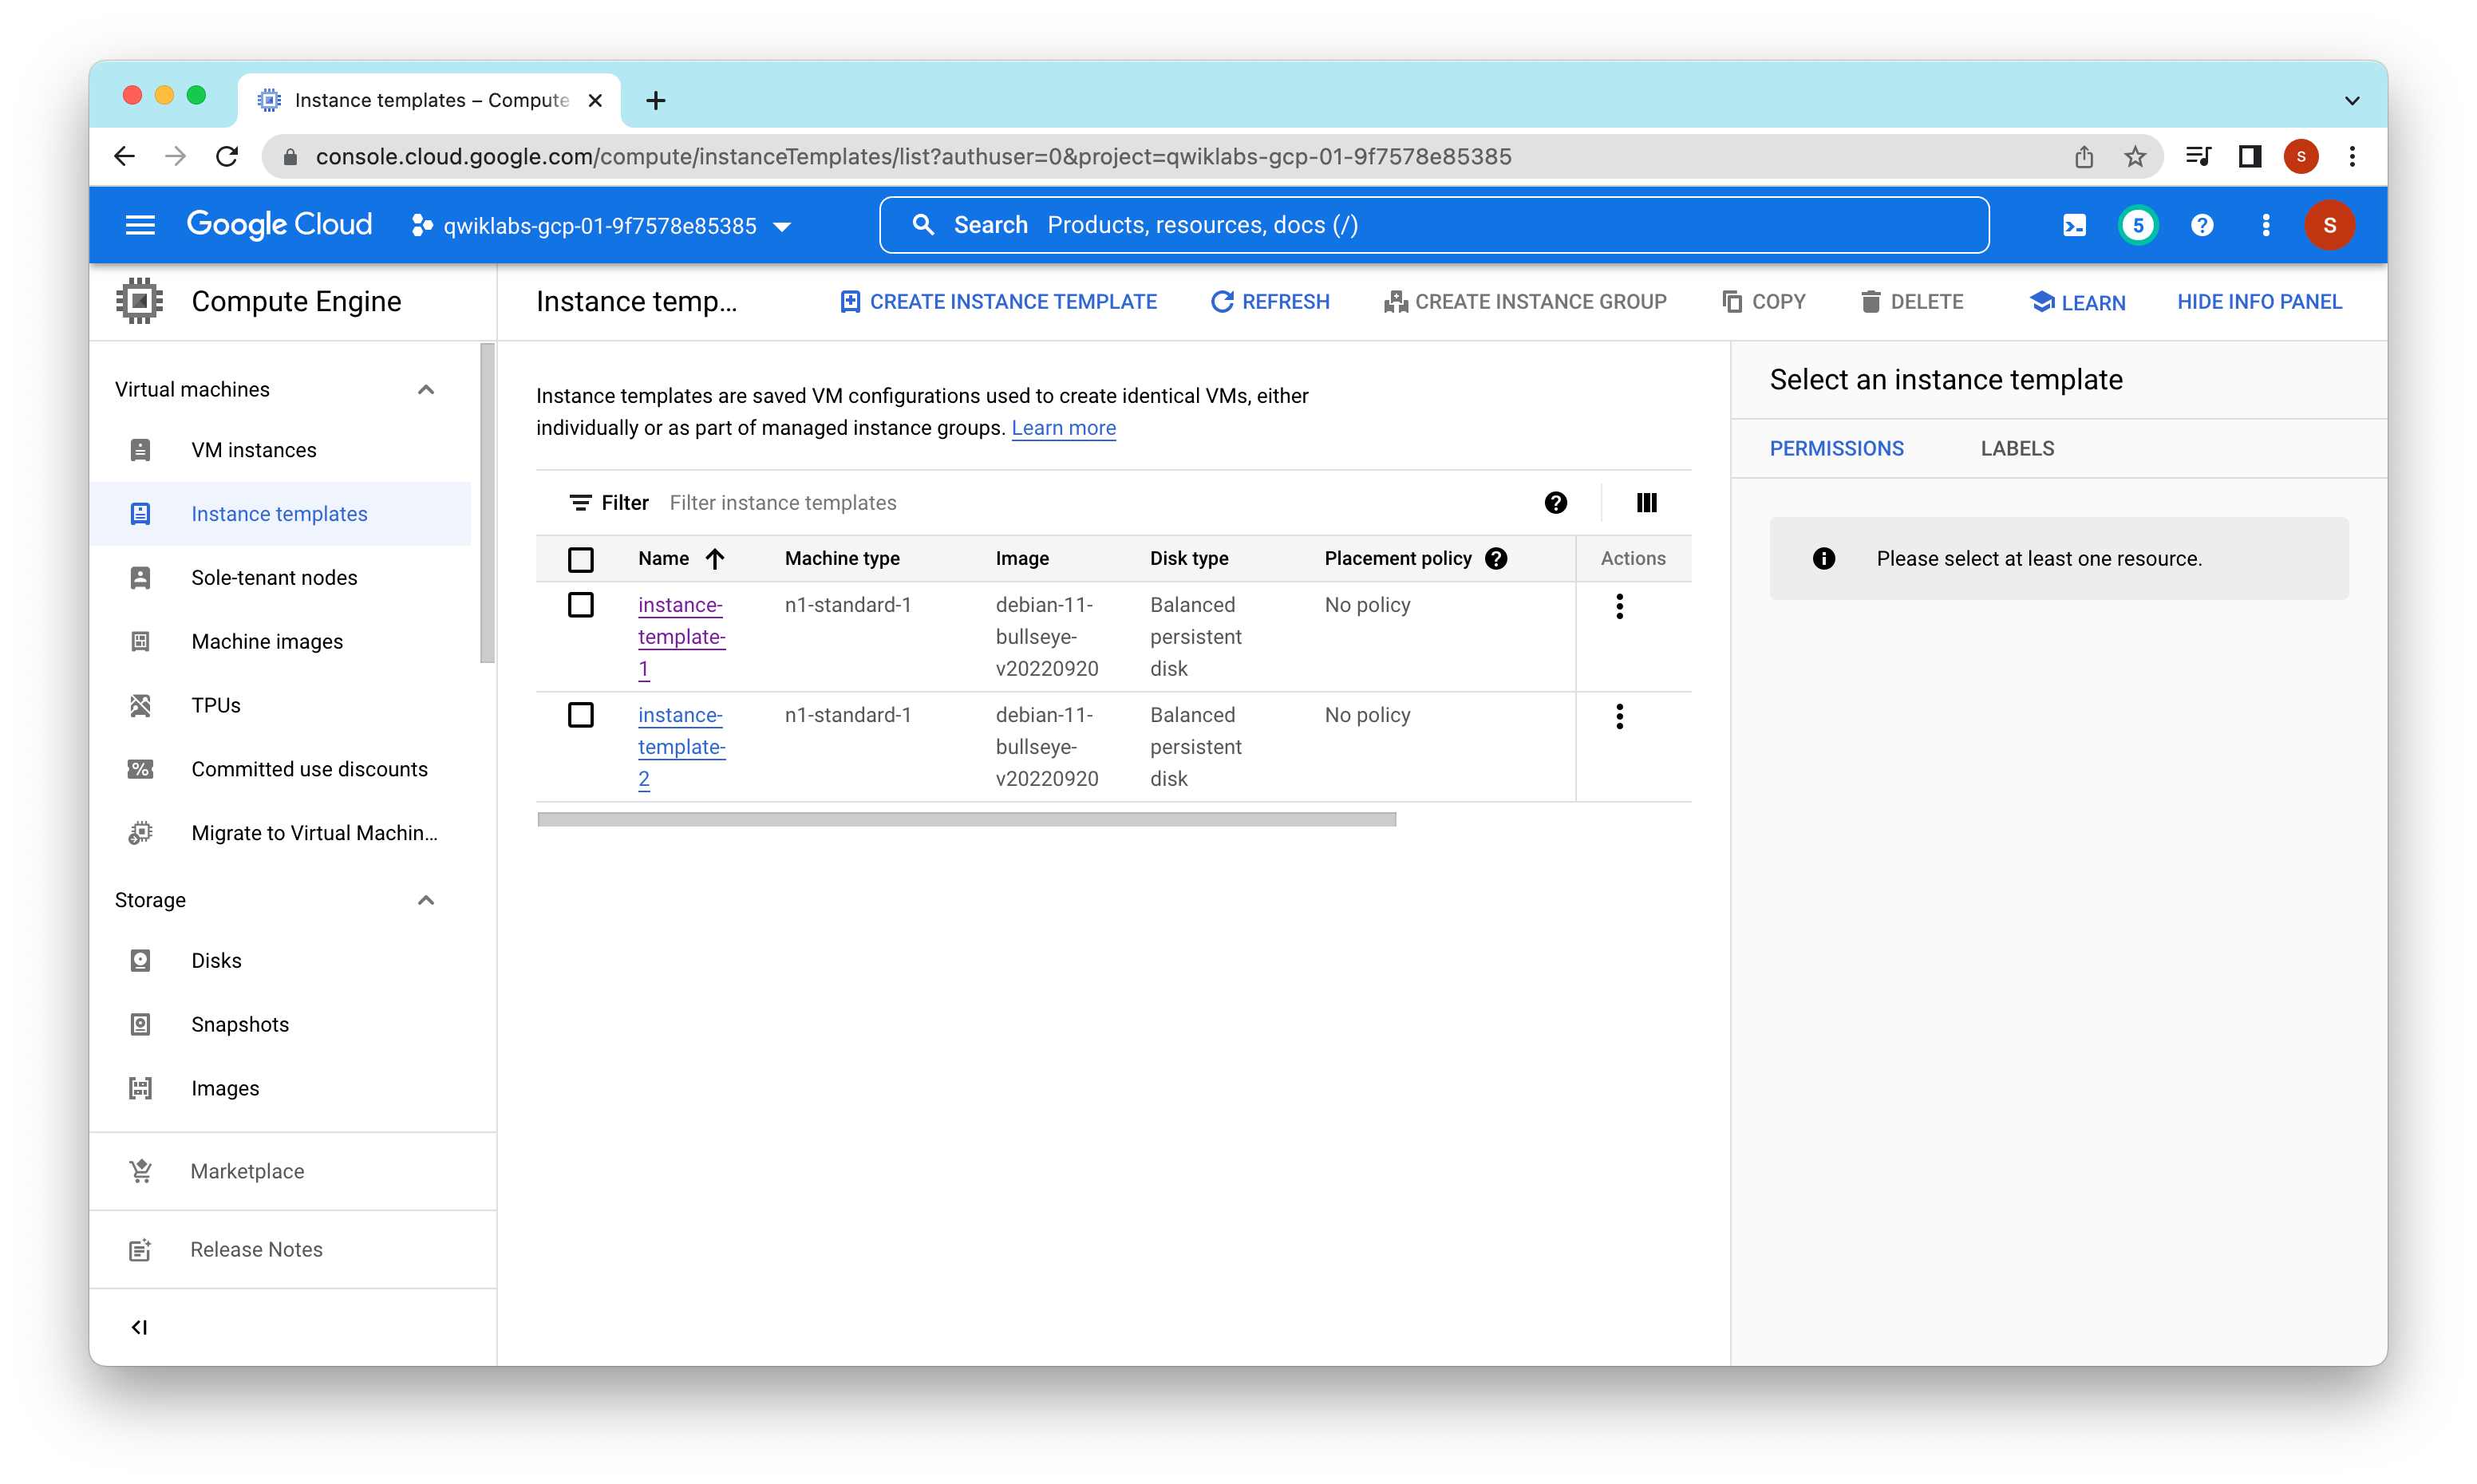
Task 3. Configure instance templates and create instance groups
A managed instance group uses an instance template to create a group of identical instances. Use these to create the backends of the internal load balancer.
Configure the instance templates An instance template is an API resource that you can use to create VM instances and managed instance groups. Instance templates define the machine type, boot disk image, subnet, labels, and other instance properties. Create an instance template for both subnets of the my-internal-app network.
gcloud compute instance-templates create instance-template-1 --project=qwiklabs-gcp-01-9f7578e85385 --machine-type=n1-standard-1 --network-interface=subnet=subnet-a,no-address --metadata=startup-script-url=gs://cloud-training/gcpnet/ilb/startup.sh,enable-oslogin=true --maintenance-policy=MIGRATE --provisioning-model=STANDARD --service-account=980968742048-compute@developer.gserviceaccount.com --scopes=https://www.googleapis.com/auth/devstorage.read_only,https://www.googleapis.com/auth/logging.write,https://www.googleapis.com/auth/monitoring.write,https://www.googleapis.com/auth/servicecontrol,https://www.googleapis.com/auth/service.management.readonly,https://www.googleapis.com/auth/trace.append --region=us-central1 --tags=backend-service --create-disk=auto-delete=yes,boot=yes,device-name=instance-template-1,image=projects/debian-cloud/global/images/debian-10-buster-v20220920,mode=rw,size=10,type=pd-balanced --no-shielded-secure-boot --shielded-vtpm --shielded-integrity-monitoring --reservation-affinity=any

Verify the backends Verify that VM instances are being created in both subnets
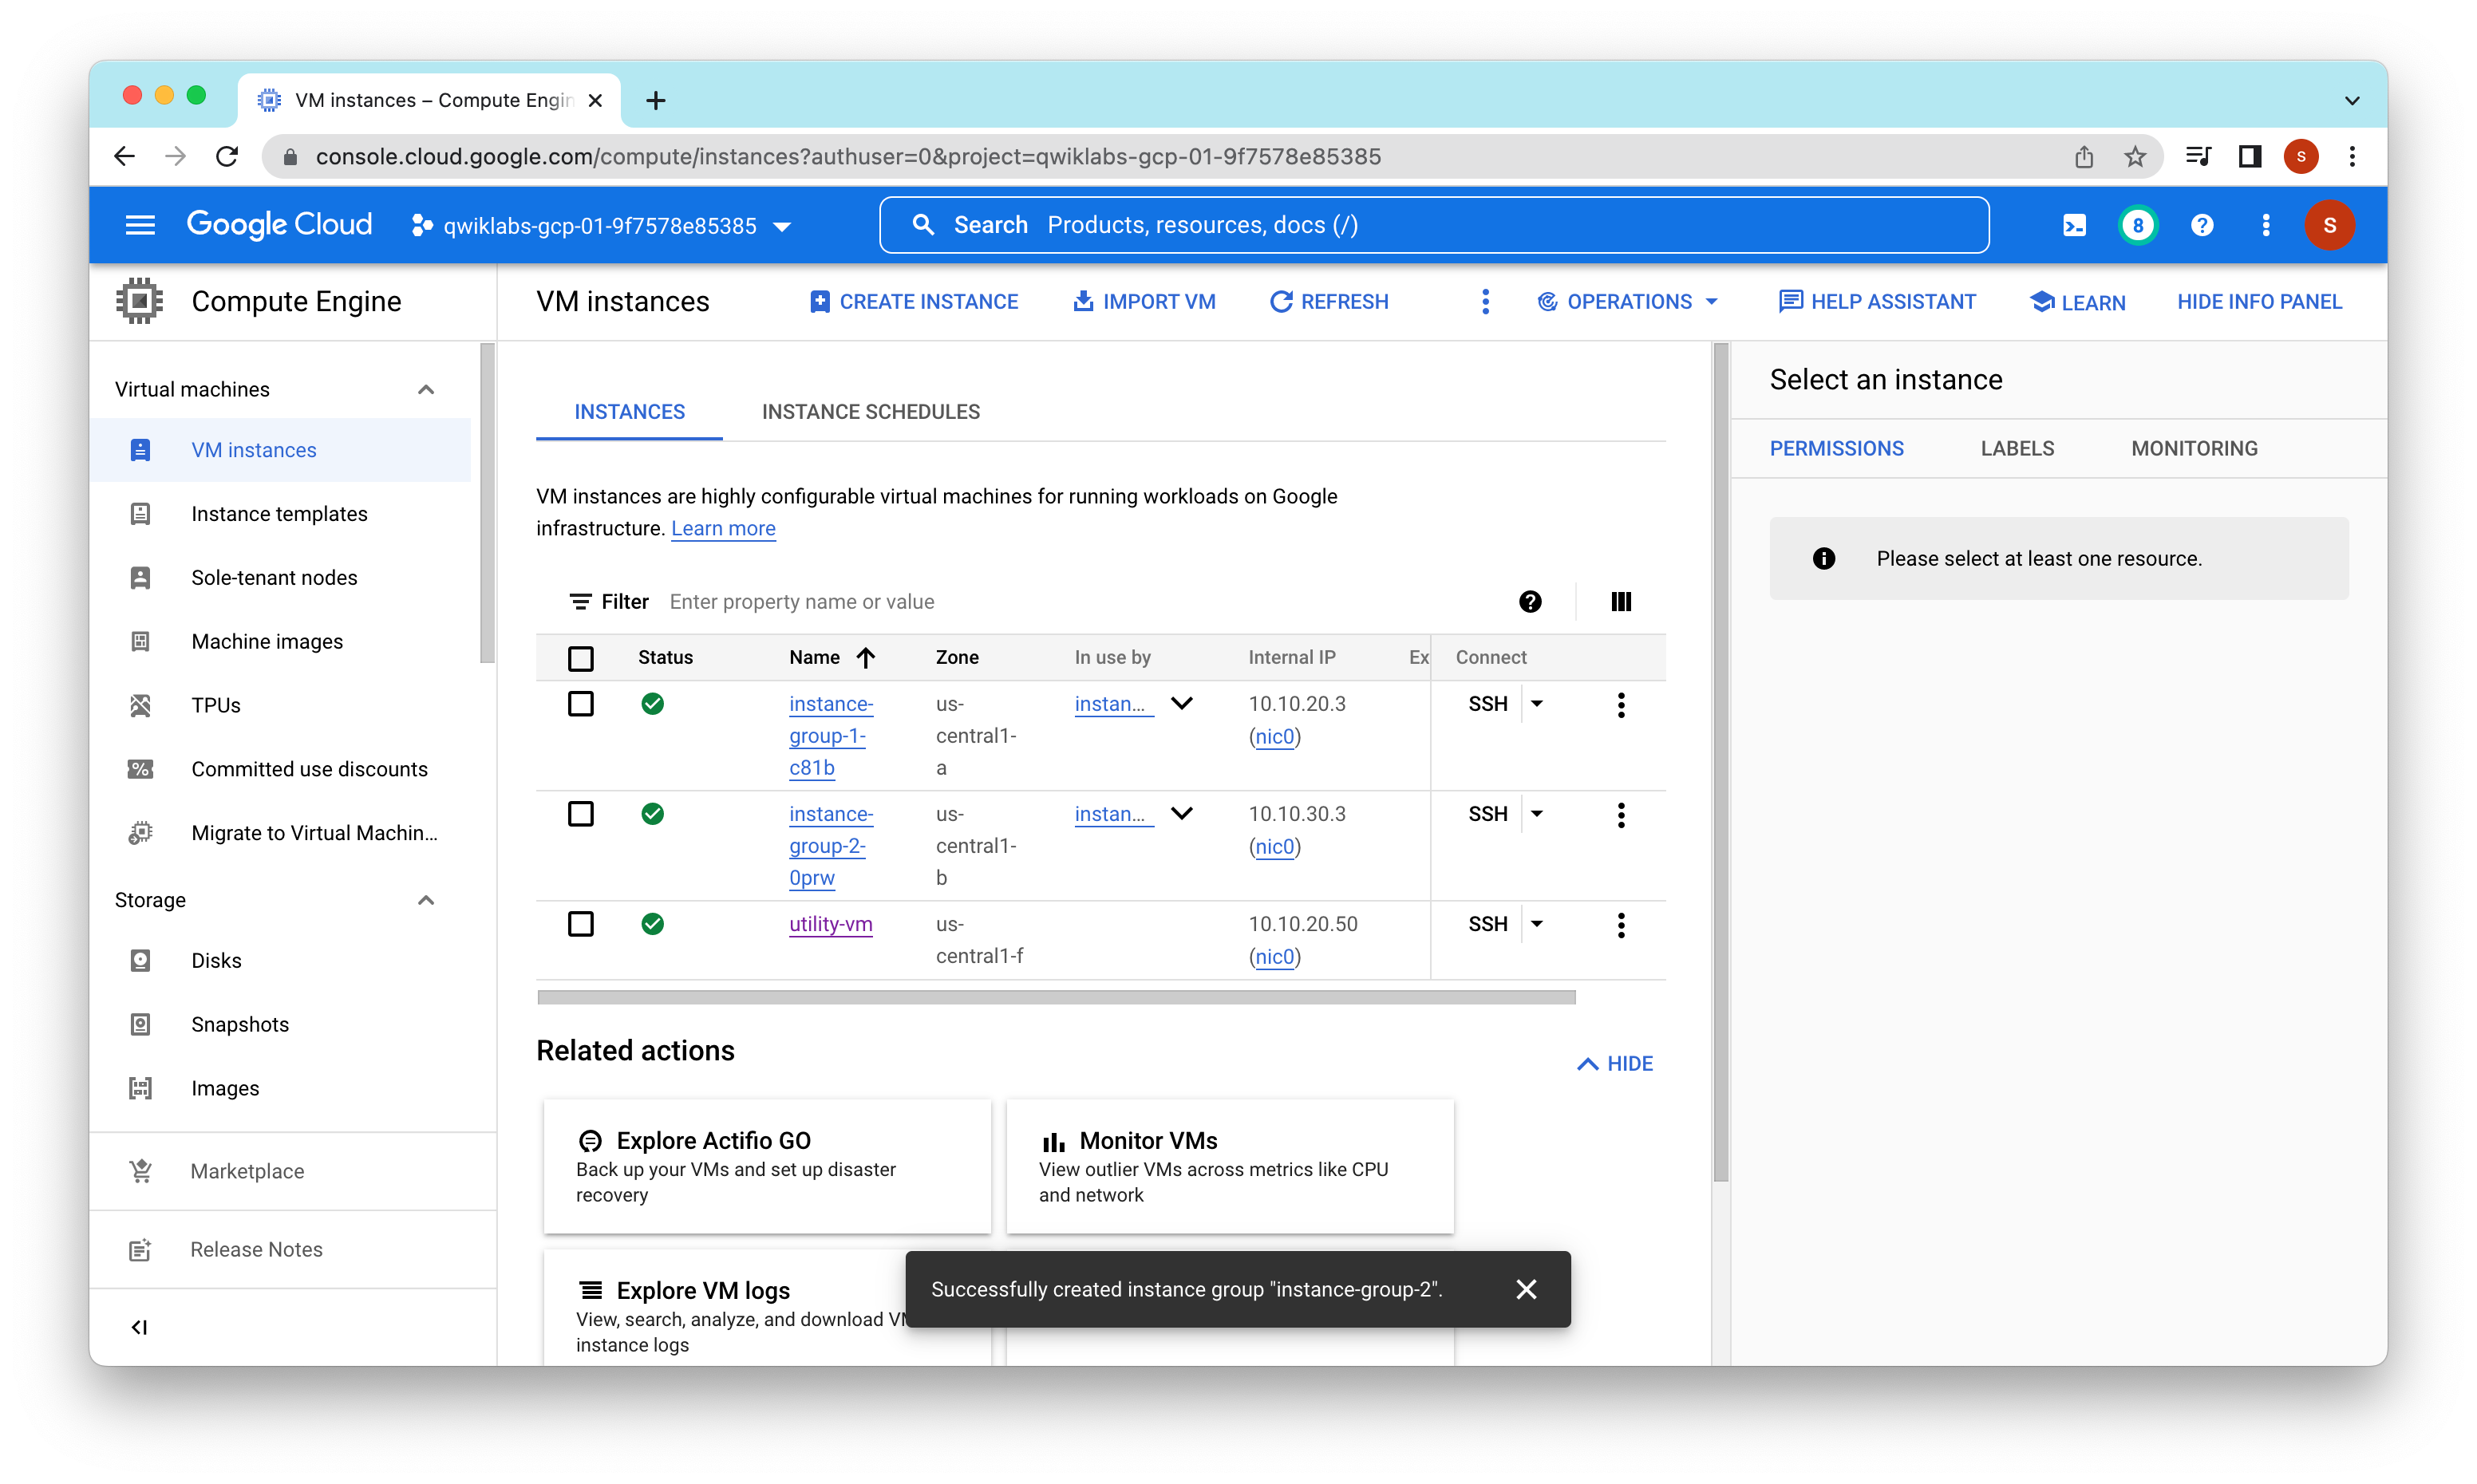
On the Navigation menu, click Compute Engine > VM instances. Notice two instances that start with instance-group-1 and instance-group-2.
These instances are in separate zones, and their internal IP addresses are part of the subnet-a and subnet-b CIDR blocks.

Create a utility VM to access the backends’ HTTP sites.
gcloud compute instances create utility-vm --project=qwiklabs-gcp-01-9f7578e85385 --zone=us-central1-f --machine-type=n1-standard-1 --network-interface=private-network-ip=10.10.20.50,subnet=subnet-a,no-address --metadata=enable-oslogin=true --maintenance-policy=MIGRATE --provisioning-model=STANDARD --service-account=980968742048-compute@developer.gserviceaccount.com --scopes=https://www.googleapis.com/auth/devstorage.read_only,https://www.googleapis.com/auth/logging.write,https://www.googleapis.com/auth/monitoring.write,https://www.googleapis.com/auth/servicecontrol,https://www.googleapis.com/auth/service.management.readonly,https://www.googleapis.com/auth/trace.append --create-disk=auto-delete=yes,boot=yes,device-name=utility-vm,image=projects/debian-cloud/global/images/debian-10-buster-v20220920,mode=rw,size=10,type=projects/qwiklabs-gcp-01-9f7578e85385/zones/us-central1-f/diskTypes/pd-balanced --no-shielded-secure-boot --shielded-vtpm --shielded-integrity-monitoring --reservation-affinity=any
Note: Because of deletion and re-creation of the instance templates and instance groups, the IP addresses are now .3 instead of .2
verify the welcome page for instance-group-1-xxxx,
Linux utility-vm 4.19.0-21-cloud-amd64 #1 SMP Debian 4.19.249-2 (2022-06-30) x86_64

The programs included with the Debian GNU/Linux system are free software;
the exact distribution terms for each program are described in the
individual files in /usr/share/doc/*/copyright.

Debian GNU/Linux comes with ABSOLUTELY NO WARRANTY, to the extent
permitted by applicable law.
Creating directory '/home/student-00-f2408545588a'.
student-00-f2408545588a@utility-vm:~$ curl 10.10.20.3
<h1>Internal Load Balancing Lab</h1><h2>Client IP</h2>Your IP address : 10.10.20.50<h2>Hostname</h2>Server Hostname: instance-group-1-c81b<h2>Server Location</h2>Region and Zone: us-central1-astudent-00-f2408545588a@utility-vm:~$
verify the welcome page for instance-group-2-xxxx
student-00-f2408545588a@utility-vm:~$ curl 10.10.30.3
<h1>Internal Load Balancing Lab</h1><h2>Client IP</h2>Your IP address : 10.10.20.50<h2>Hostname</h2>Server Hostname: instance-group-2-0prw<h2>Server Location</h2>Region and Zone: us-central1-bstudent-00-f2408545588a@utility-vm:~$
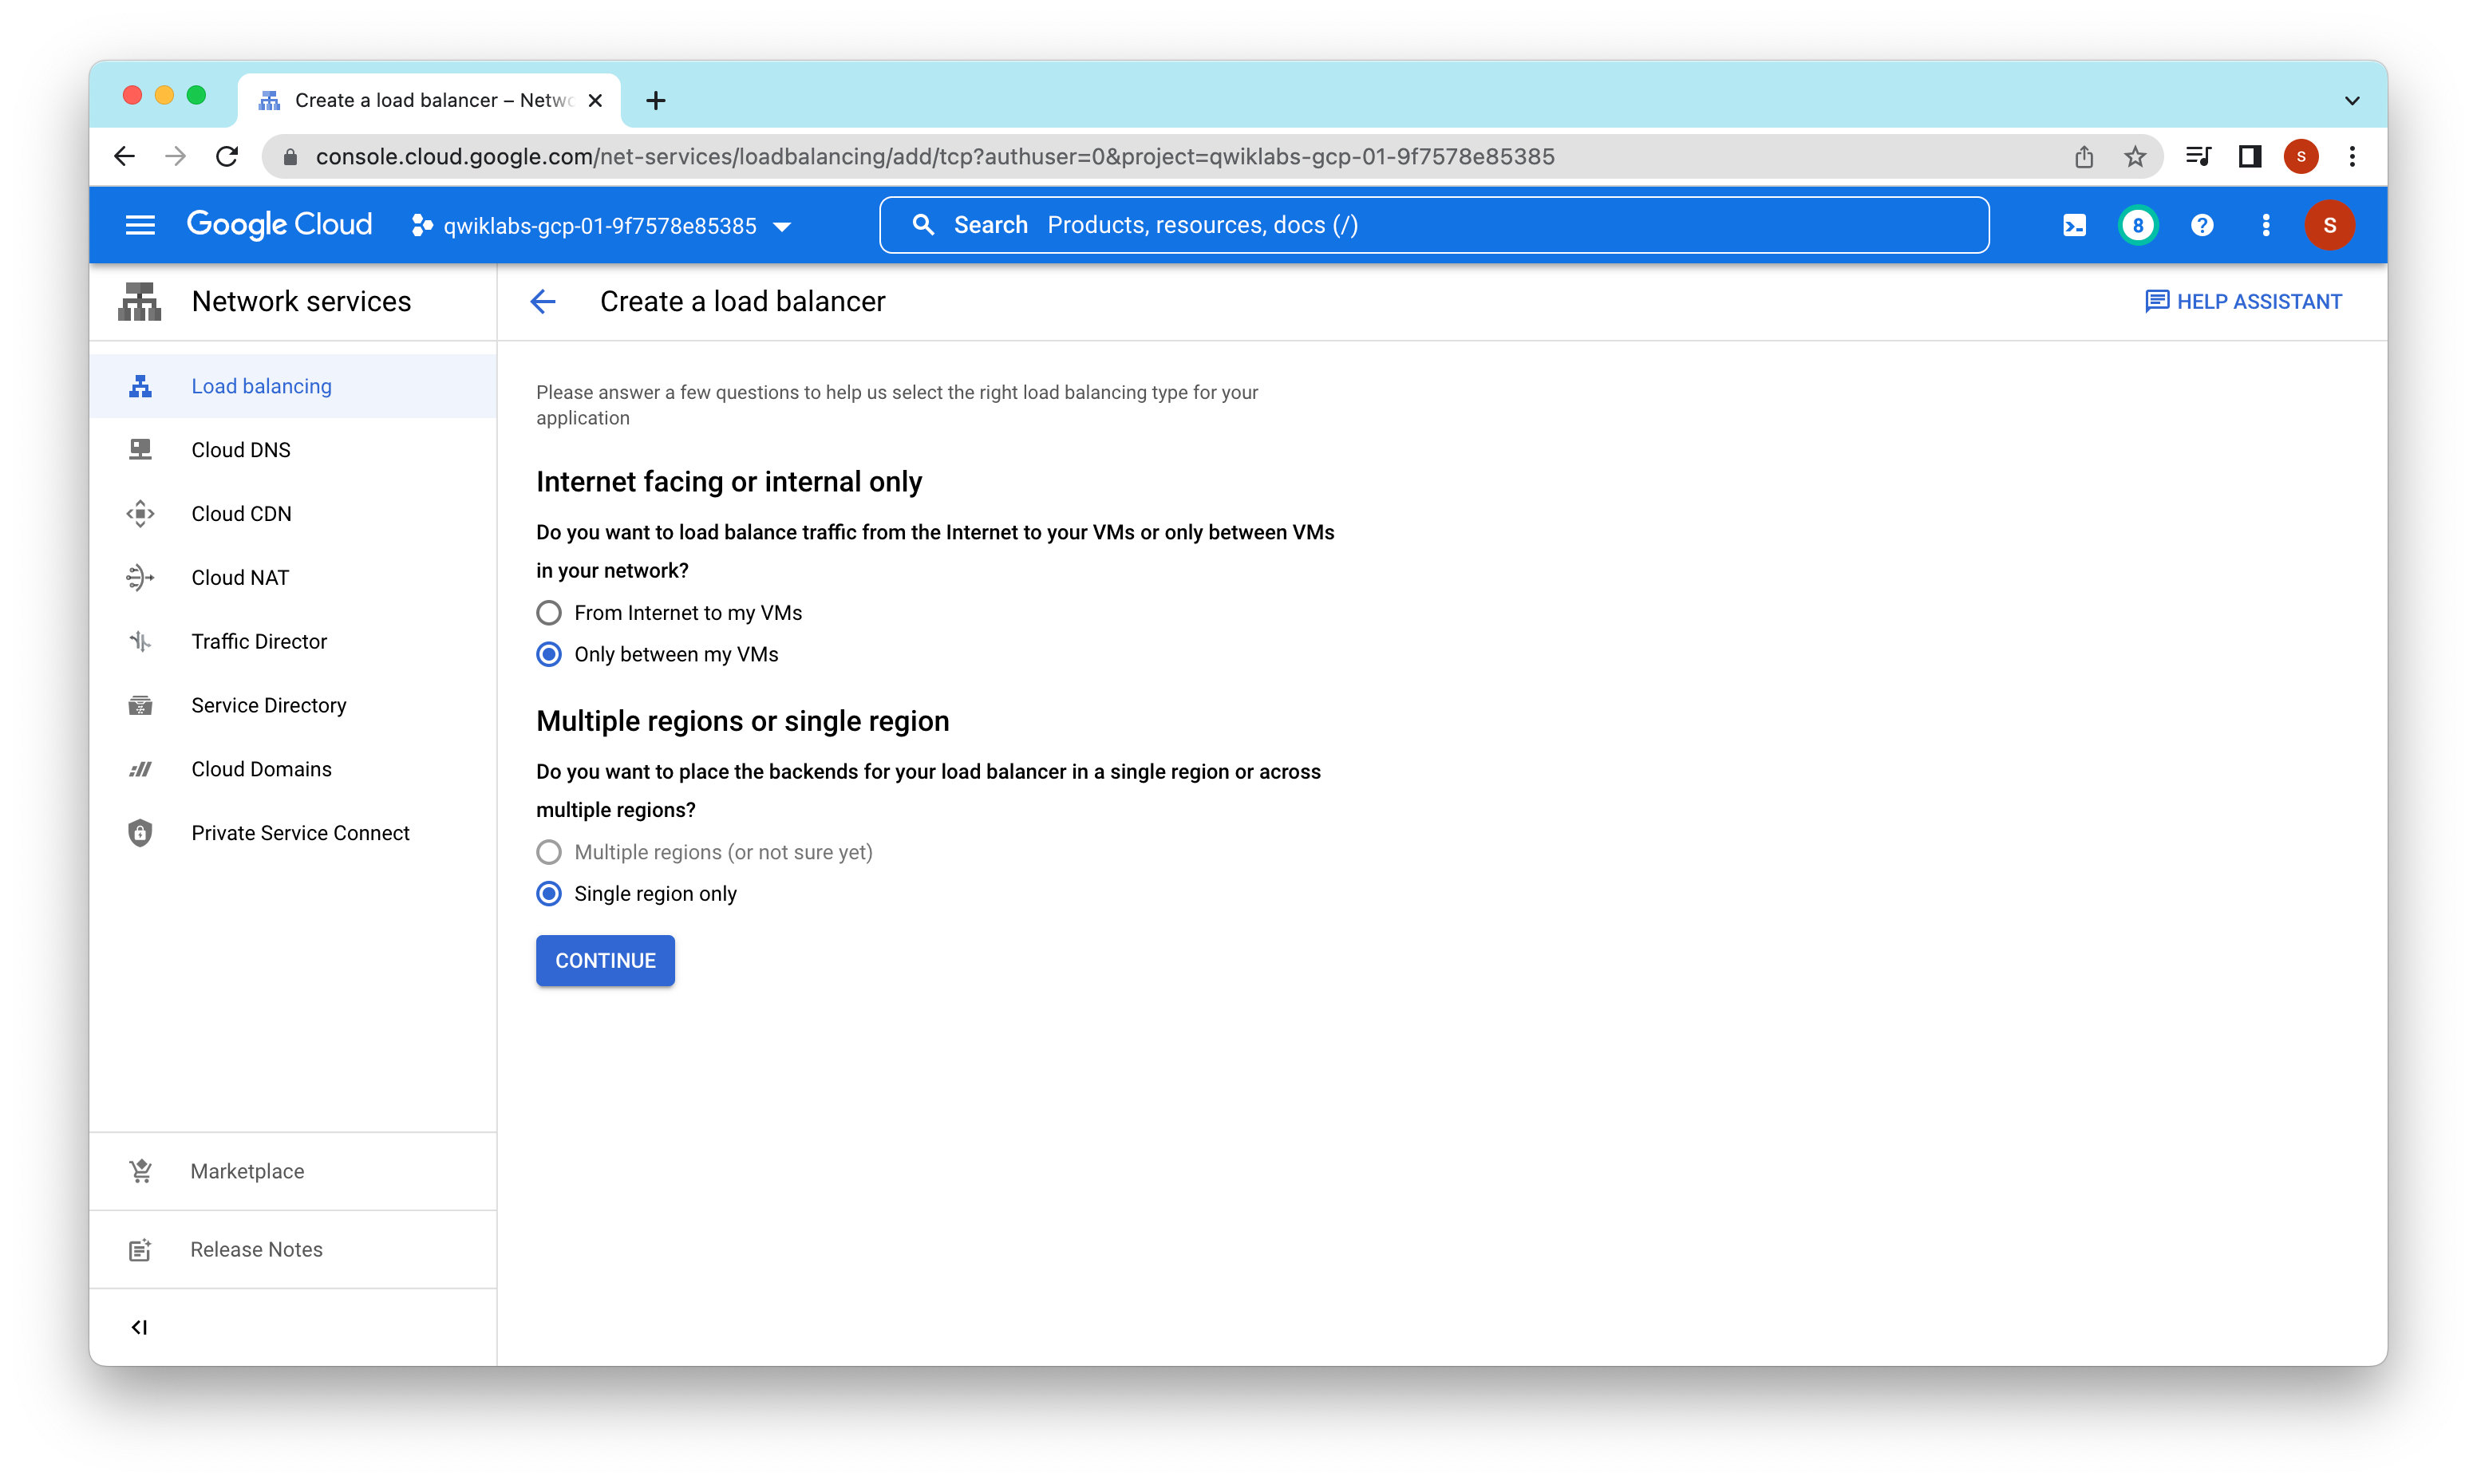
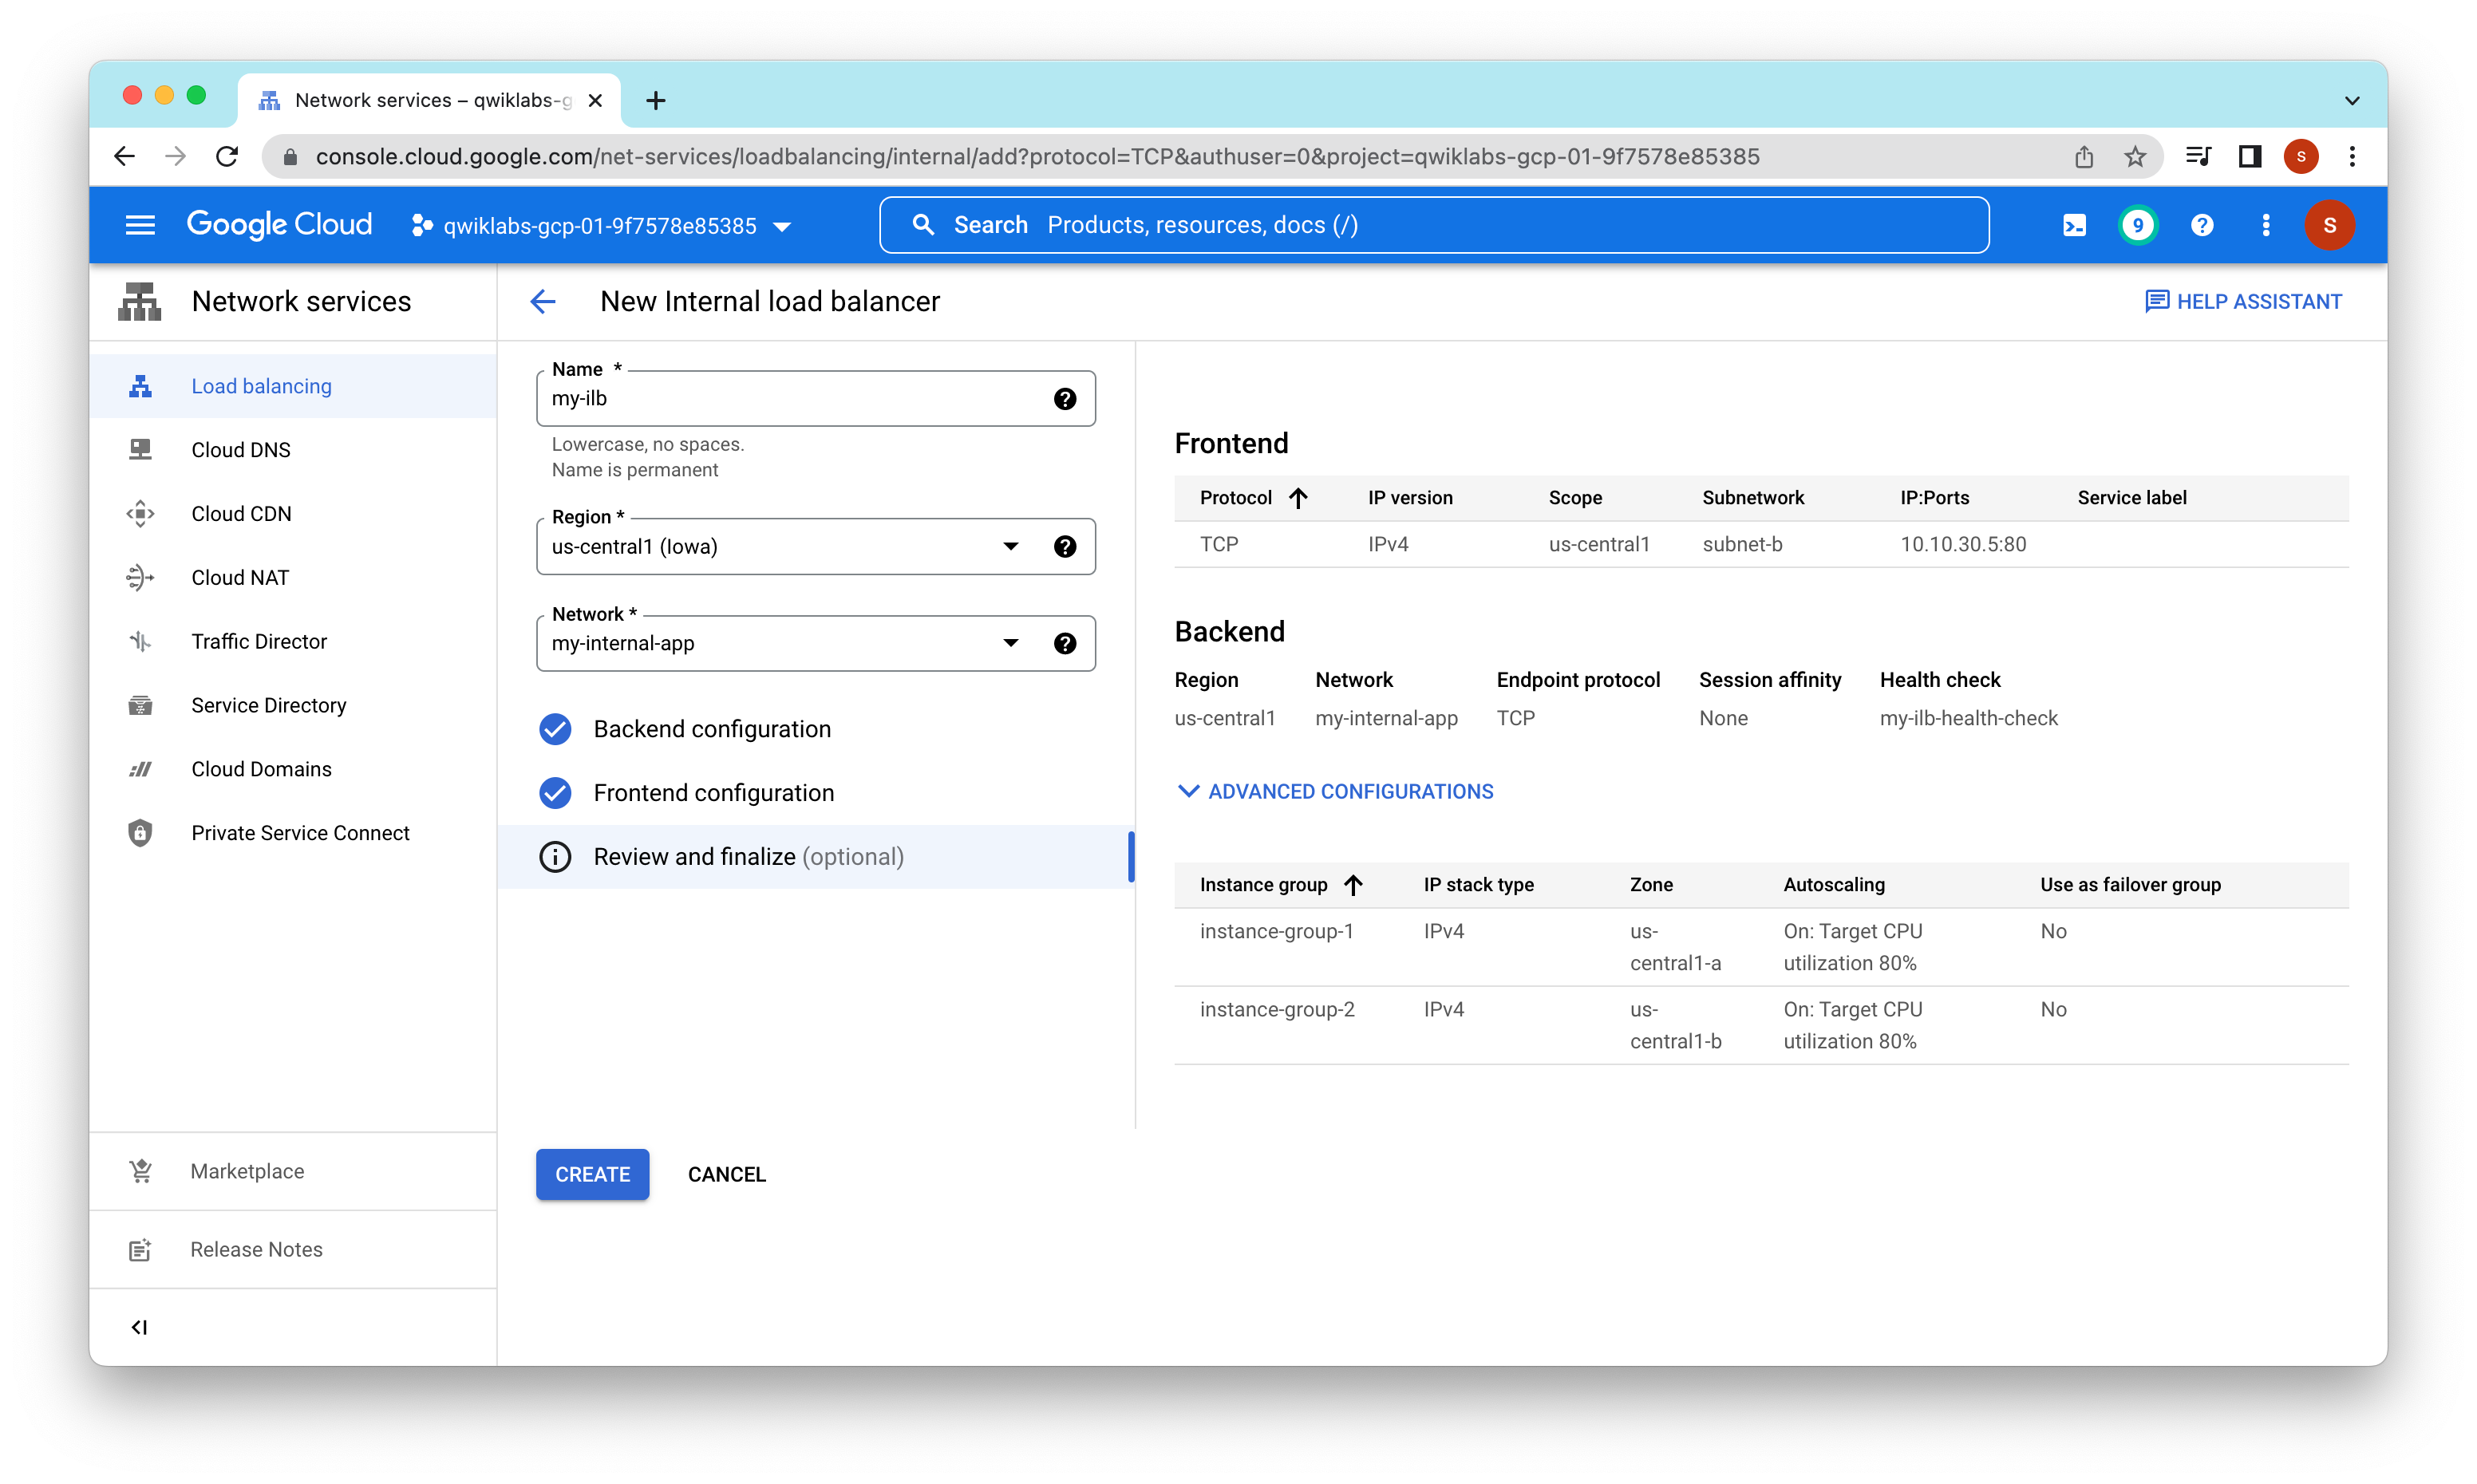
Task 4. Configure the internal load balancer
Configure the internal load balancer to balance traffic between the two backends (instance-group-1 in us-central1-a and instance-group-2 in us-central1-b)

Task 5. Test the internal load balancer
Verify that the my-ilb IP address forwards traffic to instance-group-1 in us-central1-a and instance-group-2 in us-central1-b.
Linux utility-vm 4.19.0-21-cloud-amd64 #1 SMP Debian 4.19.249-2 (2022-06-30) x86_64

The programs included with the Debian GNU/Linux system are free software;
the exact distribution terms for each program are described in the
individual files in /usr/share/doc/*/copyright.

Debian GNU/Linux comes with ABSOLUTELY NO WARRANTY, to the extent
permitted by applicable law.
Last login: Thu Oct  6 05:46:49 2022 from 35.235.244.33
student-00-f2408545588a@utility-vm:~$ curl 10.10.30.5
<h1>Internal Load Balancing Lab</h1><h2>Client IP</h2>Your IP address : 10.10.20.50<h2>Hostname</h2>Server Hostname: instance-group-1-c81b<h2>Server Location</h2>Region and Zone: us-central1-astudent-00-f2408545588a@utility-vm:~$ curl 10.10.30.5
<h1>Internal Load Balancing Lab</h1><h2>Client IP</h2>Your IP address : 10.10.20.50<h2>Hostname</h2>Server Hostname: instance-group-2-0prw<h2>Server Location</h2>Region and Zone: us-central1-bstudent-00-f2408545588a@utility-vm:~$ curl 10.10.30.5
<h1>Internal Load Balancing Lab</h1><h2>Client IP</h2>Your IP address : 10.10.20.50<h2>Hostname</h2>Server Hostname: instance-group-2-0prw<h2>Server Location</h2>Region and Zone: us-central1-bstudent-00-f2408545588a@utility-vm:~$ curl 10.10.30.5
<h1>Internal Load Balancing Lab</h1><h2>Client IP</h2>Your IP address : 10.10.20.50<h2>Hostname</h2>Server Hostname: instance-group-1-c81b<h2>Server Location</h2>Region and Zone: us-central1-astudent-00-f2408545588a@utility-vm:~$ curl 10.10.30.5
<h1>Internal Load Balancing Lab</h1><h2>Client IP</h2>Your IP address : 10.10.20.50<h2>Hostname</h2>Server Hostname: instance-group-2-0prw<h2>Server Location</h2>Region and Zone: us-central1-bstudent-00-f2408545588a@utility-vm:~$ curl 10.10.30.5
<h1>Internal Load Balancing Lab</h1><h2>Client IP</h2>Your IP address : 10.10.20.50<h2>Hostname</h2>Server Hostname: instance-group-1-c81b<h2>Server Location</h2>Region and Zone: us-central1-astudent-00-f2408545588a@utility-vm:~$ curl 10.10.30.5
<h1>Internal Load Balancing Lab</h1><h2>Client IP</h2>Your IP address : 10.10.20.50<h2>Hostname</h2>Server Hostname: instance-group-1-c81b<h2>Server Location</h2>Region and Zone: us-central1-astudent-00-f2408545588a@utility-vm:~$ curl 10.10.30.5
<h1>Internal Load Balancing Lab</h1><h2>Client IP</h2>Your IP address : 10.10.20.50<h2>Hostname</h2>Server Hostname: instance-group-2-0prw<h2>Server Location</h2>Region and Zone: us-central1-bstudent-00-f2408545588a@utility-vm:~$
As expected, traffic is forwarded from the internal load balancer (10.10.30.5) to the backends. We see responses from instance-group-1 in us-central1-a and instance-group-2 in us-central1-b.
In this lab, we created two managed instance groups in the us-central1 region and a firewall rule to allow HTTP traffic to those instances and TCP traffic from the Google Cloud health checker. Then we configured and tested an internal load balancer for those instance groups.


