
Creating infrastructure and deploying Anthos clusters on bare metal
You prepare infrastructure, create the admin workstation, create admin and user clusters, deploy workloads, and manage observability configurations.
Bare metal doesn’t always mean bare metal
Anthos clusters on bare metal can indeed run on bare metal servers, but can also run on virtual machines in VMware, AWS, or even GCE. Doing bare metal installs doesn’t take direct advantage of VMware, AWS, or GKE APIs, it uses a more generic approach to making Anthos work on your cluster.
In this lab, you run Anthos clusters on bare metal atop of GCE VMs. This does require a little extra work as the load balancer VMs need Layer 2 connectivity, so you need to configure the VMs to use VXLAN, which encapsulates Layer 2 connections on a Layer 3 network. In a pure bare metal deployment, you would just skip this step and everything else would remain the same.
- Configure your network, including firewall rules and Layer 2 connectivity.
- Prepare your admin workstation and cluster servers, including SSH setup and OS configuration.
- Install the Anthos on bare metal admin cluster on the created infrastructure.
Confirm your network setup
To reflect real-world best practices, your project has been configured as follows:
- The Default network has been deleted.
- A custom subnet network has been created.
- Two firewall rules have been created. The first allows traffic from Identity Aware Proxy (IAP), so you can SSH to internal VMs without opening port 22 to the internet. The second is used to allow vxlan networking - more on this later in the lab.
Create your server infrastructure
When you create Anthos clusters in Google Cloud, AWS, or VMware, you typically use an environment-specific installation process that takes advantage of native APIs.
When you create a bare metal cluster, the installation process doesn’t automatically create machines for you (typically, they are physical machines so they can’t be created out of thin air). That doesn’t mean, however, that you can’t create “bare metal” clusters running on VMs in any of those environments.
In this lab, you create a “bare metal” cluster on GCE VMs. It behaves almost identically to a bare metal cluster running on physical devices in your data center. The lab instructions highlight where the installation or administration deviates from a pure bare metal scenario.
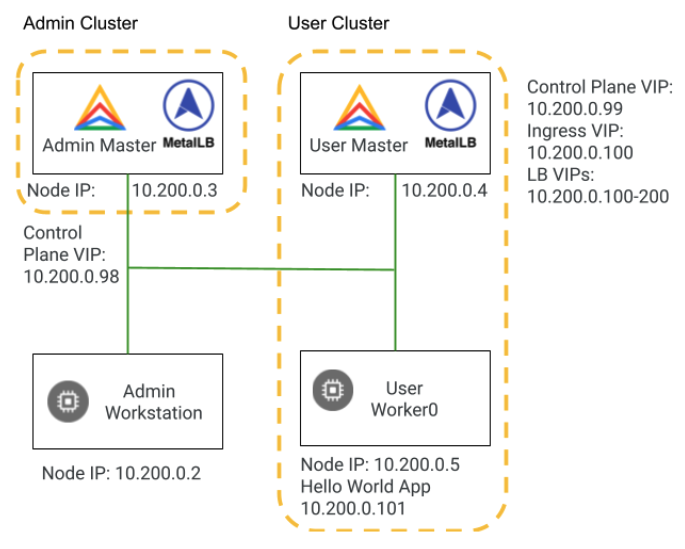
You will be building two clusters in the following labs (see diagram below). The admin cluster, which you build in this lab, has a control plane node and no worker nodes. The user cluster has a control plane node, and a worker node. In a production environment, you might consider using three nodes for high availability of both the data and the control plane.
Initialize state
- In Cloud Shell, initialize environment variables you use in later commands:
# configure environment variables with project id and zone
export PROJECT_ID=$(gcloud config get-value project)
export ZONE=us-central1-a

# configure environment variable for machine type
WS_MACHINE_TYPE=e2-standard-4
CLUSTER_MACHINE_TYPE=e2-standard-4

# configure environment variables for server names
VM_PREFIX=abm
VM_WS=$VM_PREFIX-ws
VM_A_CP1=$VM_PREFIX-admin-cp1
VM_U_CP1=$VM_PREFIX-user-cp1
VM_U_W1=$VM_PREFIX-user-w1

# create arrays of the server names
declare -a VMs=("$VM_WS" "$VM_A_CP1" "$VM_U_CP1" "$VM_U_W1")

declare -a ADMIN_CP_VMs=("$VM_A_CP1")
declare -a USER_CP_VMs=("$VM_U_CP1")
declare -a USER_WORKER_VMs=("$VM_U_W1")
declare -a LB_VMs=("$VM_A_CP1" "$VM_U_CP1")

# create an array to hold the IP addresses of the servers
declare -a IPs=()
Welcome to Cloud Shell! Type "help" to get started.
Your Cloud Platform project in this session is set to qwiklabs-gcp-04-f6d139af359a.
Use “gcloud config set project [PROJECT_ID]” to change to a different project.
student_03_ed54dee5a6ae@cloudshell:~ (qwiklabs-gcp-04-f6d139af359a)$ # configure environment variables with project id and zone
export PROJECT_ID=$(gcloud config get-value project)
export ZONE=us-central1-a

# configure environment variable for machine type
WS_MACHINE_TYPE=e2-standard-4
CLUSTER_MACHINE_TYPE=e2-standard-4

# configure environment variables for server names
VM_PREFIX=abm
VM_WS=$VM_PREFIX-ws
VM_A_CP1=$VM_PREFIX-admin-cp1
VM_U_CP1=$VM_PREFIX-user-cp1
declare -a IPs=() to hold the IP addresses of the servers1")
Your active configuration is: [cloudshell-27932]
student_03_ed54dee5a6ae@cloudshell:~ (qwiklabs-gcp-04-f6d139af359a)$
Build the GCE VMs that act as bare metal servers
- Create the VM to be used as your admin workstation:
student_03_ed54dee5a6ae@cloudshell:~ (qwiklabs-gcp-04-f6d139af359a)$ gcloud compute instances create $VM_WS \
    --image-family=ubuntu-2004-lts \
    --image-project=ubuntu-os-cloud \
    --zone=${ZONE} \
    --boot-disk-size 128G \
    --boot-disk-type pd-ssd \
    --can-ip-forward \
    --network anthos-network \
    --subnet us-central1-subnet \
    --scopes cloud-platform \
    --machine-type $WS_MACHINE_TYPE \
    --metadata=os-login=FALSE \
    --verbosity=error
IP=$(gcloud compute instances describe $VM_WS --zone ${ZONE} \
IPs+=("$IP")='get(networkInterfaces[0].networkIP)')
Created [https://www.googleapis.com/compute/v1/projects/qwiklabs-gcp-04-f6d139af359a/zones/us-central1-a/instances/abm-ws].
NAME: abm-ws
ZONE: us-central1-a
MACHINE_TYPE: e2-standard-4
PREEMPTIBLE:
INTERNAL_IP: 10.1.0.3
EXTERNAL_IP: 34.28.26.118
STATUS: RUNNING
student_03_ed54dee5a6ae@cloudshell:~ (qwiklabs-gcp-04-f6d139af359a)$
Create the VMs used as cluster servers:
student_03_ed54dee5a6ae@cloudshell:~ (qwiklabs-gcp-04-f6d139af359a)$  # loop through the array of server names
 # for each server name, create a GCE VM
 # add the new VM IP address to IP array
 for vm in "${VMs[@]:1}"
 do
     gcloud compute instances create $vm \
         --image-family=ubuntu-2004-lts \
         --image-project=ubuntu-os-cloud \
         --zone=${ZONE} \
         --boot-disk-size 128G \
         --boot-disk-type pd-standard \
         --can-ip-forward \
         --network anthos-network \
         --subnet us-central1-subnet \
 doneIPs+=("$IP")='get(networkInterfaces[0].networkIP)'){ZONE} \
Created [https://www.googleapis.com/compute/v1/projects/qwiklabs-gcp-04-f6d139af359a/zones/us-central1-a/instances/abm-admin-cp1].
NAME: abm-admin-cp1
ZONE: us-central1-a
MACHINE_TYPE: e2-standard-4
PREEMPTIBLE:
INTERNAL_IP: 10.1.0.4
EXTERNAL_IP: 34.68.12.200
STATUS: RUNNING
Created [https://www.googleapis.com/compute/v1/projects/qwiklabs-gcp-04-f6d139af359a/zones/us-central1-a/instances/abm-user-cp1].
NAME: abm-user-cp1
ZONE: us-central1-a
MACHINE_TYPE: e2-standard-4
PREEMPTIBLE:
INTERNAL_IP: 10.1.0.5
EXTERNAL_IP: 34.71.116.173
STATUS: RUNNING
Created [https://www.googleapis.com/compute/v1/projects/qwiklabs-gcp-04-f6d139af359a/zones/us-central1-a/instances/abm-user-w1].
NAME: abm-user-w1
ZONE: us-central1-a
MACHINE_TYPE: e2-standard-4
PREEMPTIBLE:
INTERNAL_IP: 10.1.0.6
EXTERNAL_IP: 34.46.190.219
STATUS: RUNNING
student_03_ed54dee5a6ae@cloudshell:~ (qwiklabs-gcp-04-f6d139af359a)$
In the Console, go to Navigation > Compute Engine > VM instances and confirm the VMs have been created.
In Cloud Shell, assign appropriate network tags to the servers, based on their roles (these tags are used to control firewall rule application):
 for vm in "${ADMIN_CP_VMs[@]}"
 do
     gcloud compute instances add-tags $vm --zone ${ZONE} \
         --tags="cp,admin"
 done

 for vm in "${USER_CP_VMs[@]}"
 do
     gcloud compute instances add-tags $vm --zone ${ZONE} \
         --tags="cp,user"
 done

 for vm in "${USER_WORKER_VMs[@]}"
 do
     gcloud compute instances add-tags $vm --zone ${ZONE} \
         --tags="worker,user"
 done

 for vm in "${LB_VMs[@]}"
 do
     gcloud compute instances add-tags $vm --zone ${ZONE} \
         --tags="lb"
 done

 for vm in "${VMs[@]}"
 do
     gcloud compute instances add-tags $vm --zone ${ZONE} \
         --tags="vxlan"
 done
student_03_ed54dee5a6ae@cloudshell:~ (qwiklabs-gcp-04-f6d139af359a)$  for vm in "${ADMIN_CP_VMs[@]}"
 do
     gcloud compute instances add-tags $vm --zone ${ZONE} \
         --tags="cp,admin"
 done

 for vm in "${USER_CP_VMs[@]}"
 done    --tags="vxlan"tances add-tags $vm --zone ${ZONE} \
Updated [https://www.googleapis.com/compute/v1/projects/qwiklabs-gcp-04-f6d139af359a/zones/us-central1-a/instances/abm-admin-cp1].
Updated [https://www.googleapis.com/compute/v1/projects/qwiklabs-gcp-04-f6d139af359a/zones/us-central1-a/instances/abm-user-cp1].
Updated [https://www.googleapis.com/compute/v1/projects/qwiklabs-gcp-04-f6d139af359a/zones/us-central1-a/instances/abm-user-w1].
Updated [https://www.googleapis.com/compute/v1/projects/qwiklabs-gcp-04-f6d139af359a/zones/us-central1-a/instances/abm-admin-cp1].
Updated [https://www.googleapis.com/compute/v1/projects/qwiklabs-gcp-04-f6d139af359a/zones/us-central1-a/instances/abm-user-cp1].
Updated [https://www.googleapis.com/compute/v1/projects/qwiklabs-gcp-04-f6d139af359a/zones/us-central1-a/instances/abm-ws].
Updated [https://www.googleapis.com/compute/v1/projects/qwiklabs-gcp-04-f6d139af359a/zones/us-central1-a/instances/abm-admin-cp1].
Updated [https://www.googleapis.com/compute/v1/projects/qwiklabs-gcp-04-f6d139af359a/zones/us-central1-a/instances/abm-user-cp1].
Updated [https://www.googleapis.com/compute/v1/projects/qwiklabs-gcp-04-f6d139af359a/zones/us-central1-a/instances/abm-user-w1].
student_03_ed54dee5a6ae@cloudshell:~ (qwiklabs-gcp-04-f6d139af359a)$
Configure the server OS as required for bare metal Anthos
You must configure the base operating system of your node machines to use Anthos clusters on bare metal. Specifically, on Ubuntu, Uncomplicated Firewall (UFW) needs to be disabled. For more information, see the Configure Ubuntu documentation.
You will disable UFW with a script that loops through a list of VM names, establishes an SSH connection into each VM, and runs the command to disable UFW.
student_03_ed54dee5a6ae@cloudshell:~ (qwiklabs-gcp-04-f6d139af359a)$ for vm in "${VMs[@]}"
do
    echo "Disabling UFW on $vm"
    gcloud compute ssh root@$vm --zone ${ZONE} --tunnel-through-iap  << EOF
        sudo ufw disable
EOF
done
Disabling UFW on abm-ws
WARNING: The private SSH key file for gcloud does not exist.
WARNING: The public SSH key file for gcloud does not exist.
WARNING: You do not have an SSH key for gcloud.
WARNING: SSH keygen will be executed to generate a key.
This tool needs to create the directory [/home/student_03_ed54dee5a6ae/.ssh] before being able to generate SSH keys.

Do you want to continue (Y/n)?  Please enter 'y' or 'n':
Generating public/private rsa key pair.
Your identification has been saved in /home/student_03_ed54dee5a6ae/.ssh/google_compute_engine
Your public key has been saved in /home/student_03_ed54dee5a6ae/.ssh/google_compute_engine.pub
The key fingerprint is:
SHA256:wPT3GMOGLGb2V0sW0/m9qt8cj5Scrd20IJw0bcbELSc student_03_ed54dee5a6ae@cs-200013956080-default
The key's randomart image is:
+---[RSA 3072]----+
|      .     o. . |
|     o o o  .o+  |
|      B + * +E +.|
|     + + o O+.+ o|
|        S ooo=  .|
|         .o =. = |
|           + .*.o|
|            .o+==|
|           .o.o++|
+----[SHA256]-----+
Updating project ssh metadata...
.........Updated [https://www.googleapis.com/compute/v1/projects/qwiklabs-gcp-04-f6d139af359a].
done.
Waiting for SSH key to propagate.
WARNING:

To increase the performance of the tunnel, consider installing NumPy. For instructions,
please see https://cloud.google.com/iap/docs/using-tcp-forwarding#increasing_the_tcp_upload_bandwidth

Warning: Permanently added 'compute.9088379366698518407' (ED25519) to the list of known hosts.
Pseudo-terminal will not be allocated because stdin is not a terminal.
WARNING:

To increase the performance of the tunnel, consider installing NumPy. For instructions,
please see https://cloud.google.com/iap/docs/using-tcp-forwarding#increasing_the_tcp_upload_bandwidth

Welcome to Ubuntu 20.04.6 LTS (GNU/Linux 5.15.0-1062-gcp x86_64)

 * Documentation:  https://help.ubuntu.com
 * Management:     https://landscape.canonical.com
 * Support:        https://ubuntu.com/pro

 System information as of Fri Jul 26 15:05:38 UTC 2024

  System load:  0.0                Processes:             118
  Usage of /:   1.5% of 123.87GB   Users logged in:       0
  Memory usage: 1%                 IPv4 address for ens4: 10.1.0.3
  Swap usage:   0%


Expanded Security Maintenance for Applications is not enabled.

0 updates can be applied immediately.

Enable ESM Apps to receive additional future security updates.
See https://ubuntu.com/esm or run: sudo pro status


Disabling UFW on abm-admin-cp1
Pseudo-terminal will not be allocated because stdin is not a terminal.
WARNING:

To increase the performance of the tunnel, consider installing NumPy. For instructions,
please see https://cloud.google.com/iap/docs/using-tcp-forwarding#increasing_the_tcp_upload_bandwidth

Warning: Permanently added 'compute.2872268715251861333' (ED25519) to the list of known hosts.
Welcome to Ubuntu 20.04.6 LTS (GNU/Linux 5.15.0-1062-gcp x86_64)

 * Documentation:  https://help.ubuntu.com
 * Management:     https://landscape.canonical.com
 * Support:        https://ubuntu.com/pro

 System information as of Fri Jul 26 15:05:44 UTC 2024

  System load:  0.0                Processes:             118
  Usage of /:   1.5% of 123.87GB   Users logged in:       0
  Memory usage: 1%                 IPv4 address for ens4: 10.1.0.4
  Swap usage:   0%

Expanded Security Maintenance for Applications is not enabled.

0 updates can be applied immediately.

Enable ESM Apps to receive additional future security updates.
See https://ubuntu.com/esm or run: sudo pro status


The programs included with the Ubuntu system are free software;
the exact distribution terms for each program are described in the
individual files in /usr/share/doc/*/copyright.

Ubuntu comes with ABSOLUTELY NO WARRANTY, to the extent permitted by
applicable law.

Firewall stopped and disabled on system startup
Disabling UFW on abm-user-cp1
Pseudo-terminal will not be allocated because stdin is not a terminal.
WARNING:

To increase the performance of the tunnel, consider installing NumPy. For instructions,
please see https://cloud.google.com/iap/docs/using-tcp-forwarding#increasing_the_tcp_upload_bandwidth

Warning: Permanently added 'compute.2281248049584801575' (ED25519) to the list of known hosts.
Welcome to Ubuntu 20.04.6 LTS (GNU/Linux 5.15.0-1062-gcp x86_64)

 * Documentation:  https://help.ubuntu.com
 * Management:     https://landscape.canonical.com
 * Support:        https://ubuntu.com/pro

 System information as of Fri Jul 26 15:05:48 UTC 2024

  System load:  0.0                Processes:             119
  Usage of /:   1.5% of 123.87GB   Users logged in:       0
  Memory usage: 1%                 IPv4 address for ens4: 10.1.0.5
  Swap usage:   0%

Expanded Security Maintenance for Applications is not enabled.

0 updates can be applied immediately.

Enable ESM Apps to receive additional future security updates.
See https://ubuntu.com/esm or run: sudo pro status


The programs included with the Ubuntu system are free software;
the exact distribution terms for each program are described in the
individual files in /usr/share/doc/*/copyright.

Ubuntu comes with ABSOLUTELY NO WARRANTY, to the extent permitted by
applicable law.

Firewall stopped and disabled on system startup
Disabling UFW on abm-user-w1
Pseudo-terminal will not be allocated because stdin is not a terminal.
WARNING:

To increase the performance of the tunnel, consider installing NumPy. For instructions,
please see https://cloud.google.com/iap/docs/using-tcp-forwarding#increasing_the_tcp_upload_bandwidth

Warning: Permanently added 'compute.7210046690480228151' (ED25519) to the list of known hosts.
Welcome to Ubuntu 20.04.6 LTS (GNU/Linux 5.15.0-1062-gcp x86_64)

 * Documentation:  https://help.ubuntu.com
 * Management:     https://landscape.canonical.com
 * Support:        https://ubuntu.com/pro

 System information as of Fri Jul 26 15:05:52 UTC 2024

  System load:  0.0                Processes:             119
  Usage of /:   1.5% of 123.87GB   Users logged in:       0
  Memory usage: 1%                 IPv4 address for ens4: 10.1.0.6
  Swap usage:   0%

Expanded Security Maintenance for Applications is not enabled.

0 updates can be applied immediately.

Enable ESM Apps to receive additional future security updates.
See https://ubuntu.com/esm or run: sudo pro status


The programs included with the Ubuntu system are free software;
the exact distribution terms for each program are described in the
individual files in /usr/share/doc/*/copyright.

Ubuntu comes with ABSOLUTELY NO WARRANTY, to the extent permitted by
applicable law.

Firewall stopped and disabled on system startup
student_03_ed54dee5a6ae@cloudshell:~ (qwiklabs-gcp-04-f6d139af359a)$
Configure the servers for L2 connectivity
With bare metal clusters, load balancer nodes need L2 connectivity. GCE uses Software Defined Networking that doesn’t provide L2 connectivity between servers. So, in order to deploy a bare metal cluster on GCE VMs, you need to configure the VMs with equivalent functionality.
Virtual Extensible LAN (VXLAN) is a network virtualization technology that encapsulates L2 Ethernet frames on an underlying L3 network. You configure this feature on your servers for this lab.
It’s likely that you would skip this step, or use alternate means of establishing L2 connectivity, if using physical servers in your data center.
Configure each VM to implement vxlan functionality; each VM gets an IP address in the 10.200.0.x range:
i=2
for vm in "${VMs[@]}"
do
    gcloud compute ssh root@$vm --zone ${ZONE} --tunnel-through-iap << EOF
        # update package list on VM
        apt-get -qq update > /dev/null
        apt-get -qq install -y jq > /dev/null

        # print executed commands to terminal
        set -x

        # create new vxlan configuration
        ip link add vxlan0 type vxlan id 42 dev ens4 dstport 4789
        current_ip=\$(ip --json a show dev ens4 | jq '.[0].addr_info[0].local' -r)
        echo "VM IP address is: \$current_ip"
        for ip in ${IPs[@]}; do
            if [ "\$ip" != "\$current_ip" ]; then
                bridge fdb append to 00:00:00:00:00:00 dst \$ip dev vxlan0
            fi
        done
        ip addr add 10.200.0.$i/24 dev vxlan0
        ip link set up dev vxlan0
EOF
    i=$((i+1))
done
student_03_ed54dee5a6ae@cloudshell:~ (qwiklabs-gcp-04-f6d139af359a)$ i=2
for vm in "${VMs[@]}"
do
    gcloud compute ssh root@$vm --zone ${ZONE} --tunnel-through-iap << EOF
        # update package list on VM
        apt-get -qq update > /dev/null
        apt-get -qq install -y jq > /dev/null

        # print executed commands to terminal
        set -x

        # create new vxlan configuration
        ip link add vxlan0 type vxlan id 42 dev ens4 dstport 4789
        current_ip=\$(ip --json a show dev ens4 | jq '.[0].addr_info[0].local' -r)
        echo "VM IP address is: \$current_ip"
        for ip in ${IPs[@]}; do
            if [ "\$ip" != "\$current_ip" ]; then
                bridge fdb append to 00:00:00:00:00:00 dst \$ip dev vxlan0
            fi
        done
        ip addr add 10.200.0.$i/24 dev vxlan0
        ip link set up dev vxlan0
EOF
    i=$((i+1))
done
Pseudo-terminal will not be allocated because stdin is not a terminal.
WARNING:

To increase the performance of the tunnel, consider installing NumPy. For instructions,
please see https://cloud.google.com/iap/docs/using-tcp-forwarding#increasing_the_tcp_upload_bandwidth

Welcome to Ubuntu 20.04.6 LTS (GNU/Linux 5.15.0-1062-gcp x86_64)

 * Documentation:  https://help.ubuntu.com
 * Management:     https://landscape.canonical.com
 * Support:        https://ubuntu.com/pro

 System information as of Fri Jul 26 15:08:36 UTC 2024

  System load:  0.0                Processes:             121
  Usage of /:   1.5% of 123.87GB   Users logged in:       0
  Memory usage: 1%                 IPv4 address for ens4: 10.1.0.3
  Swap usage:   0%


Expanded Security Maintenance for Applications is not enabled.

0 updates can be applied immediately.

Enable ESM Apps to receive additional future security updates.
See https://ubuntu.com/esm or run: sudo pro status

New release '22.04.3 LTS' available.
Run 'do-release-upgrade' to upgrade to it.


debconf: unable to initialize frontend: Dialog
debconf: (TERM is not set, so the dialog frontend is not usable.)
debconf: falling back to frontend: Readline
debconf: unable to initialize frontend: Readline
debconf: (This frontend requires a controlling tty.)
debconf: falling back to frontend: Teletype
dpkg-preconfigure: unable to re-open stdin:
+ ip link add vxlan0 type vxlan id 42 dev ens4 dstport 4789
++ jq '.[0].addr_info[0].local' -r
++ ip --json a show dev ens4
VM IP address is: 10.1.0.3
+ current_ip=10.1.0.3
+ echo 'VM IP address is: 10.1.0.3'
+ for ip in 10.1.0.3 10.1.0.4 10.1.0.5 10.1.0.6
+ '[' 10.1.0.3 '!=' 10.1.0.3 ']'
+ for ip in 10.1.0.3 10.1.0.4 10.1.0.5 10.1.0.6
+ '[' 10.1.0.4 '!=' 10.1.0.3 ']'
+ bridge fdb append to 00:00:00:00:00:00 dst 10.1.0.4 dev vxlan0
+ for ip in 10.1.0.3 10.1.0.4 10.1.0.5 10.1.0.6
+ '[' 10.1.0.5 '!=' 10.1.0.3 ']'
+ bridge fdb append to 00:00:00:00:00:00 dst 10.1.0.5 dev vxlan0
+ for ip in 10.1.0.3 10.1.0.4 10.1.0.5 10.1.0.6
+ '[' 10.1.0.6 '!=' 10.1.0.3 ']'
+ bridge fdb append to 00:00:00:00:00:00 dst 10.1.0.6 dev vxlan0
+ ip addr add 10.200.0.2/24 dev vxlan0
+ ip link set up dev vxlan0
Pseudo-terminal will not be allocated because stdin is not a terminal.
WARNING:

To increase the performance of the tunnel, consider installing NumPy. For instructions,
please see https://cloud.google.com/iap/docs/using-tcp-forwarding#increasing_the_tcp_upload_bandwidth

Welcome to Ubuntu 20.04.6 LTS (GNU/Linux 5.15.0-1062-gcp x86_64)

 * Documentation:  https://help.ubuntu.com
 * Management:     https://landscape.canonical.com
 * Support:        https://ubuntu.com/pro

 System information as of Fri Jul 26 15:08:56 UTC 2024

  System load:  0.0                Processes:             121
  Usage of /:   1.5% of 123.87GB   Users logged in:       0
  Memory usage: 1%                 IPv4 address for ens4: 10.1.0.4
  Swap usage:   0%


Expanded Security Maintenance for Applications is not enabled.

0 updates can be applied immediately.

Enable ESM Apps to receive additional future security updates.
See https://ubuntu.com/esm or run: sudo pro status

New release '22.04.3 LTS' available.
Run 'do-release-upgrade' to upgrade to it.


debconf: unable to initialize frontend: Dialog
debconf: (TERM is not set, so the dialog frontend is not usable.)
debconf: falling back to frontend: Readline
debconf: unable to initialize frontend: Readline
debconf: (This frontend requires a controlling tty.)
debconf: falling back to frontend: Teletype
dpkg-preconfigure: unable to re-open stdin:
+ ip link add vxlan0 type vxlan id 42 dev ens4 dstport 4789
++ jq '.[0].addr_info[0].local' -r
++ ip --json a show dev ens4
+ current_ip=10.1.0.4
VM IP address is: 10.1.0.4
+ echo 'VM IP address is: 10.1.0.4'
+ for ip in 10.1.0.3 10.1.0.4 10.1.0.5 10.1.0.6
+ '[' 10.1.0.3 '!=' 10.1.0.4 ']'
+ bridge fdb append to 00:00:00:00:00:00 dst 10.1.0.3 dev vxlan0
+ for ip in 10.1.0.3 10.1.0.4 10.1.0.5 10.1.0.6
+ '[' 10.1.0.4 '!=' 10.1.0.4 ']'
+ for ip in 10.1.0.3 10.1.0.4 10.1.0.5 10.1.0.6
+ '[' 10.1.0.5 '!=' 10.1.0.4 ']'
+ bridge fdb append to 00:00:00:00:00:00 dst 10.1.0.5 dev vxlan0
+ for ip in 10.1.0.3 10.1.0.4 10.1.0.5 10.1.0.6
+ '[' 10.1.0.6 '!=' 10.1.0.4 ']'
+ bridge fdb append to 00:00:00:00:00:00 dst 10.1.0.6 dev vxlan0
+ ip addr add 10.200.0.3/24 dev vxlan0
+ ip link set up dev vxlan0
Pseudo-terminal will not be allocated because stdin is not a terminal.
WARNING:

To increase the performance of the tunnel, consider installing NumPy. For instructions,
please see https://cloud.google.com/iap/docs/using-tcp-forwarding#increasing_the_tcp_upload_bandwidth

Welcome to Ubuntu 20.04.6 LTS (GNU/Linux 5.15.0-1062-gcp x86_64)

 * Documentation:  https://help.ubuntu.com
 * Management:     https://landscape.canonical.com
 * Support:        https://ubuntu.com/pro

 System information as of Fri Jul 26 15:09:17 UTC 2024

  System load:  0.0                Processes:             122
  Usage of /:   1.5% of 123.87GB   Users logged in:       0
  Memory usage: 1%                 IPv4 address for ens4: 10.1.0.5
  Swap usage:   0%


Expanded Security Maintenance for Applications is not enabled.

0 updates can be applied immediately.

Enable ESM Apps to receive additional future security updates.
See https://ubuntu.com/esm or run: sudo pro status

New release '22.04.3 LTS' available.
Run 'do-release-upgrade' to upgrade to it.


debconf: unable to initialize frontend: Dialog
debconf: (TERM is not set, so the dialog frontend is not usable.)
debconf: falling back to frontend: Readline
debconf: unable to initialize frontend: Readline
debconf: (This frontend requires a controlling tty.)
debconf: falling back to frontend: Teletype
dpkg-preconfigure: unable to re-open stdin:
+ ip link add vxlan0 type vxlan id 42 dev ens4 dstport 4789
++ jq '.[0].addr_info[0].local' -r
++ ip --json a show dev ens4
+ current_ip=10.1.0.5
VM IP address is: 10.1.0.5
+ echo 'VM IP address is: 10.1.0.5'
+ for ip in 10.1.0.3 10.1.0.4 10.1.0.5 10.1.0.6
+ '[' 10.1.0.3 '!=' 10.1.0.5 ']'
+ bridge fdb append to 00:00:00:00:00:00 dst 10.1.0.3 dev vxlan0
+ for ip in 10.1.0.3 10.1.0.4 10.1.0.5 10.1.0.6
+ '[' 10.1.0.4 '!=' 10.1.0.5 ']'
+ bridge fdb append to 00:00:00:00:00:00 dst 10.1.0.4 dev vxlan0
+ for ip in 10.1.0.3 10.1.0.4 10.1.0.5 10.1.0.6
+ '[' 10.1.0.5 '!=' 10.1.0.5 ']'
+ for ip in 10.1.0.3 10.1.0.4 10.1.0.5 10.1.0.6
+ '[' 10.1.0.6 '!=' 10.1.0.5 ']'
+ bridge fdb append to 00:00:00:00:00:00 dst 10.1.0.6 dev vxlan0
+ ip addr add 10.200.0.4/24 dev vxlan0
+ ip link set up dev vxlan0
Pseudo-terminal will not be allocated because stdin is not a terminal.
WARNING:

To increase the performance of the tunnel, consider installing NumPy. For instructions,
please see https://cloud.google.com/iap/docs/using-tcp-forwarding#increasing_the_tcp_upload_bandwidth

Welcome to Ubuntu 20.04.6 LTS (GNU/Linux 5.15.0-1062-gcp x86_64)

 * Documentation:  https://help.ubuntu.com
 * Management:     https://landscape.canonical.com
 * Support:        https://ubuntu.com/pro

 System information as of Fri Jul 26 15:09:37 UTC 2024

  System load:  0.0                Processes:             122
  Usage of /:   1.5% of 123.87GB   Users logged in:       0
  Memory usage: 1%                 IPv4 address for ens4: 10.1.0.6
  Swap usage:   0%


Expanded Security Maintenance for Applications is not enabled.

0 updates can be applied immediately.

Enable ESM Apps to receive additional future security updates.
See https://ubuntu.com/esm or run: sudo pro status

New release '22.04.3 LTS' available.
Run 'do-release-upgrade' to upgrade to it.


debconf: unable to initialize frontend: Dialog
debconf: (TERM is not set, so the dialog frontend is not usable.)
debconf: falling back to frontend: Readline
debconf: unable to initialize frontend: Readline
debconf: (This frontend requires a controlling tty.)
debconf: falling back to frontend: Teletype
dpkg-preconfigure: unable to re-open stdin:
+ ip link add vxlan0 type vxlan id 42 dev ens4 dstport 4789
++ ip --json a show dev ens4
++ jq '.[0].addr_info[0].local' -r
+ current_ip=10.1.0.6
VM IP address is: 10.1.0.6
+ echo 'VM IP address is: 10.1.0.6'
+ for ip in 10.1.0.3 10.1.0.4 10.1.0.5 10.1.0.6
+ '[' 10.1.0.3 '!=' 10.1.0.6 ']'
+ bridge fdb append to 00:00:00:00:00:00 dst 10.1.0.3 dev vxlan0
+ for ip in 10.1.0.3 10.1.0.4 10.1.0.5 10.1.0.6
+ '[' 10.1.0.4 '!=' 10.1.0.6 ']'
+ bridge fdb append to 00:00:00:00:00:00 dst 10.1.0.4 dev vxlan0
+ for ip in 10.1.0.3 10.1.0.4 10.1.0.5 10.1.0.6
+ '[' 10.1.0.5 '!=' 10.1.0.6 ']'
+ bridge fdb append to 00:00:00:00:00:00 dst 10.1.0.5 dev vxlan0
+ for ip in 10.1.0.3 10.1.0.4 10.1.0.5 10.1.0.6
+ '[' 10.1.0.6 '!=' 10.1.0.6 ']'
+ ip addr add 10.200.0.5/24 dev vxlan0
+ ip link set up dev vxlan0
student_03_ed54dee5a6ae@cloudshell:~ (qwiklabs-gcp-04-f6d139af359a)$
Check the vxlan IPs that have been associated with each of the VMs:
student_03_ed54dee5a6ae@cloudshell:~ (qwiklabs-gcp-04-f6d139af359a)$ i=2
for vm in "${VMs[@]}";
do
    echo $vm;
    gcloud compute ssh root@$vm --zone ${ZONE} --tunnel-through-iap --command="hostname -I";
    i=$((i+1));
done
abm-ws
WARNING:

To increase the performance of the tunnel, consider installing NumPy. For instructions,
please see https://cloud.google.com/iap/docs/using-tcp-forwarding#increasing_the_tcp_upload_bandwidth

10.1.0.3 10.200.0.2
abm-admin-cp1
WARNING:

To increase the performance of the tunnel, consider installing NumPy. For instructions,
please see https://cloud.google.com/iap/docs/using-tcp-forwarding#increasing_the_tcp_upload_bandwidth

10.1.0.4 10.200.0.3
abm-user-cp1
WARNING:

To increase the performance of the tunnel, consider installing NumPy. For instructions,
please see https://cloud.google.com/iap/docs/using-tcp-forwarding#increasing_the_tcp_upload_bandwidth

10.1.0.5 10.200.0.4
abm-user-w1
WARNING:

To increase the performance of the tunnel, consider installing NumPy. For instructions,
please see https://cloud.google.com/iap/docs/using-tcp-forwarding#increasing_the_tcp_upload_bandwidth

10.1.0.6 10.200.0.5
student_03_ed54dee5a6ae@cloudshell:~ (qwiklabs-gcp-04-f6d139af359a)$
Configure the network firewall rules to allow Anthos traffic
Currently, your VPC network does NOT have firewall rules that allow required Anthos connections to be established with the servers. You must configure firewall rules to allow this traffic. Since you are using GCE VMs, you will use GCE firewall rules. In an on-premises network, you would use other mechanisms, but strive to accomplish the same connectivity. For details, see the Network requirements documentation.
Create the firewall rules that allow traffic to the control plane servers:
student_03_ed54dee5a6ae@cloudshell:~ (qwiklabs-gcp-04-f6d139af359a)$ gcloud compute firewall-rules create abm-allow-cp \
    --network="anthos-network" \
    --allow="UDP:6081,TCP:22,TCP:6444,TCP:2379-2380,TCP:10250-10252,TCP:4240" \
    --source-ranges="10.0.0.0/8" \
    --target-tags="cp"
Creating firewall...working..Created [https://www.googleapis.com/compute/v1/projects/qwiklabs-gcp-04-f6d139af359a/global/firewalls/abm-allow-cp].
Creating firewall...done.
NAME: abm-allow-cp
NETWORK: anthos-network
DIRECTION: INGRESS
PRIORITY: 1000
ALLOW: udp:6081,tcp:22,tcp:6444,tcp:2379-2380,tcp:10250-10252,tcp:4240
DENY:
DISABLED: False
student_03_ed54dee5a6ae@cloudshell:~ (qwiklabs-gcp-04-f6d139af359a)$
Create the firewall rules that allow inbound traffic to the worker nodes:
student_03_ed54dee5a6ae@cloudshell:~ (qwiklabs-gcp-04-f6d139af359a)$ gcloud compute firewall-rules create abm-allow-worker \
    --network="anthos-network" \
    --allow="UDP:6081,TCP:22,TCP:10250,TCP:30000-32767,TCP:4240" \
    --source-ranges="10.0.0.0/8" \
    --target-tags="worker"
Creating firewall...working..Created [https://www.googleapis.com/compute/v1/projects/qwiklabs-gcp-04-f6d139af359a/global/firewalls/abm-allow-worker].
Creating firewall...done.
NAME: abm-allow-worker
NETWORK: anthos-network
DIRECTION: INGRESS
PRIORITY: 1000
ALLOW: udp:6081,tcp:22,tcp:10250,tcp:30000-32767,tcp:4240
DENY:
DISABLED: False
student_03_ed54dee5a6ae@cloudshell:~ (qwiklabs-gcp-04-f6d139af359a)$
Create the firewall rules that allow inbound traffic to the load balancer nodes. In our case, the load balancer is hosted in the same node as the admin cluster control plane node.
student_03_ed54dee5a6ae@cloudshell:~ (qwiklabs-gcp-04-f6d139af359a)$ gcloud compute firewall-rules create abm-allow-lb \
    --network="anthos-network" \
    --allow="UDP:6081,TCP:22,TCP:443,TCP:7946,UDP:7496,TCP:4240" \
    --source-ranges="10.0.0.0/8" \
    --target-tags="lb"

gcloud compute firewall-rules create allow-gfe-to-lb \
    --network="anthos-network" \
    --allow="TCP:443" \
    --source-ranges="10.0.0.0/8,130.211.0.0/22,35.191.0.0/16" \
    --target-tags="lb"
Creating firewall...working..Created [https://www.googleapis.com/compute/v1/projects/qwiklabs-gcp-04-f6d139af359a/global/firewalls/abm-allow-lb].
Creating firewall...done.
NAME: abm-allow-lb
NETWORK: anthos-network
DIRECTION: INGRESS
PRIORITY: 1000
ALLOW: udp:6081,tcp:22,tcp:443,tcp:7946,udp:7496,tcp:4240
DENY:
DISABLED: False
Creating firewall...working..Created [https://www.googleapis.com/compute/v1/projects/qwiklabs-gcp-04-f6d139af359a/global/firewalls/allow-gfe-to-lb].
Creating firewall...done.
NAME: allow-gfe-to-lb
NETWORK: anthos-network
DIRECTION: INGRESS
PRIORITY: 1000
ALLOW: tcp:443
DENY:
DISABLED: False
student_03_ed54dee5a6ae@cloudshell:~ (qwiklabs-gcp-04-f6d139af359a)$
Create the firewall rules that allow multi-cluster traffic. This allows the communication between the admin and the user cluster. If you were deploying an Anthos cluster on bare metal of type hybrid or standalone with no other user clusters, you would not need these firewall rules.
student_03_ed54dee5a6ae@cloudshell:~ (qwiklabs-gcp-04-f6d139af359a)$ gcloud compute firewall-rules create abm-allow-multi \
    --network="anthos-network" \
    --allow="TCP:22,TCP:443" \
    --source-tags="admin" \
    --target-tags="user"
Creating firewall...working..Created [https://www.googleapis.com/compute/v1/projects/qwiklabs-gcp-04-f6d139af359a/global/firewalls/abm-allow-multi].
Creating firewall...done.
NAME: abm-allow-multi
NETWORK: anthos-network
DIRECTION: INGRESS
PRIORITY: 1000
ALLOW: tcp:22,tcp:443
DENY:
DISABLED: False
student_03_ed54dee5a6ae@cloudshell:~ (qwiklabs-gcp-04-f6d139af359a)$
In the Console, confirm the creation of the firewall rules by visiting Navigation > VPC network > Firewall.
Congratulations! You have set up your Google Cloud project, your network, and the servers that will be used by your bare metal cluster.
Set up the admin workstation
In this task you prepare your admin workstation. This includes:
- Installing and configuring the Google Cloud SDK.
- Installing kubectl and bmctl and Docker.
You also configure your cluster servers to allow SSH sessions from the admin workstation, so it can do its work.
Install tools
- If you don’t already have an open, active Cloud Shell session, open Cloud Shell. Then, initialize key variables in Cloud Shell:
 export PROJECT_ID=$(gcloud config get-value project)
 export ZONE=us-central1-a

 # configure environment variables for server names
 VM_PREFIX=abm
 VM_WS=$VM_PREFIX-ws
 VM_A_CP1=$VM_PREFIX-admin-cp1
 VM_U_CP1=$VM_PREFIX-user-cp1
 VM_U_W1=$VM_PREFIX-user-w1

 # create arrays of the server names
 declare -a VMs=("$VM_WS" "$VM_A_CP1" "$VM_U_CP1" "$VM_U_W1")

 declare -a ADMIN_CP_VMs=("$VM_A_CP1")
 declare -a USER_CP_VMs=("$VM_U_CP1")
 declare -a USER_WORKER_VMs=("$VM_U_W1")
 declare -a LB_VMs=("$VM_A_CP1" "$VM_U_CP1")
student_03_ed54dee5a6ae@cloudshell:~ (qwiklabs-gcp-04-f6d139af359a)$  export PROJECT_ID=$(gcloud config get-value project)
 export ZONE=us-central1-a

 # configure environment variables for server names
 VM_PREFIX=abm
 VM_WS=$VM_PREFIX-ws
 VM_A_CP1=$VM_PREFIX-admin-cp1
 declare -a LB_VMs=("$VM_A_CP1" "$VM_U_CP1")_CP1" "$VM_U_W1")
Your active configuration is: [cloudshell-27932]
student_03_ed54dee5a6ae@cloudshell:~ (qwiklabs-gcp-04-f6d139af359a)$
SSH from the Cloud Shell VM into the machine you will use as your admin workstation:
student_03_ed54dee5a6ae@cloudshell:~ (qwiklabs-gcp-04-f6d139af359a)$ # enable ssh-agent
eval `ssh-agent`

# add your identity
ssh-add ~/.ssh/google_compute_engine

# ssh into the admin workstation with authentication forwarding
    --tunnel-through-iap-flag="-A" root@$VM_WS \
Agent pid 1547
Identity added: /home/student_03_ed54dee5a6ae/.ssh/google_compute_engine (student_03_ed54dee5a6ae@cs-200013956080-default)
WARNING:

To increase the performance of the tunnel, consider installing NumPy. For instructions,
please see https://cloud.google.com/iap/docs/using-tcp-forwarding#increasing_the_tcp_upload_bandwidth

Welcome to Ubuntu 20.04.6 LTS (GNU/Linux 5.15.0-1062-gcp x86_64)

 * Documentation:  https://help.ubuntu.com
 * Management:     https://landscape.canonical.com
 * Support:        https://ubuntu.com/pro

 System information as of Fri Jul 26 15:19:10 UTC 2024

  System load:  0.0                Processes:             118
  Usage of /:   1.7% of 123.87GB   Users logged in:       0
  Memory usage: 1%                 IPv4 address for ens4: 10.1.0.3
  Swap usage:   0%


Expanded Security Maintenance for Applications is not enabled.

0 updates can be applied immediately.

Enable ESM Apps to receive additional future security updates.
See https://ubuntu.com/esm or run: sudo pro status

New release '22.04.3 LTS' available.
Run 'do-release-upgrade' to upgrade to it.


root@abm-ws:~#
In the SSH session to your admin workstation, set an environment variable:
Install the SDK onto the admin workstation. When prompted, enter the replies shown in the table that follows the command:
For the latest full release notes, please visit:
  https://cloud.google.com/sdk/release_notes

Performing in place update...

╔════════════════════════════════════════════════════════════╗
╠═ Downloading: BigQuery Command Line Tool                  ═╣
╠════════════════════════════════════════════════════════════╣
╠═ Downloading: BigQuery Command Line Tool (Platform Spe... ═╣
╠════════════════════════════════════════════════════════════╣
╠═ Downloading: Bundled Python 3.11                         ═╣
╠════════════════════════════════════════════════════════════╣
╠═ Downloading: Bundled Python 3.11 (Platform Specific)     ═╣
╠════════════════════════════════════════════════════════════╣
╠═ Downloading: Cloud Storage Command Line Tool             ═╣
╠════════════════════════════════════════════════════════════╣
╠═ Downloading: Cloud Storage Command Line Tool (Platfor... ═╣
╠════════════════════════════════════════════════════════════╣
╠═ Downloading: Default set of gcloud commands              ═╣
╠════════════════════════════════════════════════════════════╣
╠═ Downloading: Google Cloud CLI Core Libraries (Platfor... ═╣
╠════════════════════════════════════════════════════════════╣
╠═ Downloading: Google Cloud CRC32C Hash Tool               ═╣
╠════════════════════════════════════════════════════════════╣
╠═ Downloading: Google Cloud CRC32C Hash Tool (Platform ... ═╣
╠════════════════════════════════════════════════════════════╣
╠═ Downloading: gcloud cli dependencies (Platform Specific) ═╣
╠════════════════════════════════════════════════════════════╣
╠═ Installing: BigQuery Command Line Tool                   ═╣
╠════════════════════════════════════════════════════════════╣
╠═ Installing: BigQuery Command Line Tool (Platform Spec... ═╣
╠════════════════════════════════════════════════════════════╣
╠═ Installing: Bundled Python 3.11                          ═╣
╠════════════════════════════════════════════════════════════╣
╠═ Installing: Bundled Python 3.11 (Platform Specific)      ═╣
╠════════════════════════════════════════════════════════════╣
╠═ Installing: Cloud Storage Command Line Tool              ═╣
╠════════════════════════════════════════════════════════════╣
╠═ Installing: Cloud Storage Command Line Tool (Platform... ═╣
╠════════════════════════════════════════════════════════════╣
╠═ Installing: Default set of gcloud commands               ═╣
╠════════════════════════════════════════════════════════════╣
╠═ Installing: Google Cloud CLI Core Libraries (Platform... ═╣
╠════════════════════════════════════════════════════════════╣
╠═ Installing: Google Cloud CRC32C Hash Tool                ═╣
╠════════════════════════════════════════════════════════════╣
╠═ Installing: Google Cloud CRC32C Hash Tool (Platform S... ═╣
╠════════════════════════════════════════════════════════════╣
╠═ Installing: gcloud cli dependencies (Platform Specific)  ═╣
╚════════════════════════════════════════════════════════════╝

Performing post processing steps...done.

Update done!

WARNING:   There are other instances of Google Cloud tools on your system PATH.
  Please remove the following to avoid confusion or accidental invocation:

  /usr/bin/snap


Modify profile to update your $PATH and enable shell command completion?

Do you want to continue (Y/n)?  y

The Google Cloud SDK installer will now prompt you to update an rc file to bring the Google Cloud CLIs into your environment.

Enter a path to an rc file to update, or leave blank to use [/root/.bashrc]:
Backing up [/root/.bashrc] to [/root/.bashrc.backup].
[/root/.bashrc] has been updated.

==> Start a new shell for the changes to take effect.


For more information on how to get started, please visit:
  https://cloud.google.com/sdk/docs/quickstarts


root@abm-ws:~#
root@abm-ws:~#
Restart your shell, then configure the Application Default Credentials on your server:
root@abm-ws:~# # restart your shell
root@abm-ws:~# exec -l $SHELL
root@abm-ws:~#
root@abm-ws:~# # Create keys for a service account with the same permissions as the lab user
root@abm-ws:~# gcloud iam service-accounts keys create installer.json \
>   --iam-account=${PROJECT_ID}@${PROJECT_ID}.iam.gserviceaccount.com

created key [38f214c6bf35fe32f66dc7a3045db1c0f6f2578d] of type [json] as [installer.json] for [qwiklabs-gcp-04-f6d139af359a@qwiklabs-gcp-04-f6d139af359a.iam.gserviceaccount.com]
root@abm-ws:~#
root@abm-ws:~# # set the Application Default Credentials
root@abm-ws:~# export GOOGLE_APPLICATION_CREDENTIALS=~/installer.json
root@abm-ws:~#
Use gcloud to install kubectl on the admin workstation:
root@abm-ws:~# gcloud components install kubectl


Your current Google Cloud CLI version is: 485.0.0
Installing components from version: 485.0.0

┌─────────────────────────────────────────────────────────────────┐
│               These components will be installed.               │
├────────────────────────────────────────────┬─────────┬──────────┤
│                    Name                    │ Version │   Size   │
├────────────────────────────────────────────┼─────────┼──────────┤
│ gke-gcloud-auth-plugin (Platform Specific) │   0.5.9 │  4.0 MiB │
│ kubectl                                    │ 1.27.15 │  < 1 MiB │
│ kubectl (Platform Specific)                │ 1.27.15 │ 73.4 MiB │
└────────────────────────────────────────────┴─────────┴──────────┘

For the latest full release notes, please visit:
  https://cloud.google.com/sdk/release_notes

Once started, canceling this operation may leave your SDK installation in an inconsistent state.

Do you want to continue (Y/n)?  y

Performing in place update...

╔════════════════════════════════════════════════════════════╗
╠═ Downloading: gke-gcloud-auth-plugin                      ═╣
╠════════════════════════════════════════════════════════════╣
╠═ Downloading: gke-gcloud-auth-plugin (Platform Specific)  ═╣
╠════════════════════════════════════════════════════════════╣
╠═ Downloading: kubectl                                     ═╣
╠════════════════════════════════════════════════════════════╣
╠═ Downloading: kubectl (Platform Specific)                 ═╣
╠════════════════════════════════════════════════════════════╣
╠═ Installing: gke-gcloud-auth-plugin                       ═╣
╠════════════════════════════════════════════════════════════╣
╠═ Installing: gke-gcloud-auth-plugin (Platform Specific)   ═╣
╠════════════════════════════════════════════════════════════╣
╠═ Installing: kubectl                                      ═╣
╠════════════════════════════════════════════════════════════╣
╠═ Installing: kubectl (Platform Specific)                  ═╣
╚════════════════════════════════════════════════════════════╝

Performing post processing steps...done.

Update done!

WARNING:   There are other instances of Google Cloud tools on your system PATH.
  Please remove the following to avoid confusion or accidental invocation:

  /usr/bin/snap


root@abm-ws:~#
Confirm the kubectl is installed and working:
root@abm-ws:~# kubectl config view
apiVersion: v1
clusters: null
contexts: null
current-context: ""
kind: Config
preferences: {}
users: null
root@abm-ws:~#
You need bmctl installed on your admin workstation to create and manage bare metal clusters.
Create a new directory for bmctl and related files:
Download and configure the bmctl tool, which you use to create and manage the bare metal clusters:
Confirm that the tool has been installed:
root@abm-ws:~# mkdir baremetal && cd baremetal
root@abm-ws:~/baremetal# gsutil cp gs://anthos-baremetal-release/bmctl/1.16.0/linux-amd64/bmctl .

Copying gs://anthos-baremetal-release/bmctl/1.16.0/linux-amd64/bmctl...
\ [1 files][ 93.0 MiB/ 93.0 MiB]
Operation completed over 1 objects/93.0 MiB.
root@abm-ws:~/baremetal# chmod a+x bmctl
root@abm-ws:~/baremetal# mv bmctl /usr/local/sbin/
root@abm-ws:~/baremetal# bmctl version
[2024-07-26 15:25:32+0000] bmctl version: 1.16.0-gke.26, git commit: 97a6fb01605a615292fcaea753be8d4942f9934a, build date: Wed Aug 23 16:18:46 PDT 2023
root@abm-ws:~/baremetal#
The installation process requires Docker on your admin workstation.
Download and install Docker:
root@abm-ws:~/baremetal# cd ~
root@abm-ws:~# echo "Installing docker"
Installing docker
root@abm-ws:~# curl -fsSL https://get.docker.com -o get-docker.sh
root@abm-ws:~# sh get-docker.sh
# Executing docker install script, commit: 1ce4e39c9502b89728cdd4790a8c3895709e358d
+ sh -c apt-get update -qq >/dev/null
+ sh -c DEBIAN_FRONTEND=noninteractive apt-get install -y -qq ca-certificates curl >/dev/null
+ sh -c install -m 0755 -d /etc/apt/keyrings
+ sh -c curl -fsSL "https://download.docker.com/linux/ubuntu/gpg" -o /etc/apt/keyrings/docker.asc
+ sh -c chmod a+r /etc/apt/keyrings/docker.asc
+ sh -c echo "deb [arch=amd64 signed-by=/etc/apt/keyrings/docker.asc] https://download.docker.com/linux/ubuntu focal stable" > /etc/apt/sources.list.d/docker.list
+ sh -c apt-get update -qq >/dev/null
+ sh -c DEBIAN_FRONTEND=noninteractive apt-get install -y -qq docker-ce docker-ce-cli containerd.io docker-compose-plugin docker-ce-rootless-extras docker-buildx-plugin >/dev/null
+ sh -c docker version
Client: Docker Engine - Community
 Version:           27.1.1
 API version:       1.46
 Go version:        go1.21.12
 Git commit:        6312585
 Built:             Tue Jul 23 19:56:56 2024
 OS/Arch:           linux/amd64
 Context:           default

Server: Docker Engine - Community
 Engine:
  Version:          27.1.1
  API version:      1.46 (minimum version 1.24)
  Go version:       go1.21.12
  Git commit:       cc13f95
  Built:            Tue Jul 23 19:56:56 2024
  OS/Arch:          linux/amd64
  Experimental:     false
 containerd:
  Version:          1.7.19
  GitCommit:        2bf793ef6dc9a18e00cb12efb64355c2c9d5eb41
 runc:
  Version:          1.7.19
  GitCommit:        v1.1.13-0-g58aa920
 docker-init:
  Version:          0.19.0
  GitCommit:        de40ad0

================================================================================

To run Docker as a non-privileged user, consider setting up the
Docker daemon in rootless mode for your user:

    dockerd-rootless-setuptool.sh install

Visit https://docs.docker.com/go/rootless/ to learn about rootless mode.


To run the Docker daemon as a fully privileged service, but granting non-root
users access, refer to https://docs.docker.com/go/daemon-access/

WARNING: Access to the remote API on a privileged Docker daemon is equivalent
         to root access on the host. Refer to the 'Docker daemon attack surface'
         documentation for details: https://docs.docker.com/go/attack-surface/

================================================================================

root@abm-ws:~#
Confirm that Docker was successfully installed:
root@abm-ws:~# docker version
Client: Docker Engine - Community
 Version:           27.1.1
 API version:       1.46
 Go version:        go1.21.12
 Git commit:        6312585
 Built:             Tue Jul 23 19:56:56 2024
 OS/Arch:           linux/amd64
 Context:           default

Server: Docker Engine - Community
 Engine:
  Version:          27.1.1
  API version:      1.46 (minimum version 1.24)
  Go version:       go1.21.12
  Git commit:       cc13f95
  Built:            Tue Jul 23 19:56:56 2024
  OS/Arch:          linux/amd64
  Experimental:     false
 containerd:
  Version:          1.7.19
  GitCommit:        2bf793ef6dc9a18e00cb12efb64355c2c9d5eb41
 runc:
  Version:          1.7.19
  GitCommit:        v1.1.13-0-g58aa920
 docker-init:
  Version:          0.19.0
  GitCommit:        de40ad0
root@abm-ws:~#
Configure servers to allow SSH from admin workstation
In order for the admin workstation to configure all the servers in your clusters, the bmctl utility must be able to SSH into the servers. You are going to configure the servers to allow this by creating an SSH key pair for the admin workstation, then configuring each cluster server to allow SSH connections using the private key from that key pair.
- In your SSH session to the admin workstation, create a new key pair with the following command:
root@abm-ws:~# ssh-keygen -t rsa
Generating public/private rsa key pair.
Enter file in which to save the key (/root/.ssh/id_rsa):
Enter passphrase (empty for no passphrase):
Enter same passphrase again:
Your identification has been saved in /root/.ssh/id_rsa
Your public key has been saved in /root/.ssh/id_rsa.pub
The key fingerprint is:
SHA256:gg4yzKy303FesoyiU1dHEb1MZliOx+UAHtaItvvJh7I root@abm-ws
The key's randomart image is:
+---[RSA 3072]----+
|       .*Xo .    |
|      oo+=*+     |
|     . oo=+..    |
|+    .o ..o      |
|o+. ...oS        |
|.o.oo +..        |
|...o.* * o       |
|..o.o = = .      |
|.o.o  Eo .       |
+----[SHA256]-----+
root@abm-ws:~#
Configure all the cluster machines to accept this key for SSH sessions with the following commands:
root@abm-ws:~# VM_PREFIX=abm
root@abm-ws:~# VM_WS=$VM_PREFIX-ws
root@abm-ws:~# VM_A_CP1=$VM_PREFIX-admin-cp1
root@abm-ws:~# VM_U_CP1=$VM_PREFIX-user-cp1
root@abm-ws:~# VM_U_W1=$VM_PREFIX-user-w1
root@abm-ws:~#
root@abm-ws:~# declare -a VMs=("$VM_WS" "$VM_A_CP1" "$VM_U_CP1" "$VM_U_W1")
root@abm-ws:~#
root@abm-ws:~# for vm in "${VMs[@]:1}"
> do
>     ssh-copy-id -o StrictHostKeyChecking=no -i ~/.ssh/id_rsa.pub root@$vm
> done
/usr/bin/ssh-copy-id: INFO: Source of key(s) to be installed: "/root/.ssh/id_rsa.pub"
/usr/bin/ssh-copy-id: INFO: attempting to log in with the new key(s), to filter out any that are already installed
/usr/bin/ssh-copy-id: INFO: 1 key(s) remain to be installed -- if you are prompted now it is to install the new keys

Number of key(s) added: 1

Now try logging into the machine, with:   "ssh -o 'StrictHostKeyChecking=no' 'root@abm-admin-cp1'"
and check to make sure that only the key(s) you wanted were added.

/usr/bin/ssh-copy-id: INFO: Source of key(s) to be installed: "/root/.ssh/id_rsa.pub"
/usr/bin/ssh-copy-id: INFO: attempting to log in with the new key(s), to filter out any that are already installed
/usr/bin/ssh-copy-id: INFO: 1 key(s) remain to be installed -- if you are prompted now it is to install the new keys

Number of key(s) added: 1

Now try logging into the machine, with:   "ssh -o 'StrictHostKeyChecking=no' 'root@abm-user-cp1'"
and check to make sure that only the key(s) you wanted were added.

/usr/bin/ssh-copy-id: INFO: Source of key(s) to be installed: "/root/.ssh/id_rsa.pub"
/usr/bin/ssh-copy-id: INFO: attempting to log in with the new key(s), to filter out any that are already installed
/usr/bin/ssh-copy-id: INFO: 1 key(s) remain to be installed -- if you are prompted now it is to install the new keys

Number of key(s) added: 1

Now try logging into the machine, with:   "ssh -o 'StrictHostKeyChecking=no' 'root@abm-user-w1'"
and check to make sure that only the key(s) you wanted were added.

root@abm-ws:~#
Install kubectx on the admin workstation with the following commands:
root@abm-ws:~# git clone https://github.com/ahmetb/kubectx /opt/kubectx
Cloning into '/opt/kubectx'...
remote: Enumerating objects: 1524, done.
remote: Counting objects: 100% (474/474), done.
remote: Compressing objects: 100% (117/117), done.
remote: Total 1524 (delta 402), reused 366 (delta 355), pack-reused 1050
Receiving objects: 100% (1524/1524), 927.38 KiB | 8.43 MiB/s, done.
Resolving deltas: 100% (888/888), done.
root@abm-ws:~# ln -s /opt/kubectx/kubectx /usr/local/bin/kubectx
root@abm-ws:~# ln -s /opt/kubectx/kubens /usr/local/bin/kubens
root@abm-ws:~#
Congratulations! You have set up and configured your admin workstation, and are now ready to use it to create and manage Anthos admin and user clusters.
Create your admin cluster
In this task, you will create your admin cluster. This includes:
- Enabling Anthos-related services.
- Creating Anthos-required service accounts.
- Creating and editing the admin cluster configuration file.
- Building and connecting to an Anthos admin cluster.
Create the configuration file
In Cloud Shell, where you have an active SSH session into the admin workstation, initialize some key environment variables:
root@abm-ws:~#  # configure environment variables
root@abm-ws:~#  export ZONE=us-central1-a
root@abm-ws:~#  export SSH_PRIVATE_KEY=/root/.ssh/id_rsa
root@abm-ws:~#  export LB_CONTROLL_PLANE_NODE=10.200.0.3
root@abm-ws:~#  export LB_CONTROLL_PLANE_VIP=10.200.0.98
root@abm-ws:~#
root@abm-ws:~#  # create additional arrays of the server names
root@abm-ws:~#
root@abm-ws:~#  declare -a ADMIN_CP_VMs=("$VM_A_CP1")
root@abm-ws:~#  declare -a USER_CP_VMs=("$VM_U_CP1")
root@abm-ws:~#  declare -a USER_WORKER_VMs=("$VM_U_W1")
root@abm-ws:~#  declare -a LB_VMs=("$VM_A_CP1" "$VM_U_CP1")
root@abm-ws:~#
Use the bmctl tool to enable APIs, create service accounts, and generate a configuration file:
root@abm-ws:~# cd ~/baremetal
root@abm-ws:~/baremetal# bmctl create config -c abm-admin-cluster   --enable-apis --create-service-accounts --project-id=$PROJECT_ID
[2024-07-26 15:32:14+0000] Enabling APIs for GCP project qwiklabs-gcp-04-f6d139af359a

[2024-07-26 15:32:14+0000] Enabling the following APIs for GCP project qwiklabs-gcp-04-f6d139af359a:
[2024-07-26 15:32:14+0000] - anthos.googleapis.com
[2024-07-26 15:32:14+0000] - anthosaudit.googleapis.com
[2024-07-26 15:32:14+0000] - anthosgke.googleapis.com
[2024-07-26 15:32:14+0000] - cloudresourcemanager.googleapis.com
[2024-07-26 15:32:14+0000] - connectgateway.googleapis.com
[2024-07-26 15:32:14+0000] - container.googleapis.com
[2024-07-26 15:32:14+0000] - gkeconnect.googleapis.com
[2024-07-26 15:32:14+0000] - gkehub.googleapis.com
[2024-07-26 15:32:14+0000] - gkeonprem.googleapis.com
[2024-07-26 15:32:14+0000] - iam.googleapis.com
[2024-07-26 15:32:14+0000] - logging.googleapis.com
[2024-07-26 15:32:14+0000] - monitoring.googleapis.com
[2024-07-26 15:32:14+0000] - opsconfigmonitoring.googleapis.com
[2024-07-26 15:32:14+0000] - serviceusage.googleapis.com
[2024-07-26 15:32:14+0000] - stackdriver.googleapis.com
[2024-07-26 15:32:14+0000] - storage.googleapis.com
[2024-07-26 15:32:18+0000] Creating service accounts with keys for GCP project qwiklabs-gcp-04-f6d139af359a

[2024-07-26 15:32:25+0000] Service account keys stored at directory bmctl-workspace/.sa-keys

[2024-07-26 15:32:25+0000] Created config: bmctl-workspace/abm-admin-cluster/abm-admin-cluster.yaml
root@abm-ws:~/baremetal#
Check that the services are activated by going to Navigation > APIs & Services > Dashboard. You should see the enabled services in the list.
If for some reason you don’t see the Anthos services listed, it’s likely an issue with updating the list. You can search for one of the APIs in the search bar at the top of the screen and see that it’s enabled, or you can take it on faith and continue.
The bmctl utility also creates services accounts required by the admin cluster, and grants those service accounts the appropriate permissions.
Check that the service accounts have been created by going to Navigation > IAM & Admin > Service Accounts.
Check the roles assigned to your service accounts by going to Navigation > IAM & Admin > IAM. You should see the newly created service accounts and their role assignment.
Check the key files for your service accounts have been downloaded:
root@abm-ws:~/baremetal# ls bmctl-workspace/.sa-keys/
qwiklabs-gcp-04-f6d139af359a-anthos-baremetal-cloud-ops.json  qwiklabs-gcp-04-f6d139af359a-anthos-baremetal-gcr.json
qwiklabs-gcp-04-f6d139af359a-anthos-baremetal-connect.json    qwiklabs-gcp-04-f6d139af359a-anthos-baremetal-register.json
root@abm-ws:~/baremetal#
Edit the configuration file
While bmctl creates a draft configuration file, you need to make multiple edits to make the file usable. The instructions below walk you through the process.
To avoid mistakes, there are commands that pre-fill the information. If you want to edit the file yourself, you can, just keep in mind that spaces and indents count in YAML files, so be careful that you get positioning correct.
View the generated configuration file:
root@abm-ws:~/baremetal# cat bmctl-workspace/abm-admin-cluster/abm-admin-cluster.yaml
# bmctl configuration variables. Because this section is valid YAML but not a valid Kubernetes
# resource, this section can only be included when using bmctl to
# create the initial admin/hybrid cluster. Afterwards, when creating user clusters by directly
# applying the cluster and node pool resources to the existing cluster, you must remove this
# section.
gcrKeyPath: bmctl-workspace/.sa-keys/qwiklabs-gcp-04-f6d139af359a-anthos-baremetal-gcr.json
sshPrivateKeyPath: <path to SSH private key, used for node access>
gkeConnectAgentServiceAccountKeyPath: bmctl-workspace/.sa-keys/qwiklabs-gcp-04-f6d139af359a-anthos-baremetal-connect.json
gkeConnectRegisterServiceAccountKeyPath: bmctl-workspace/.sa-keys/qwiklabs-gcp-04-f6d139af359a-anthos-baremetal-register.json
cloudOperationsServiceAccountKeyPath: bmctl-workspace/.sa-keys/qwiklabs-gcp-04-f6d139af359a-anthos-baremetal-cloud-ops.json
---
apiVersion: v1
kind: Namespace
metadata:
  name: cluster-abm-admin-cluster
---
# Cluster configuration. Note that some of these fields are immutable once the cluster is created.
# For more info, see https://cloud.google.com/anthos/clusters/docs/bare-metal/1.16/reference/cluster-config-ref#cluster_configuration_fields
apiVersion: baremetal.cluster.gke.io/v1
kind: Cluster
metadata:
  name: abm-admin-cluster
  namespace: cluster-abm-admin-cluster
spec:
  # Cluster type. This can be:
  #   1) admin:  to create an admin cluster. This can later be used to create user clusters.
  #   2) user:   to create a user cluster. Requires an existing admin cluster.
  #   3) hybrid: to create a hybrid cluster that runs admin cluster components and user workloads.
  #   4) standalone: to create a cluster that manages itself, runs user workloads, but does not manage other clusters.
  type: hybrid
  # Cluster profile. This can be either 'default' or 'edge'.
  # The edge profile is tailored for deployments on the edge locations
  # and should be used together with the 'standalone' cluster type.
  profile: default
  # Anthos cluster version.
  anthosBareMetalVersion: 1.16.0
  # GKE connect configuration
  gkeConnect:
    projectID: qwiklabs-gcp-04-f6d139af359a
  # Control plane configuration
  controlPlane:
    nodePoolSpec:
      nodes:
      # Control plane node pools. Typically, this is either a single machine
      # or 3 machines if using a high availability deployment.
      - address: <Machine 1 IP>
  # Cluster networking configuration
  clusterNetwork:
    # Pods specify the IP ranges from which pod networks are allocated.
    pods:
      cidrBlocks:
      - 192.168.0.0/16
    # Services specify the network ranges from which service virtual IPs are allocated.
    # This can be any RFC1918 range that does not conflict with any other IP range
    # in the cluster and node pool resources.
    services:
      cidrBlocks:
      - 10.96.0.0/20
  # Load balancer configuration
  loadBalancer:
    # Load balancer mode can be either 'bundled' or 'manual'.
    # In 'bundled' mode a load balancer will be installed on load balancer nodes during cluster creation.
    # In 'manual' mode the cluster relies on a manually-configured external load balancer.
    mode: bundled
    # Load balancer port configuration
    ports:
      # Specifies the port the load balancer serves the Kubernetes control plane on.
      # In 'manual' mode the external load balancer must be listening on this port.
      controlPlaneLBPort: 443
    # There are two load balancer virtual IP (VIP) addresses: one for the control plane
    # and one for the L7 Ingress service.
    # If you use Layer2 load balancing, the VIPs must be in the same subnet as the load balancer nodes.
    # If you use bundled BGP-based load balancing (mode: 'bundled' and type: 'bgp'), the VIPs
    # must not come from the same subnet as any of the nodes in the cluster.
    # These IP addresses do not correspond to physical network interfaces.
    vips:
      # ControlPlaneVIP specifies the VIP to connect to the Kubernetes API server.
      # This address must not be in the address pools below.
      controlPlaneVIP: 10.0.0.8
      # IngressVIP specifies the VIP shared by all services for ingress traffic.
      # Allowed only in non-admin clusters.
      # This address must be in the address pools below.
      # ingressVIP: 10.0.0.2
    # AddressPools is a list of non-overlapping IP ranges for the data plane load balancer.
    # All addresses must be in the same subnet as the load balancer nodes.
    # Address pool configuration is only valid for 'bundled' LB mode in non-admin clusters.
    # addressPools:
    # - name: pool1
    #   addresses:
    #   # Each address must be either in the CIDR form (1.2.3.0/24)
    #   # or range form (1.2.3.1-1.2.3.5).
    #   - 10.0.0.1-10.0.0.4
    # A load balancer node pool can be configured to specify nodes used for load balancing.
    # These nodes are part of the Kubernetes cluster and run regular workloads as well as load balancers.
    # If the node pool config is absent then the control plane nodes are used.
    # Node pool configuration is only valid for 'bundled' LB mode.
    # nodePoolSpec:
    #  nodes:
    #  - address: <Machine 1 IP>
  # Proxy configuration
  # proxy:
  #   url: http://[username:password@]domain
  #   # A list of IPs, hostnames or domains that should not be proxied.
  #   noProxy:
  #   - 127.0.0.1
  #   - localhost
  # Logging and Monitoring
  clusterOperations:
    # Cloud project for logs and metrics.
    projectID: qwiklabs-gcp-04-f6d139af359a
    # Cloud location for logs and metrics.
    location: us-central1
  # Storage configuration
  storage:
    # lvpNodeMounts specifies the config for local PersistentVolumes backed by mounted disks.
    # These disks need to be formatted and mounted by the user, which can be done before or after
    # cluster creation.
    lvpNodeMounts:
      # path specifies the host machine path where mounted disks will be discovered and a local PV
      # will be created for each mount.
      path: /mnt/localpv-disk
      # storageClassName specifies the StorageClass that PVs will be created with. The StorageClass
      # is created during cluster creation.
      storageClassName: local-disks
    # lvpShare specifies the config for local PersistentVolumes backed by subdirectories in a shared filesystem.
    # These subdirectories are automatically created during cluster creation.
    lvpShare:
      # path specifies the host machine path where subdirectories will be created on each host. A local PV
      # will be created for each subdirectory.
      path: /mnt/localpv-share
      # storageClassName specifies the StorageClass that PVs will be created with. The StorageClass
      # is created during cluster creation.
      storageClassName: local-shared
      # numPVUnderSharedPath specifies the number of subdirectories to create under path.
      numPVUnderSharedPath: 5
  # NodeConfig specifies the configuration that applies to all nodes in the cluster.
  nodeConfig:
    # podDensity specifies the pod density configuration.
    podDensity:
      # maxPodsPerNode specifies at most how many pods can be run on a single node.
      maxPodsPerNode: 250
  # GKEOnPremAPI (Optional) Specify if you wish to explicitly enable/disable the cloud hosted gkeonprem
  # API to enable/disable cluster lifecycle management from gcloud UI and Terraform.
  # gkeOnPremAPI:
    # enabled: false
    # location is the Cloud location for the cluster resource metadata where the cluster will be enrolled.
    # location: us-central1
  # Authentication; uncomment this section if you wish to enable authentication to the cluster with OpenID Connect.
  # authentication:
  #   oidc:
  #     # issuerURL specifies the URL of your OpenID provider, such as "https://accounts.google.com". The Kubernetes API
  #     # server uses this URL to discover public keys for verifying tokens. Must use HTTPS.
  #     issuerURL: <URL for OIDC Provider; required>
  #     # clientID specifies the ID for the client application that makes authentication requests to the OpenID
  #     # provider.
  #     clientID: <ID for OIDC client application; required>
  #     # clientSecret specifies the secret for the client application.
  #     clientSecret: <Secret for OIDC client application; optional>
  #     # kubectlRedirectURL specifies the redirect URL (required) for the gcloud CLI, such as
  #     # "http://localhost:[PORT]/callback".
  #     kubectlRedirectURL: <Redirect URL for the gcloud CLI; optional, default is "http://kubectl.redirect.invalid">
  #     # username specifies the JWT claim to use as the username. The default is "sub", which is expected to be a
  #     # unique identifier of the end user.
  #     username: <JWT claim to use as the username; optional, default is "sub">
  #     # usernamePrefix specifies the prefix prepended to username claims to prevent clashes with existing names.
  #     usernamePrefix: <Prefix prepended to username claims; optional>
  #     # group specifies the JWT claim that the provider will use to return your security groups.
  #     group: <JWT claim to use as the group name; optional>
  #     # groupPrefix specifies the prefix prepended to group claims to prevent clashes with existing names.
  #     groupPrefix: <Prefix prepended to group claims; optional>
  #     # scopes specifies additional scopes to send to the OpenID provider as a comma-delimited list.
  #     scopes: <Additional scopes to send to OIDC provider as a comma-separated list; optional>
  #     # extraParams specifies additional key-value parameters to send to the OpenID provider as a comma-delimited
  #     # list.
  #     extraParams: <Additional key-value parameters to send to OIDC provider as a comma-separated list; optional>
  #     # proxy specifies the proxy server to use for the cluster to connect to your OIDC provider, if applicable.
  #     # Example: https://user:password@10.10.10.10:8888. If left blank, this defaults to no proxy.
  #     proxy: <Proxy server to use for the cluster to connect to your OIDC provider; optional, default is no proxy>
  #     # deployCloudConsoleProxy specifies whether to deploy a reverse proxy in the cluster to allow Google Cloud
  #     # Console access to the on-premises OIDC provider for authenticating users. If your identity provider is not
  #     # reachable over the public internet, and you wish to authenticate using Google Cloud Console, then this field
  #     # must be set to true. If left blank, this field defaults to false.
  #     deployCloudConsoleProxy: <Whether to deploy a reverse proxy for Google Cloud Console authentication; optional>
  #     # certificateAuthorityData specifies a Base64 PEM-encoded certificate authority certificate of your identity
  #     # provider. It's not needed if your identity provider's certificate was issued by a well-known public CA.
  #     # However, if deployCloudConsoleProxy is true, then this value must be provided, even for a well-known public
  #     # CA.
  #     certificateAuthorityData: <Base64 PEM-encoded certificate authority certificate of your OIDC provider; optional>
  # Node access configuration; uncomment this section if you wish to use a non-root user
  # with passwordless sudo capability for machine login.
  # nodeAccess:
  #   loginUser: <login user name>
---
# Node pools for worker nodes
apiVersion: baremetal.cluster.gke.io/v1
kind: NodePool
metadata:
  name: node-pool-1
  namespace: cluster-abm-admin-cluster
spec:
  clusterName: abm-admin-cluster
  nodes:
  - address: <Machine 2 IP>
  - address: <Machine 3 IP>
root@abm-ws:~/baremetal#
Modify the config file by updating the following lines with the values suggested below. You can either edit the file by hand in the vi, or you can run the commands provided to update the file for you.
root@abm-ws:~/baremetal# sed -r -i "s|sshPrivateKeyPath: <path to SSH private key, used for node access>|sshPrivateKeyPath: $(echo $SSH_PRIVATE_KEY)|g" bmctl-workspace/abm-admin-cluster/abm-admin-cluster.yaml
root@abm-ws:~/baremetal# sed -r -i "s|type: hybrid|type: admin|g" bmctl-workspace/abm-admin-cluster/abm-admin-cluster.yaml
root@abm-ws:~/baremetal# sed -r -i "s|- address: <Machine 1 IP>|- address: $(echo $LB_CONTROLL_PLANE_NODE)|g" bmctl-workspace/abm-admin-cluster/abm-admin-cluster.yaml
root@abm-ws:~/baremetal# sed -r -i "s|controlPlaneVIP: 10.0.0.8|controlPlaneVIP: $(echo $LB_CONTROLL_PLANE_VIP)|g" bmctl-workspace/abm-admin-cluster/abm-admin-cluster.yaml
root@abm-ws:~/baremetal#
Delete the entire NodePool section of the configuration file. Typically, admin clusters don’t need worker nodes. You can do this manually or use the following command to automate the modification:
root@abm-ws:~/baremetal# head -n -11 bmctl-workspace/abm-admin-cluster/abm-admin-cluster.yaml > temp_file && mv temp_file bmctl-workspace/abm-admin-cluster/abm-admin-cluster.yaml
root@abm-ws:~/baremetal#
f you haven’t already, review the modified admin cluster configuration file:
root@abm-ws:~/baremetal# cat bmctl-workspace/abm-admin-cluster/abm-admin-cluster.yaml
# bmctl configuration variables. Because this section is valid YAML but not a valid Kubernetes
# resource, this section can only be included when using bmctl to
# create the initial admin/hybrid cluster. Afterwards, when creating user clusters by directly
# applying the cluster and node pool resources to the existing cluster, you must remove this
# section.
gcrKeyPath: bmctl-workspace/.sa-keys/qwiklabs-gcp-04-f6d139af359a-anthos-baremetal-gcr.json
sshPrivateKeyPath: /root/.ssh/id_rsa
gkeConnectAgentServiceAccountKeyPath: bmctl-workspace/.sa-keys/qwiklabs-gcp-04-f6d139af359a-anthos-baremetal-connect.json
gkeConnectRegisterServiceAccountKeyPath: bmctl-workspace/.sa-keys/qwiklabs-gcp-04-f6d139af359a-anthos-baremetal-register.json
cloudOperationsServiceAccountKeyPath: bmctl-workspace/.sa-keys/qwiklabs-gcp-04-f6d139af359a-anthos-baremetal-cloud-ops.json
---
apiVersion: v1
kind: Namespace
metadata:
  name: cluster-abm-admin-cluster
---
# Cluster configuration. Note that some of these fields are immutable once the cluster is created.
# For more info, see https://cloud.google.com/anthos/clusters/docs/bare-metal/1.16/reference/cluster-config-ref#cluster_configuration_fields
apiVersion: baremetal.cluster.gke.io/v1
kind: Cluster
metadata:
  name: abm-admin-cluster
  namespace: cluster-abm-admin-cluster
spec:
  # Cluster type. This can be:
  #   1) admin:  to create an admin cluster. This can later be used to create user clusters.
  #   2) user:   to create a user cluster. Requires an existing admin cluster.
  #   3) hybrid: to create a hybrid cluster that runs admin cluster components and user workloads.
  #   4) standalone: to create a cluster that manages itself, runs user workloads, but does not manage other clusters.
  type: admin
  # Cluster profile. This can be either 'default' or 'edge'.
  # The edge profile is tailored for deployments on the edge locations
  # and should be used together with the 'standalone' cluster type.
  profile: default
  # Anthos cluster version.
  anthosBareMetalVersion: 1.16.0
  # GKE connect configuration
  gkeConnect:
    projectID: qwiklabs-gcp-04-f6d139af359a
  # Control plane configuration
  controlPlane:
    nodePoolSpec:
      nodes:
      # Control plane node pools. Typically, this is either a single machine
      # or 3 machines if using a high availability deployment.
      - address: 10.200.0.3
  # Cluster networking configuration
  clusterNetwork:
    # Pods specify the IP ranges from which pod networks are allocated.
    pods:
      cidrBlocks:
      - 192.168.0.0/16
    # Services specify the network ranges from which service virtual IPs are allocated.
    # This can be any RFC1918 range that does not conflict with any other IP range
    # in the cluster and node pool resources.
    services:
      cidrBlocks:
      - 10.96.0.0/20
  # Load balancer configuration
  loadBalancer:
    # Load balancer mode can be either 'bundled' or 'manual'.
    # In 'bundled' mode a load balancer will be installed on load balancer nodes during cluster creation.
    # In 'manual' mode the cluster relies on a manually-configured external load balancer.
    mode: bundled
    # Load balancer port configuration
    ports:
      # Specifies the port the load balancer serves the Kubernetes control plane on.
      # In 'manual' mode the external load balancer must be listening on this port.
      controlPlaneLBPort: 443
    # There are two load balancer virtual IP (VIP) addresses: one for the control plane
    # and one for the L7 Ingress service.
    # If you use Layer2 load balancing, the VIPs must be in the same subnet as the load balancer nodes.
    # If you use bundled BGP-based load balancing (mode: 'bundled' and type: 'bgp'), the VIPs
    # must not come from the same subnet as any of the nodes in the cluster.
    # These IP addresses do not correspond to physical network interfaces.
    vips:
      # ControlPlaneVIP specifies the VIP to connect to the Kubernetes API server.
      # This address must not be in the address pools below.
      controlPlaneVIP: 10.200.0.98
      # IngressVIP specifies the VIP shared by all services for ingress traffic.
      # Allowed only in non-admin clusters.
      # This address must be in the address pools below.
      # ingressVIP: 10.0.0.2
    # AddressPools is a list of non-overlapping IP ranges for the data plane load balancer.
    # All addresses must be in the same subnet as the load balancer nodes.
    # Address pool configuration is only valid for 'bundled' LB mode in non-admin clusters.
    # addressPools:
    # - name: pool1
    #   addresses:
    #   # Each address must be either in the CIDR form (1.2.3.0/24)
    #   # or range form (1.2.3.1-1.2.3.5).
    #   - 10.0.0.1-10.0.0.4
    # A load balancer node pool can be configured to specify nodes used for load balancing.
    # These nodes are part of the Kubernetes cluster and run regular workloads as well as load balancers.
    # If the node pool config is absent then the control plane nodes are used.
    # Node pool configuration is only valid for 'bundled' LB mode.
    # nodePoolSpec:
    #  nodes:
    #  - address: 10.200.0.3
  # Proxy configuration
  # proxy:
  #   url: http://[username:password@]domain
  #   # A list of IPs, hostnames or domains that should not be proxied.
  #   noProxy:
  #   - 127.0.0.1
  #   - localhost
  # Logging and Monitoring
  clusterOperations:
    # Cloud project for logs and metrics.
    projectID: qwiklabs-gcp-04-f6d139af359a
    # Cloud location for logs and metrics.
    location: us-central1
  # Storage configuration
  storage:
    # lvpNodeMounts specifies the config for local PersistentVolumes backed by mounted disks.
    # These disks need to be formatted and mounted by the user, which can be done before or after
    # cluster creation.
    lvpNodeMounts:
      # path specifies the host machine path where mounted disks will be discovered and a local PV
      # will be created for each mount.
      path: /mnt/localpv-disk
      # storageClassName specifies the StorageClass that PVs will be created with. The StorageClass
      # is created during cluster creation.
      storageClassName: local-disks
    # lvpShare specifies the config for local PersistentVolumes backed by subdirectories in a shared filesystem.
    # These subdirectories are automatically created during cluster creation.
    lvpShare:
      # path specifies the host machine path where subdirectories will be created on each host. A local PV
      # will be created for each subdirectory.
      path: /mnt/localpv-share
      # storageClassName specifies the StorageClass that PVs will be created with. The StorageClass
      # is created during cluster creation.
      storageClassName: local-shared
      # numPVUnderSharedPath specifies the number of subdirectories to create under path.
      numPVUnderSharedPath: 5
  # NodeConfig specifies the configuration that applies to all nodes in the cluster.
  nodeConfig:
    # podDensity specifies the pod density configuration.
    podDensity:
      # maxPodsPerNode specifies at most how many pods can be run on a single node.
      maxPodsPerNode: 250
  # GKEOnPremAPI (Optional) Specify if you wish to explicitly enable/disable the cloud hosted gkeonprem
  # API to enable/disable cluster lifecycle management from gcloud UI and Terraform.
  # gkeOnPremAPI:
    # enabled: false
    # location is the Cloud location for the cluster resource metadata where the cluster will be enrolled.
    # location: us-central1
  # Authentication; uncomment this section if you wish to enable authentication to the cluster with OpenID Connect.
  # authentication:
  #   oidc:
  #     # issuerURL specifies the URL of your OpenID provider, such as "https://accounts.google.com". The Kubernetes API
  #     # server uses this URL to discover public keys for verifying tokens. Must use HTTPS.
  #     issuerURL: <URL for OIDC Provider; required>
  #     # clientID specifies the ID for the client application that makes authentication requests to the OpenID
  #     # provider.
  #     clientID: <ID for OIDC client application; required>
  #     # clientSecret specifies the secret for the client application.
  #     clientSecret: <Secret for OIDC client application; optional>
  #     # kubectlRedirectURL specifies the redirect URL (required) for the gcloud CLI, such as
  #     # "http://localhost:[PORT]/callback".
  #     kubectlRedirectURL: <Redirect URL for the gcloud CLI; optional, default is "http://kubectl.redirect.invalid">
  #     # username specifies the JWT claim to use as the username. The default is "sub", which is expected to be a
  #     # unique identifier of the end user.
  #     username: <JWT claim to use as the username; optional, default is "sub">
  #     # usernamePrefix specifies the prefix prepended to username claims to prevent clashes with existing names.
  #     usernamePrefix: <Prefix prepended to username claims; optional>
  #     # group specifies the JWT claim that the provider will use to return your security groups.
  #     group: <JWT claim to use as the group name; optional>
  #     # groupPrefix specifies the prefix prepended to group claims to prevent clashes with existing names.
  #     groupPrefix: <Prefix prepended to group claims; optional>
  #     # scopes specifies additional scopes to send to the OpenID provider as a comma-delimited list.
  #     scopes: <Additional scopes to send to OIDC provider as a comma-separated list; optional>
  #     # extraParams specifies additional key-value parameters to send to the OpenID provider as a comma-delimited
  #     # list.
  #     extraParams: <Additional key-value parameters to send to OIDC provider as a comma-separated list; optional>
  #     # proxy specifies the proxy server to use for the cluster to connect to your OIDC provider, if applicable.
  #     # Example: https://user:password@10.10.10.10:8888. If left blank, this defaults to no proxy.
  #     proxy: <Proxy server to use for the cluster to connect to your OIDC provider; optional, default is no proxy>
  #     # deployCloudConsoleProxy specifies whether to deploy a reverse proxy in the cluster to allow Google Cloud
  #     # Console access to the on-premises OIDC provider for authenticating users. If your identity provider is not
  #     # reachable over the public internet, and you wish to authenticate using Google Cloud Console, then this field
  #     # must be set to true. If left blank, this field defaults to false.
  #     deployCloudConsoleProxy: <Whether to deploy a reverse proxy for Google Cloud Console authentication; optional>
  #     # certificateAuthorityData specifies a Base64 PEM-encoded certificate authority certificate of your identity
  #     # provider. It's not needed if your identity provider's certificate was issued by a well-known public CA.
  #     # However, if deployCloudConsoleProxy is true, then this value must be provided, even for a well-known public
  #     # CA.
  #     certificateAuthorityData: <Base64 PEM-encoded certificate authority certificate of your OIDC provider; optional>
  # Node access configuration; uncomment this section if you wish to use a non-root user
  # with passwordless sudo capability for machine login.
  # nodeAccess:
  #   loginUser: <login user name>
---
root@abm-ws:~/baremetal#
Without comments
root@abm-ws:~/baremetal# grep -v '#' bmctl-workspace/abm-admin-cluster/abm-admin-cluster.yaml
gcrKeyPath: bmctl-workspace/.sa-keys/qwiklabs-gcp-04-f6d139af359a-anthos-baremetal-gcr.json
sshPrivateKeyPath: /root/.ssh/id_rsa
gkeConnectAgentServiceAccountKeyPath: bmctl-workspace/.sa-keys/qwiklabs-gcp-04-f6d139af359a-anthos-baremetal-connect.json
gkeConnectRegisterServiceAccountKeyPath: bmctl-workspace/.sa-keys/qwiklabs-gcp-04-f6d139af359a-anthos-baremetal-register.json
cloudOperationsServiceAccountKeyPath: bmctl-workspace/.sa-keys/qwiklabs-gcp-04-f6d139af359a-anthos-baremetal-cloud-ops.json
---
apiVersion: v1
kind: Namespace
metadata:
  name: cluster-abm-admin-cluster
---
apiVersion: baremetal.cluster.gke.io/v1
kind: Cluster
metadata:
  name: abm-admin-cluster
  namespace: cluster-abm-admin-cluster
spec:
  type: admin
  profile: default
  anthosBareMetalVersion: 1.16.0
  gkeConnect:
    projectID: qwiklabs-gcp-04-f6d139af359a
  controlPlane:
    nodePoolSpec:
      nodes:
      - address: 10.200.0.3
  clusterNetwork:
    pods:
      cidrBlocks:
      - 192.168.0.0/16
    services:
      cidrBlocks:
      - 10.96.0.0/20
  loadBalancer:
    mode: bundled
    ports:
      controlPlaneLBPort: 443
    vips:
      controlPlaneVIP: 10.200.0.98
  clusterOperations:
    projectID: qwiklabs-gcp-04-f6d139af359a
    location: us-central1
  storage:
    lvpNodeMounts:
      path: /mnt/localpv-disk
      storageClassName: local-disks
    lvpShare:
      path: /mnt/localpv-share
      storageClassName: local-shared
      numPVUnderSharedPath: 5
  nodeConfig:
    podDensity:
      maxPodsPerNode: 250
---
root@abm-ws:~/baremetal#
Create the admin cluster
- Create your admin cluster with the following command:
It will take about 20 minutes for your cluster creation to complete. Wait until the cluster creation is done before moving to the next task.
root@abm-ws:~/baremetal# bmctl create cluster -c abm-admin-cluster
[2024-07-26 15:44:30+0000] Runnning command: bmctl create cluster -c abm-admin-cluster
Please check the logs at bmctl-workspace/abm-admin-cluster/log/create-cluster-20240726-154430/create-cluster.log
[2024-07-26 15:44:34+0000] Creating bootstrap cluster... OK
[2024-07-26 15:45:33+0000] Installing dependency components... ⠙ W0726 15:46:14.443801    5208 schema.go:149] unexpected field validation directive: validator, skipping validation
[2024-07-26 15:45:33+0000] Installing dependency components... ⠦ W0726 15:46:51.627471    5208 warnings.go:70] metadata.name: this is used in Pod names and hostnames, which can result in surprising behavior; a DNS label is recommended: [must not contain dots]
[2024-07-26 15:45:33+0000] Installing dependency components... ⠴ W0726 15:46:54.612755    5208 warnings.go:70] metadata.name: this is used in Pod names and hostnames, which can result in surprising behavior; a DNS label is recommended: [must not contain dots]
[2024-07-26 15:45:33+0000] Installing dependency components... ⠦ W0726 15:46:56.754744    5208 warnings.go:70] metadata.name: this is used in Pod names and hostnames, which can result in surprising behavior; a DNS label is recommended: [must not contain dots]
[2024-07-26 15:45:33+0000] Installing dependency W0726 15:46:59.242573    5208 warnings.go:70] metadata.name: this is used in Pod names and hostnames, which can result in surprising behavior; a DNS label is recommended: [must not contain dots]
[2024-07-26 15:45:33+0000] Installing dependency components... OK
[2024-07-26 15:47:15+0000] Cluster.Spec.GKEOnPremAPI is not specified. This cluster will enroll automatically to GKE onprem API for easier management with gcloud, UI and terraform after installation if GKE Onprem API is enabled in GCP services. To unenroll, just update the Cluster.Spec.GKEOnPremAPI.Enabled to be false after installation.
[2024-07-26 15:47:16+0000] Waiting for preflight check job to finish... OK
[2024-07-26 15:49:26+0000] - Validation Category: machines and network
[2024-07-26 15:49:26+0000]      - [PASSED] 10.200.0.3
[2024-07-26 15:49:26+0000]      - [PASSED] 10.200.0.3-gcp
[2024-07-26 15:49:26+0000]      - [PASSED] gcp
[2024-07-26 15:49:26+0000]      - [PASSED] node-network
[2024-07-26 15:49:26+0000]      - [PASSED] pod-cidr
[2024-07-26 15:49:26+0000] Flushing logs... OK
[2024-07-26 15:49:27+0000] Applying resources for new cluster
[2024-07-26 15:49:28+0000] Waiting for cluster kubeconfig to become ready OK
[2024-07-26 15:57:28+0000] Writing kubeconfig file
[2024-07-26 15:57:28+0000] kubeconfig of cluster being created is present at bmctl-workspace/abm-admin-cluster/abm-admin-cluster-kubeconfig
[2024-07-26 15:57:28+0000] Please restrict access to this file as it contains authentication credentials of your cluster.
[2024-07-26 15:57:28+0000] Waiting for cluster to become ready OK
[2024-07-26 16:06:18+0000] Please run
[2024-07-26 16:06:18+0000] kubectl --kubeconfig bmctl-workspace/abm-admin-cluster/abm-admin-cluster-kubeconfig get nodes
[2024-07-26 16:06:18+0000] to get cluster nodes status.
[2024-07-26 16:06:18+0000] Waiting for node pools to become ready OK
[2024-07-26 16:06:38+0000] Waiting for metrics to become ready in GCP OK
[2024-07-26 16:07:08+0000] Waiting for cluster API provider to install in the created admin cluster OK
[2024-07-26 16:07:18+0000] Moving admin cluster resources to the created admin cluster
[2024-07-26 16:07:24+0000] Waiting for node update jobs to finish OK
[2024-07-26 16:10:44+0000] Flushing logs... OK
[2024-07-26 16:10:44+0000] Deleting bootstrap cluster... OK
root@abm-ws:~/baremetal#
Understand the admin bootstrap process and learn to troubleshoot
In order to create the admin cluster, Anthos must execute some scripts that connect to the worker nodes and install the necessary software. Instead of running the scripts directly on the admin-workstation, Anthos creates a temporary Kind cluster on the admin-workstation that runs those scripts as Kubernetes Jobs, and makes sure that the software is installed correctly.
You can find the kubeconfig file under bmctl-workspace/.kindkubeconfig, which you can use to access the Kind Kubernetes API to view logs and debug the admin cluster creation process. To simplify the debugging process, and be able to access the information after the creation has completed, the Kind cluster exports the logs onto the admin-workstation under the bmctl-workspace/abm-admin-cluster/log folder.
In the following task, you learn how to access those logs.
In Cloud Shell, find the logs exported in the creation process:
export LATEST_ADMIN_FOLDER=$(ls -d bmctl-workspace/abm-admin-cluster/log/create* -t  | head -n 1)
cat $LATEST_ADMIN_FOLDER/create-cluster.log
E0726 16:10:44.375797    5208 poll.go:208]  "msg"="Log streamer failed to get stream logs lifecycle-controllers-manager-6f6bf44fdd-hqkm9" "error"="unexpected EOF"
E0726 16:10:44.375798    5208 poll.go:208]  "msg"="Log streamer failed to get stream logs cap-controller-manager-1.16.0-55cf984586-6z9jp" "error"="unexpected EOF"
E0726 16:10:44.375936    5208 poll.go:208]  "msg"="Log streamer failed to get stream logs capi-controller-manager-1.16.0-757c799b7f-vsrsq" "error"="unexpected EOF"
E0726 16:10:44.375935    5208 poll.go:208]  "msg"="Log streamer failed to get stream logs capi-kubeadm-bootstrap-controller-manager-1.16.0-5c755978fvkfqn" "error"="unexpected EOF"
E0726 16:10:44.375937    5208 poll.go:208]  "msg"="Log streamer failed to get stream logs kube-proxy-7bdnn" "error"="unexpected EOF"
E0726 16:10:45.529365    5208 poll.go:103]  "msg"="Log streamer failed to get BareMetalMachines" "error"="Get \"https://127.0.0.1:39423/apis/infrastructure.baremetal.cluster.gke.io/v1/namespaces/cluster-abm-admin-cluster/baremetalmachines\": dial tcp 127.0.0.1:39423: connect: connection refused"
I0726 16:10:48.344375    5208 kind.go:196] Deleted nodes: ["bmctl-control-plane"]
root@abm-ws:~/baremetal#
root@abm-ws:~/baremetal# ls $LATEST_ADMIN_FOLDER
10.200.0.3  bootstrap-cluster  check-kernel  create-cluster.log
root@abm-ws:~/baremetal#
In addition to the create-cluster.log file, there is another file in that folder:
10.200.0.3: contains all the logs produced by the admin master node. Here, you see checks to verify that the binaries have been copied and installed (including custom tools, Docker, kubeadm, kubectl, kubelet), creation of Kubernetes CA certificates and kubeadm actions like initializing and joining the cluster.
- View the admin master node logs:
cat $LATEST_ADMIN_FOLDER/10.200.0.3
PLAY RECAP *********************************************************************
10.200.0.3                 : ok=75   changed=17   unreachable=0    failed=0    skipped=20   rescued=0    ignored=1
localhost                  : ok=1    changed=0    unreachable=0    failed=0    skipped=0    rescued=0    ignored=0

Friday 26 July 2024  16:01:27 +0000 (0:00:00.381)       0:01:21.826 ***********
===============================================================================
containerd_update : Pre-Pull critical images --------------------------- 39.59s
containerd : Copy containerd binaries ----------------------------------- 5.70s
install_pkg : Install core packages ------------------------------------- 4.22s
copy_tools : Copy tools ------------------------------------------------- 3.83s
install_pkg : Install apparmor ------------------------------------------ 2.57s
Gathering Facts --------------------------------------------------------- 2.35s
controlplane_lb : Copy keepalived/haproxy/bgpadvertiser static pod manifest to /etc/kubernetes/manifests --- 1.28s
controlplane_lb : Copy over keepalived manifests ------------------------ 1.23s
containerd : Copy runc binary ------------------------------------------- 0.98s
containerd_update : Start service containerd, if not started ------------ 0.87s
containerd : Check if containerd exists --------------------------------- 0.83s
controlplane_lb : Copy over haproxy manifests --------------------------- 0.73s
containerd_update : Copy containerd config for containerd runtime ------- 0.67s
containerd_update : Copy Private Registry CA File ----------------------- 0.66s
containerd : Copy /etc/systemd/system/containerd.service ---------------- 0.65s
copy_tools : Creates tmp directory -------------------------------------- 0.57s
controlplane_lb : Stop keepalived container to have it restarted -------- 0.54s
controlplane_lb : Enable ip_nonlocal_bind for haproxy ------------------- 0.54s
install_pkg : Check if /sys/kernel/security/apparmor directory exists --- 0.52s
install_pkg : Check if /sys/module/apparmor/parameters/enabled is set to Y --- 0.49s
I0726 16:01:27.977405       1 valreturn.go:32] Env RETURN_VALUE_CONFIGMAP not set, skipping return value handling.
I0726 16:01:27.977540       1 main.go:304] Ansible run complete
Pod:bm-system-cplb-update-10.200.0.3-1c47f89ae48bb46b425376ef3c6wm4 Result:Running Reason: Time:Fri Jul 26 16:01:30 2024
root@abm-ws:~/baremetal#
Investigate the preflight checks that bmctl performs before creating the cluster:
root@abm-ws:~/baremetal# export LATEST_PREFLIGHT_FOLDER=$(ls -d bmctl-workspace/abm-admin-cluster/log/preflight* -t  | head -n 1)
root@abm-ws:~/baremetal# ls $LATEST_PREFLIGHT_FOLDER
10.200.0.3  10.200.0.3-gcp  gcp  node-network
root@abm-ws:~/baremetal#
Check the connectivity tests for the nodes in your network:
cat $LATEST_PREFLIGHT_FOLDER/node-network
PLAY RECAP *********************************************************************
10.200.0.3                 : ok=49   changed=27   unreachable=0    failed=0    skipped=43   rescued=0    ignored=0
localhost                  : ok=32   changed=15   unreachable=0    failed=0    skipped=59   rescued=0    ignored=0

Friday 26 July 2024  15:49:02 +0000 (0:00:00.368)       0:00:38.277 ***********
===============================================================================
vip_node_test : Send gratuitous ARP ------------------------------------- 5.87s
vip_test : Wait for test to end ----------------------------------------- 5.68s
copy_tools : Copy tools ------------------------------------------------- 4.49s
copy_tools : Copy tools ------------------------------------------------- 3.66s
Gathering Facts --------------------------------------------------------- 1.98s
Gathering Facts --------------------------------------------------------- 1.15s
copy_tools : Creates tmp directory -------------------------------------- 0.79s
etcd_events_conn_test : Create input config ----------------------------- 0.75s
vip_node_test : Create input config ------------------------------------- 0.68s
conn_test : Create input config ----------------------------------------- 0.66s
conn_test : Start connectivity test ------------------------------------- 0.63s
conn_test : Wait for test to end in non-node-agent mode ----------------- 0.55s
etcd_events_conn_test : Check etcd events exists ------------------------ 0.55s
get_k8s_ifc : Get interface name ---------------------------------------- 0.53s
etcd_events_conn_test : Start connectivity test ------------------------- 0.42s
vip_test : Start negative test for vip: 10.200.0.98 --------------------- 0.42s
vip_node_test : Start connectivity test on LB node ---------------------- 0.39s
conn_test : Test port bind ---------------------------------------------- 0.39s
stop_netdiag : Get test PID --------------------------------------------- 0.38s
etcd_events_conn_test : Test port bind ---------------------------------- 0.38s
I0726 15:49:02.479365       1 valreturn.go:32] Env RETURN_VALUE_CONFIGMAP not set, skipping return value handling.
I0726 15:49:02.479531       1 main.go:190] Ansible run complete.
Pod:bm-system-network-preflight-check-create4539ac18acee6db3dbcwkq4 Result:Running Reason: Time:Fri Jul 26 15:49:05 2024
root@abm-ws:~/baremetal#
Sign in to your admin cluster
- In Cloud Shell configure kubectl to use the newly generated kubeconfig file that points to your admin cluster:
- Rename your kubectl context to something a little easier to remember
- Test to make sure you can access and use your admin cluster:
root@abm-ws:~/baremetal# export KUBECONFIG=$KUBECONFIG:~/baremetal/bmctl-workspace/abm-admin-cluster/abm-admin-cluster-kubeconfig
root@abm-ws:~/baremetal# kubectx admin=.
Context "abm-admin-cluster-admin@abm-admin-cluster" renamed to "admin".
root@abm-ws:~/baremetal# kubectl get nodes
NAME            STATUS   ROLES           AGE   VERSION
abm-admin-cp1   Ready    control-plane   19m   v1.27.4-gke.1600
root@abm-ws:~/baremetal#
In Cloud Shell, create a Kubernetes Service Account on your cluster and grant it the cluster-admin role:
root@abm-ws:~/baremetal# kubectl create clusterrolebinding admin-user-binding \
>     --clusterrole cluster-admin --serviceaccount kube-system:admin-user
clusterrolebinding.rbac.authorization.k8s.io/admin-user-binding created
root@abm-ws:~/baremetal#
Create a token that you can use to log in to the cluster from the Console:
root@abm-ws:~/baremetal# kubectl create token admin-user -n kube-system
eyJhbGciOiJSUzI1NiIsImtpZCI6IjBHRXVtMmg5N3NDNEQyX19fV0N1akRseF9jSXh6emx5UGhveDNvTk90bzgifQ.eyJhdWQiOlsiaHR0cHM6Ly9rdWJlcm5ldGVzLmRlZmF1bHQuc3ZjLmNsdXN0ZXIubG9jYWwiXSwiZXhwIjoxNzIyMDE0MzY5LCJpYXQiOjE3MjIwMTA3NjksImlzcyI6Imh0dHBzOi8va3ViZXJuZXRlcy5kZWZhdWx0LnN2Yy5jbHVzdGVyLmxvY2FsIiwia3ViZXJuZXRlcy5pbyI6eyJuYW1lc3BhY2UiOiJrdWJlLXN5c3RlbSIsInNlcnZpY2VhY2NvdW50Ijp7Im5hbWUiOiJhZG1pbi11c2VyIiwidWlkIjoiYjQ1NWJmMWItYWFkMi00YjlkLWEyYjMtZGEyMDk4ZDY1ZWE2In19LCJuYmYiOjE3MjIwMTA3NjksInN1YiI6InN5c3RlbTpzZXJ2aWNlYWNjb3VudDprdWJlLXN5c3RlbTphZG1pbi11c2VyIn0.TloioGOD4SKMrCbG6JPg_dV1OFUjPWatseba4-Y-k2eC9VAT7IqbX5dWBIHyQT__y6tuFzh82V7VAzQki3OSlNQhu34o4ntUXK4l_yw3dCZRGjClrKqyL9zPZXCpNWpfzBKDai04NGJN4tG6pTnWoRTTzxELdW0hopfDbpQKxq8s9QuqqmxbeGqWZzWwS1nVXPlSSb_NB-sqOrrZOH4roLO_OGYc5ODCaauayyGwjfy_xtmy5IuPn7NhdA2sd640jag0TpneJMrigaX9Uozx5vYSalTSVtDkYPHMzxhOuTS9vRCPgBpuD0b_VwVp6LYCucYcl_w-mWpNEpJtHhIzdQ
root@abm-ws:~/baremetal#
- Select the token in the SSH session (this will copy the token - don’t try to copy with CTRL+C).
- Find the abm-admin-cluster entry in the cluster list showing in the Console and click the three-dots menu at the far right of the row.
- Select Log in, select Token, then paste the token from your Clipboard into the provided field. Click Login.
Congratulations! You have successfully logged in to your Anthos on bare metal admin cluster!
Troubleshooting
- If you get disconnected from Cloud Shell and want to sign back in to the admin workstation:
root@abm-ws:~/baremetal# exit
logout
Connection to compute.9088379366698518407 closed.
student_03_ed54dee5a6ae@cloudshell:~ (qwiklabs-gcp-04-f6d139af359a)$ gcloud compute ssh --ssh-flag="-A" root@abm-ws \
  --zone us-central1-a \
  --tunnel-through-iap
WARNING:

To increase the performance of the tunnel, consider installing NumPy. For instructions,
please see https://cloud.google.com/iap/docs/using-tcp-forwarding#increasing_the_tcp_upload_bandwidth

Welcome to Ubuntu 20.04.6 LTS (GNU/Linux 5.15.0-1062-gcp x86_64)

 * Documentation:  https://help.ubuntu.com
 * Management:     https://landscape.canonical.com
 * Support:        https://ubuntu.com/pro

 System information as of Fri Jul 26 16:21:42 UTC 2024

  System load:  0.02               Processes:             131
  Usage of /:   3.6% of 123.87GB   Users logged in:       0
  Memory usage: 3%                 IPv4 address for ens4: 10.1.0.3
  Swap usage:   0%


Expanded Security Maintenance for Applications is not enabled.

0 updates can be applied immediately.

Enable ESM Apps to receive additional future security updates.
See https://ubuntu.com/esm or run: sudo pro status

New release '22.04.3 LTS' available.
Run 'do-release-upgrade' to upgrade to it.


Last login: Fri Jul 26 15:19:11 2024 from 35.235.244.32
root@abm-ws:~#
If you get disconnected from Cloud Shell and want to connect to the admin cluster:
root@abm-ws:~#
root@abm-ws:~# # From the admin workstation (root@abm-ws)
root@abm-ws:~# export KUBECONFIG=$KUBECONFIG:~/baremetal/bmctl-workspace/abm-admin-cluster/abm-admin-cluster-kubeconfig
root@abm-ws:~# kubectx admin
Switched to context "admin".
root@abm-ws:~# kubectl get nodes
NAME            STATUS   ROLES           AGE   VERSION
abm-admin-cp1   Ready    control-plane   24m   v1.27.4-gke.1600
root@abm-ws:~#
In this lab, you deployed the bare metal infrastructure on GCE and installed the Anthos on bare metal admin cluster. You also learned how to debug the cluster creation and how to run health checks in your cluster. Finally, you logged in through the Google Cloud Console and accessed your on-premises cluster from Google Cloud.


