
Configuring an HTTP Load Balancer with Autoscaling
Overview
Google Cloud HTTP(S) load balancing is implemented at the edge of Google’s network in Google’s points of presence (POP) around the world. User traffic directed to an HTTP(S) load balancer enters the POP closest to the user and is then load-balanced over Google’s global network to the closest backend that has sufficient available capacity.
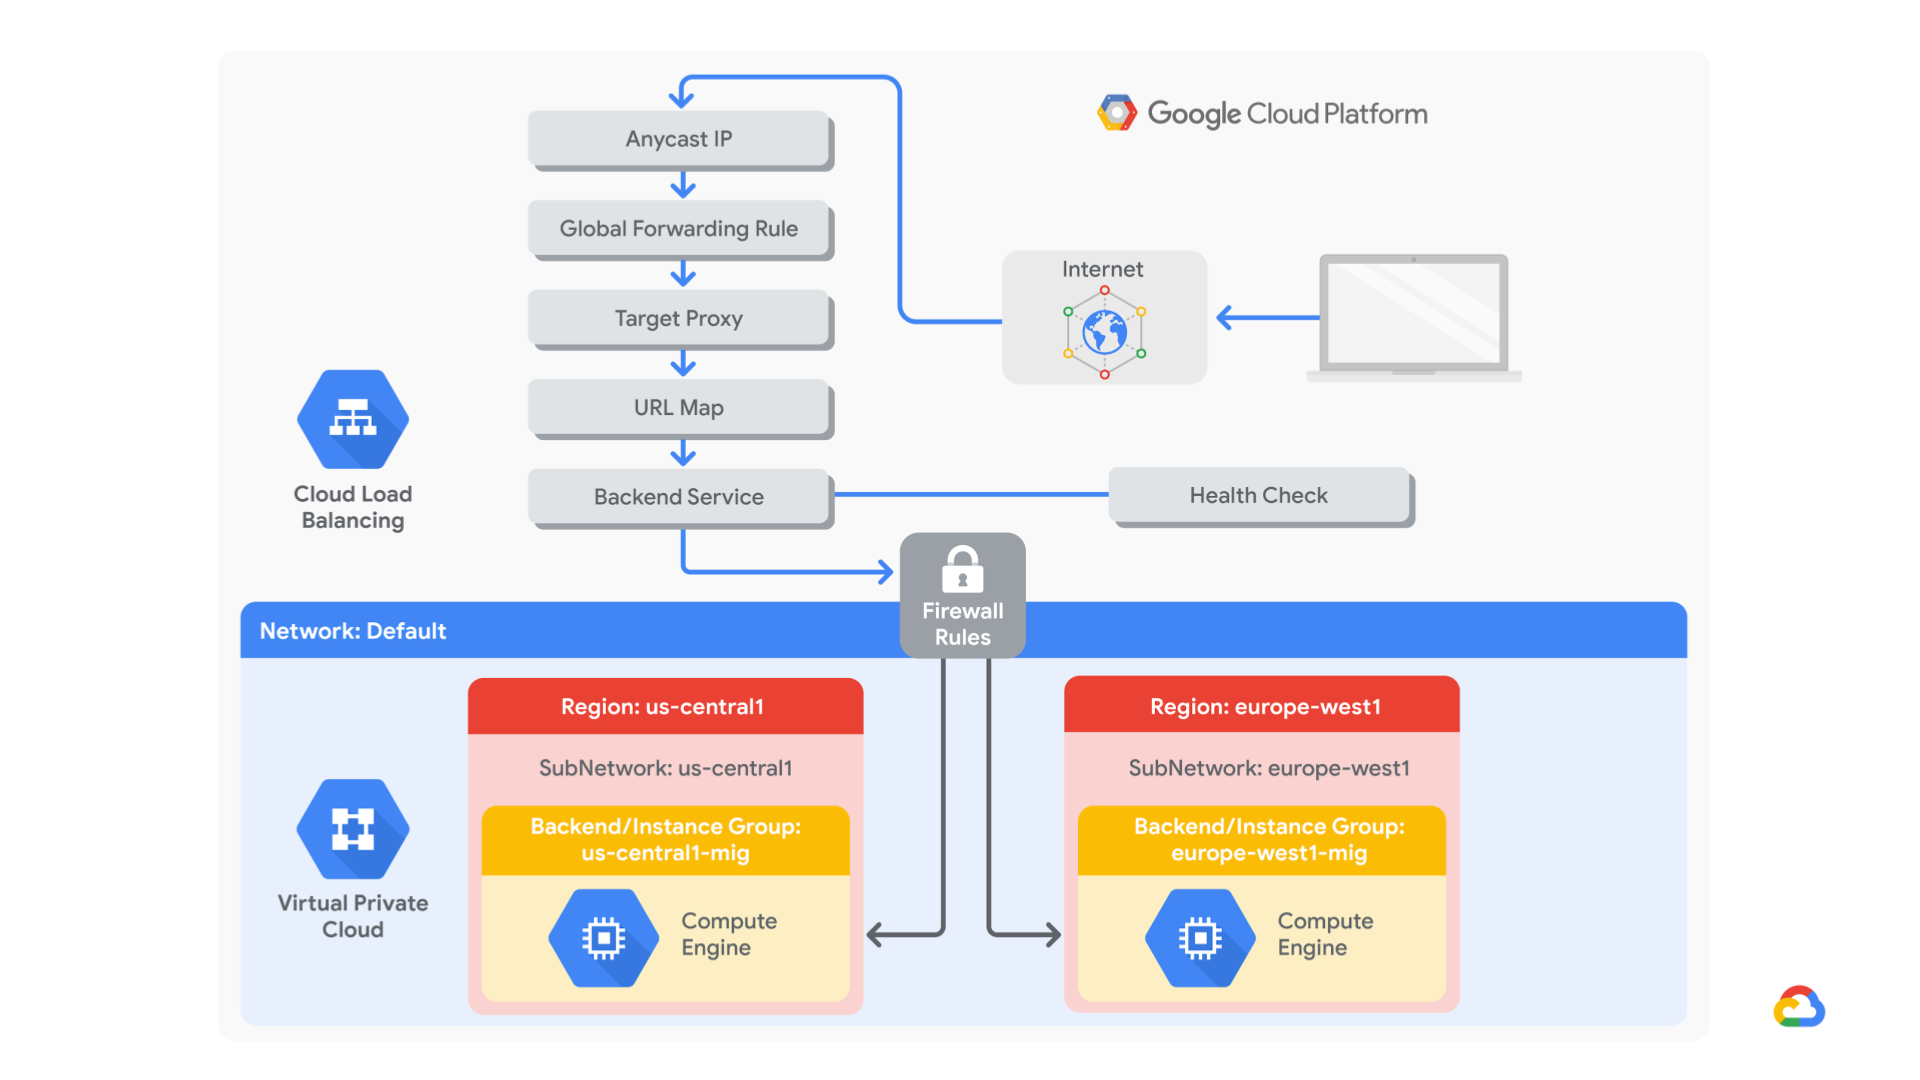
In this lab, you configure an HTTP load balancer as shown in the diagram below. Then, you stress test the load balancer to demonstrate global load balancing and autoscaling.
- Create a health check firewall rule
- Create a NAT configuration using Cloud Router
- Create a custom image for a web server
- Create an instance template based on the custom image
- Create two managed instance groups
- Configure an HTTP load balancer with IPv4 and IPv6
- Stress test an HTTP load balancer
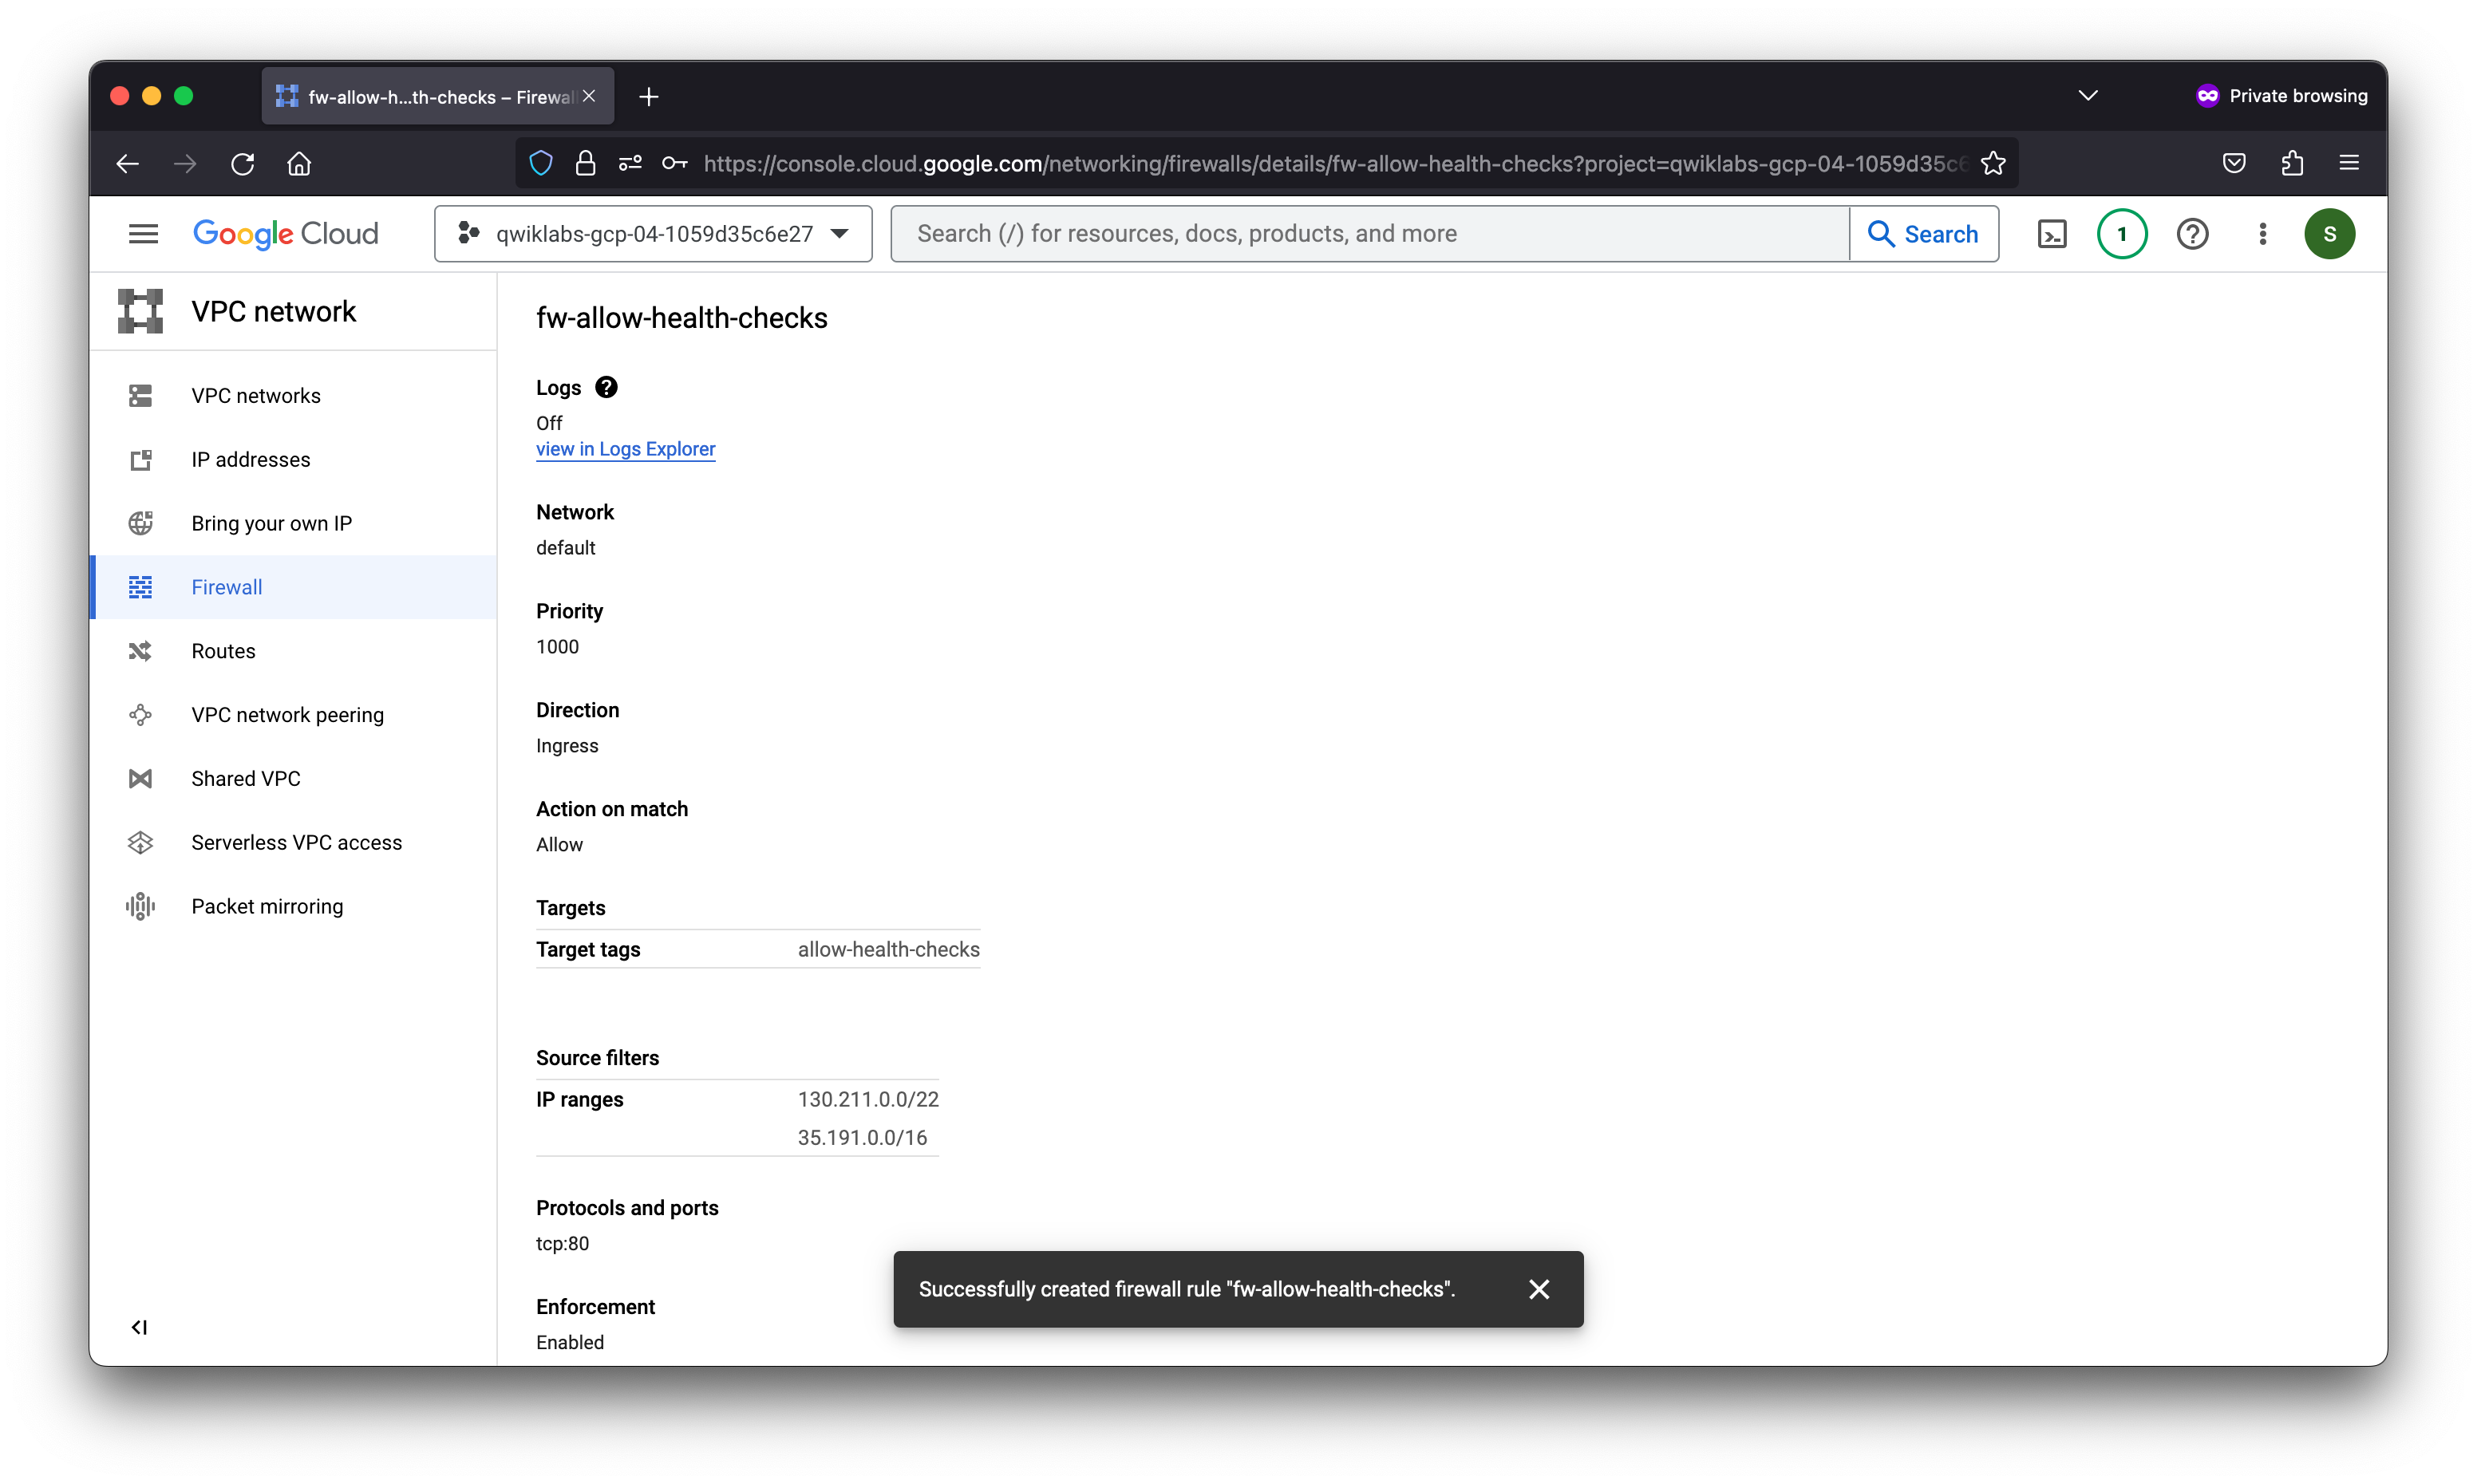
Task 1. Configure a health check firewall rule
Health checks determine which instances of a load balancer can receive new connections. For HTTP load balancing, the health check probes to your load-balanced instances come from addresses in the ranges 130.211.0.0/22 and 35.191.0.0/16. Your firewall rules must allow these connections.
gcloud compute --project=qwiklabs-gcp-04-1059d35c6e27 firewall-rules create fw-allow-health-checks --direction=INGRESS --priority=1000 --network=default --action=ALLOW --rules=tcp:80 --source-ranges=130.211.0.0/22,35.191.0.0/16 --target-tags=allow-health-checks
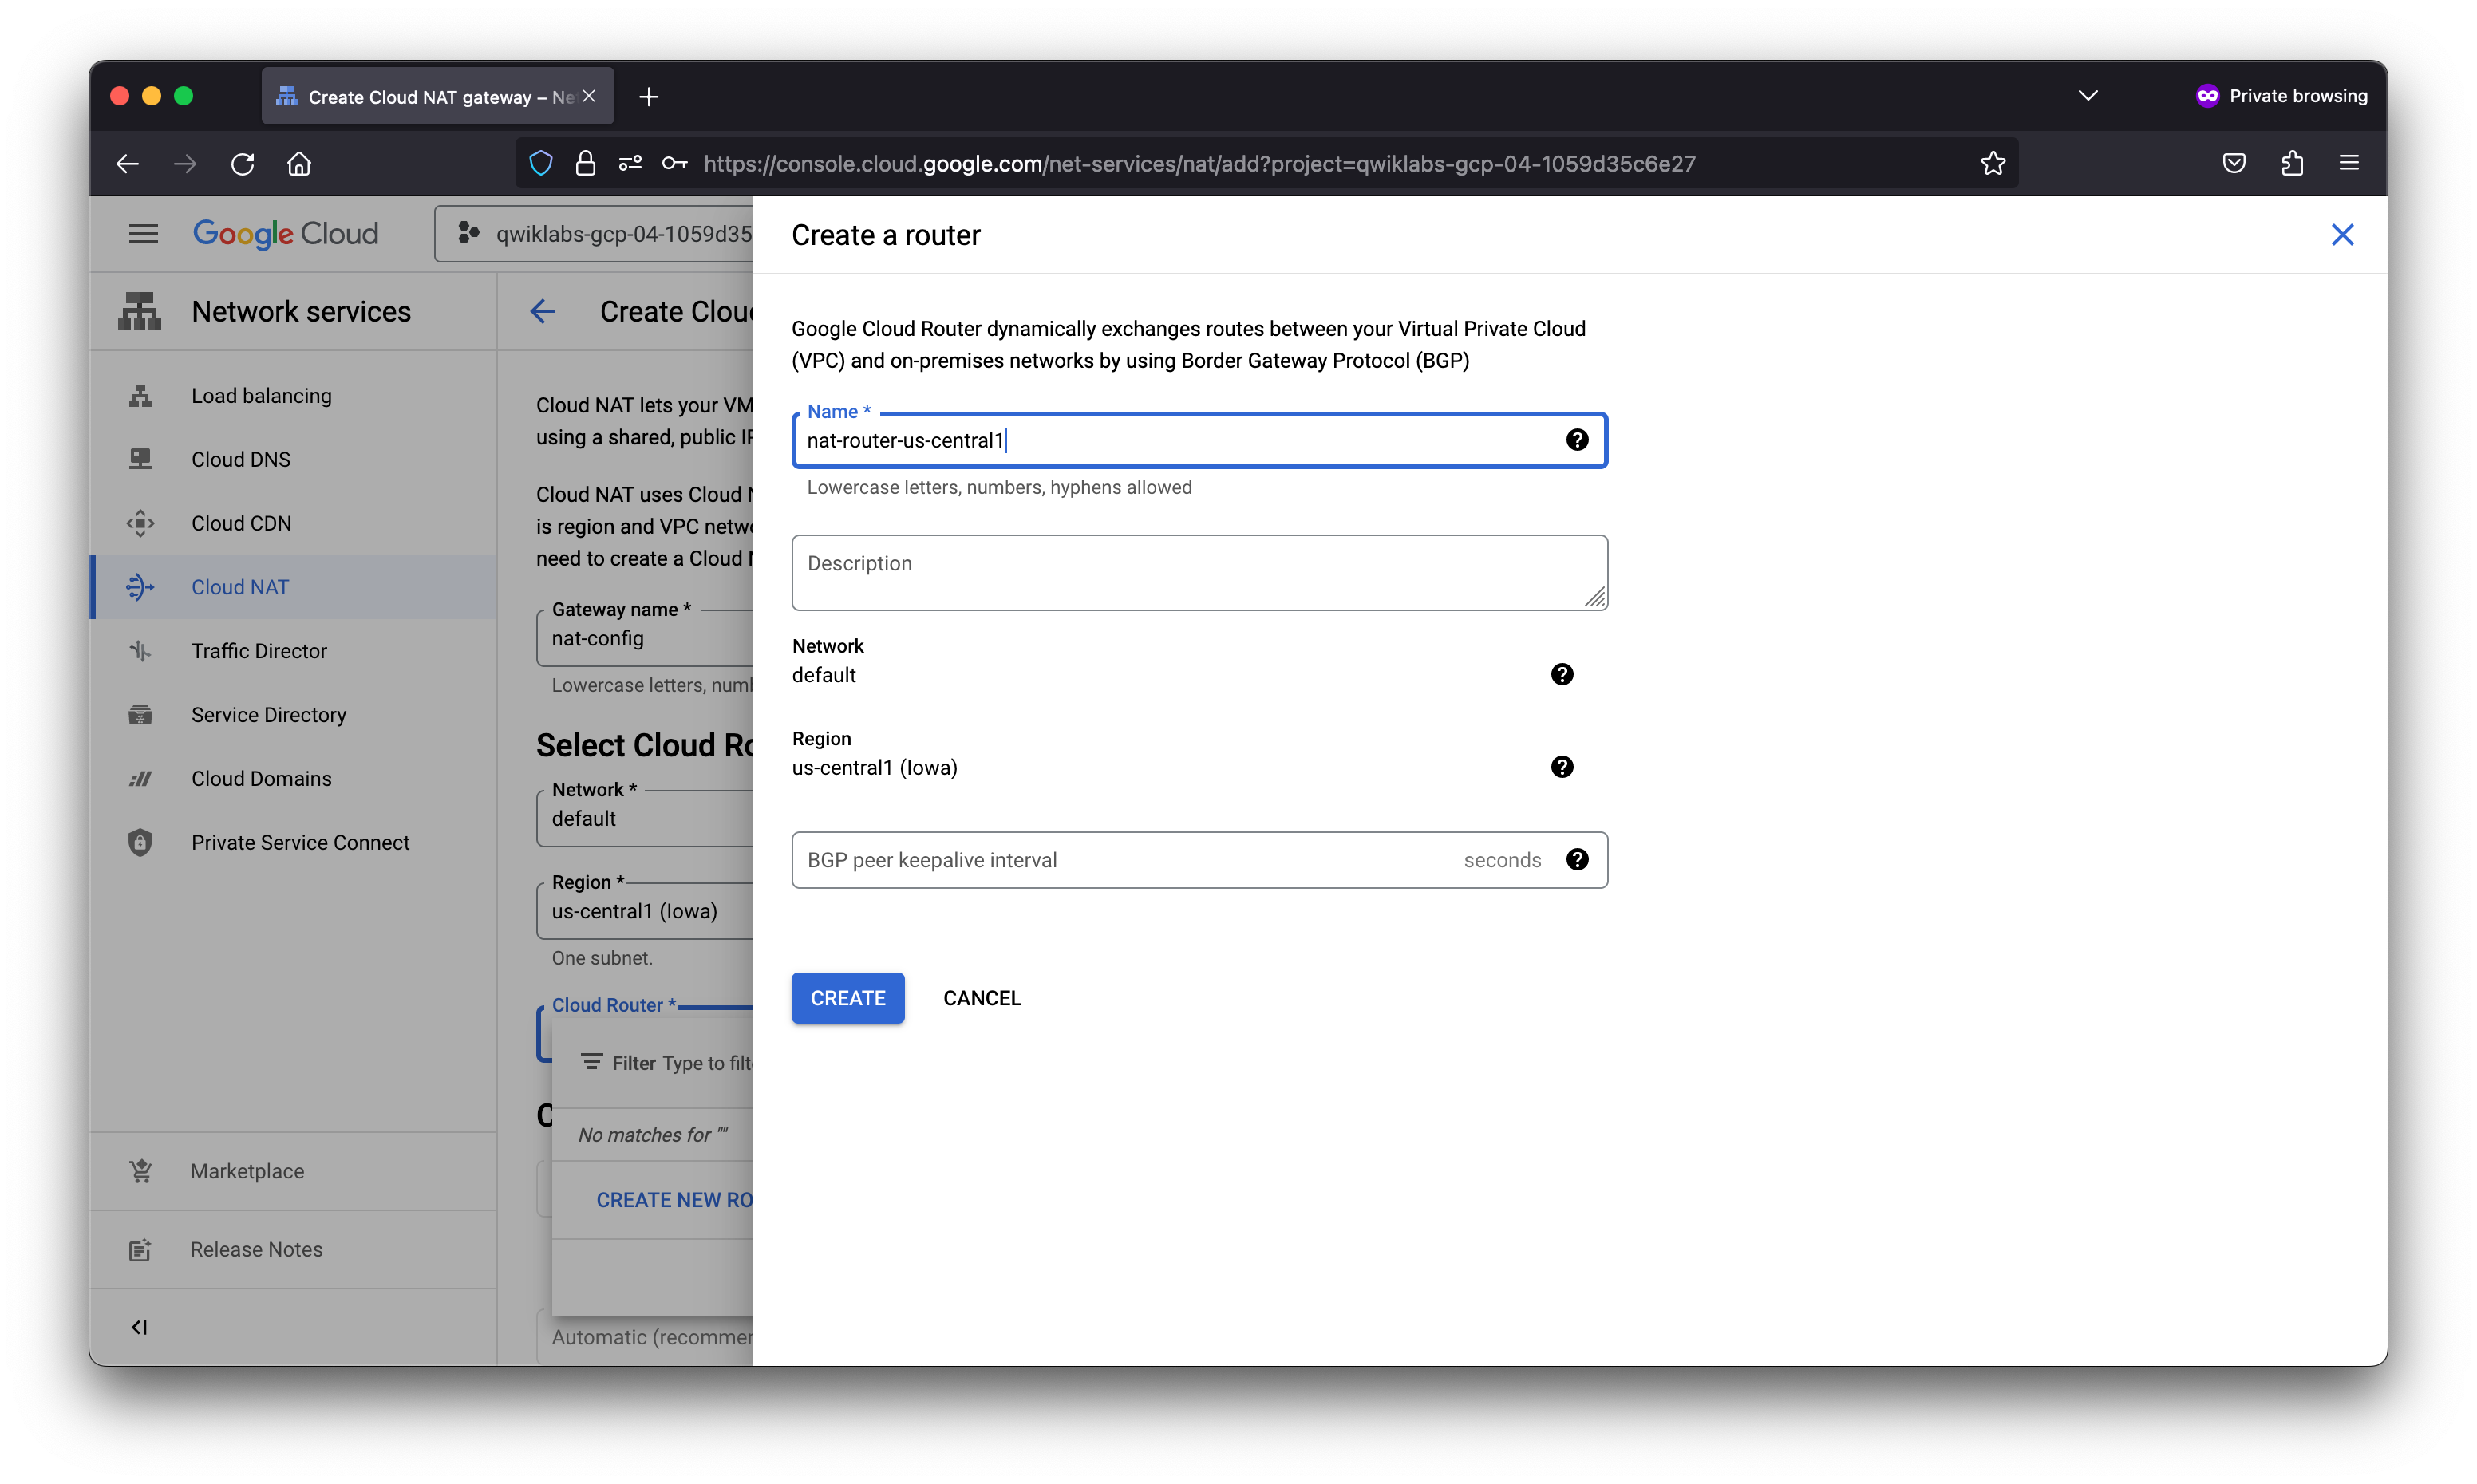
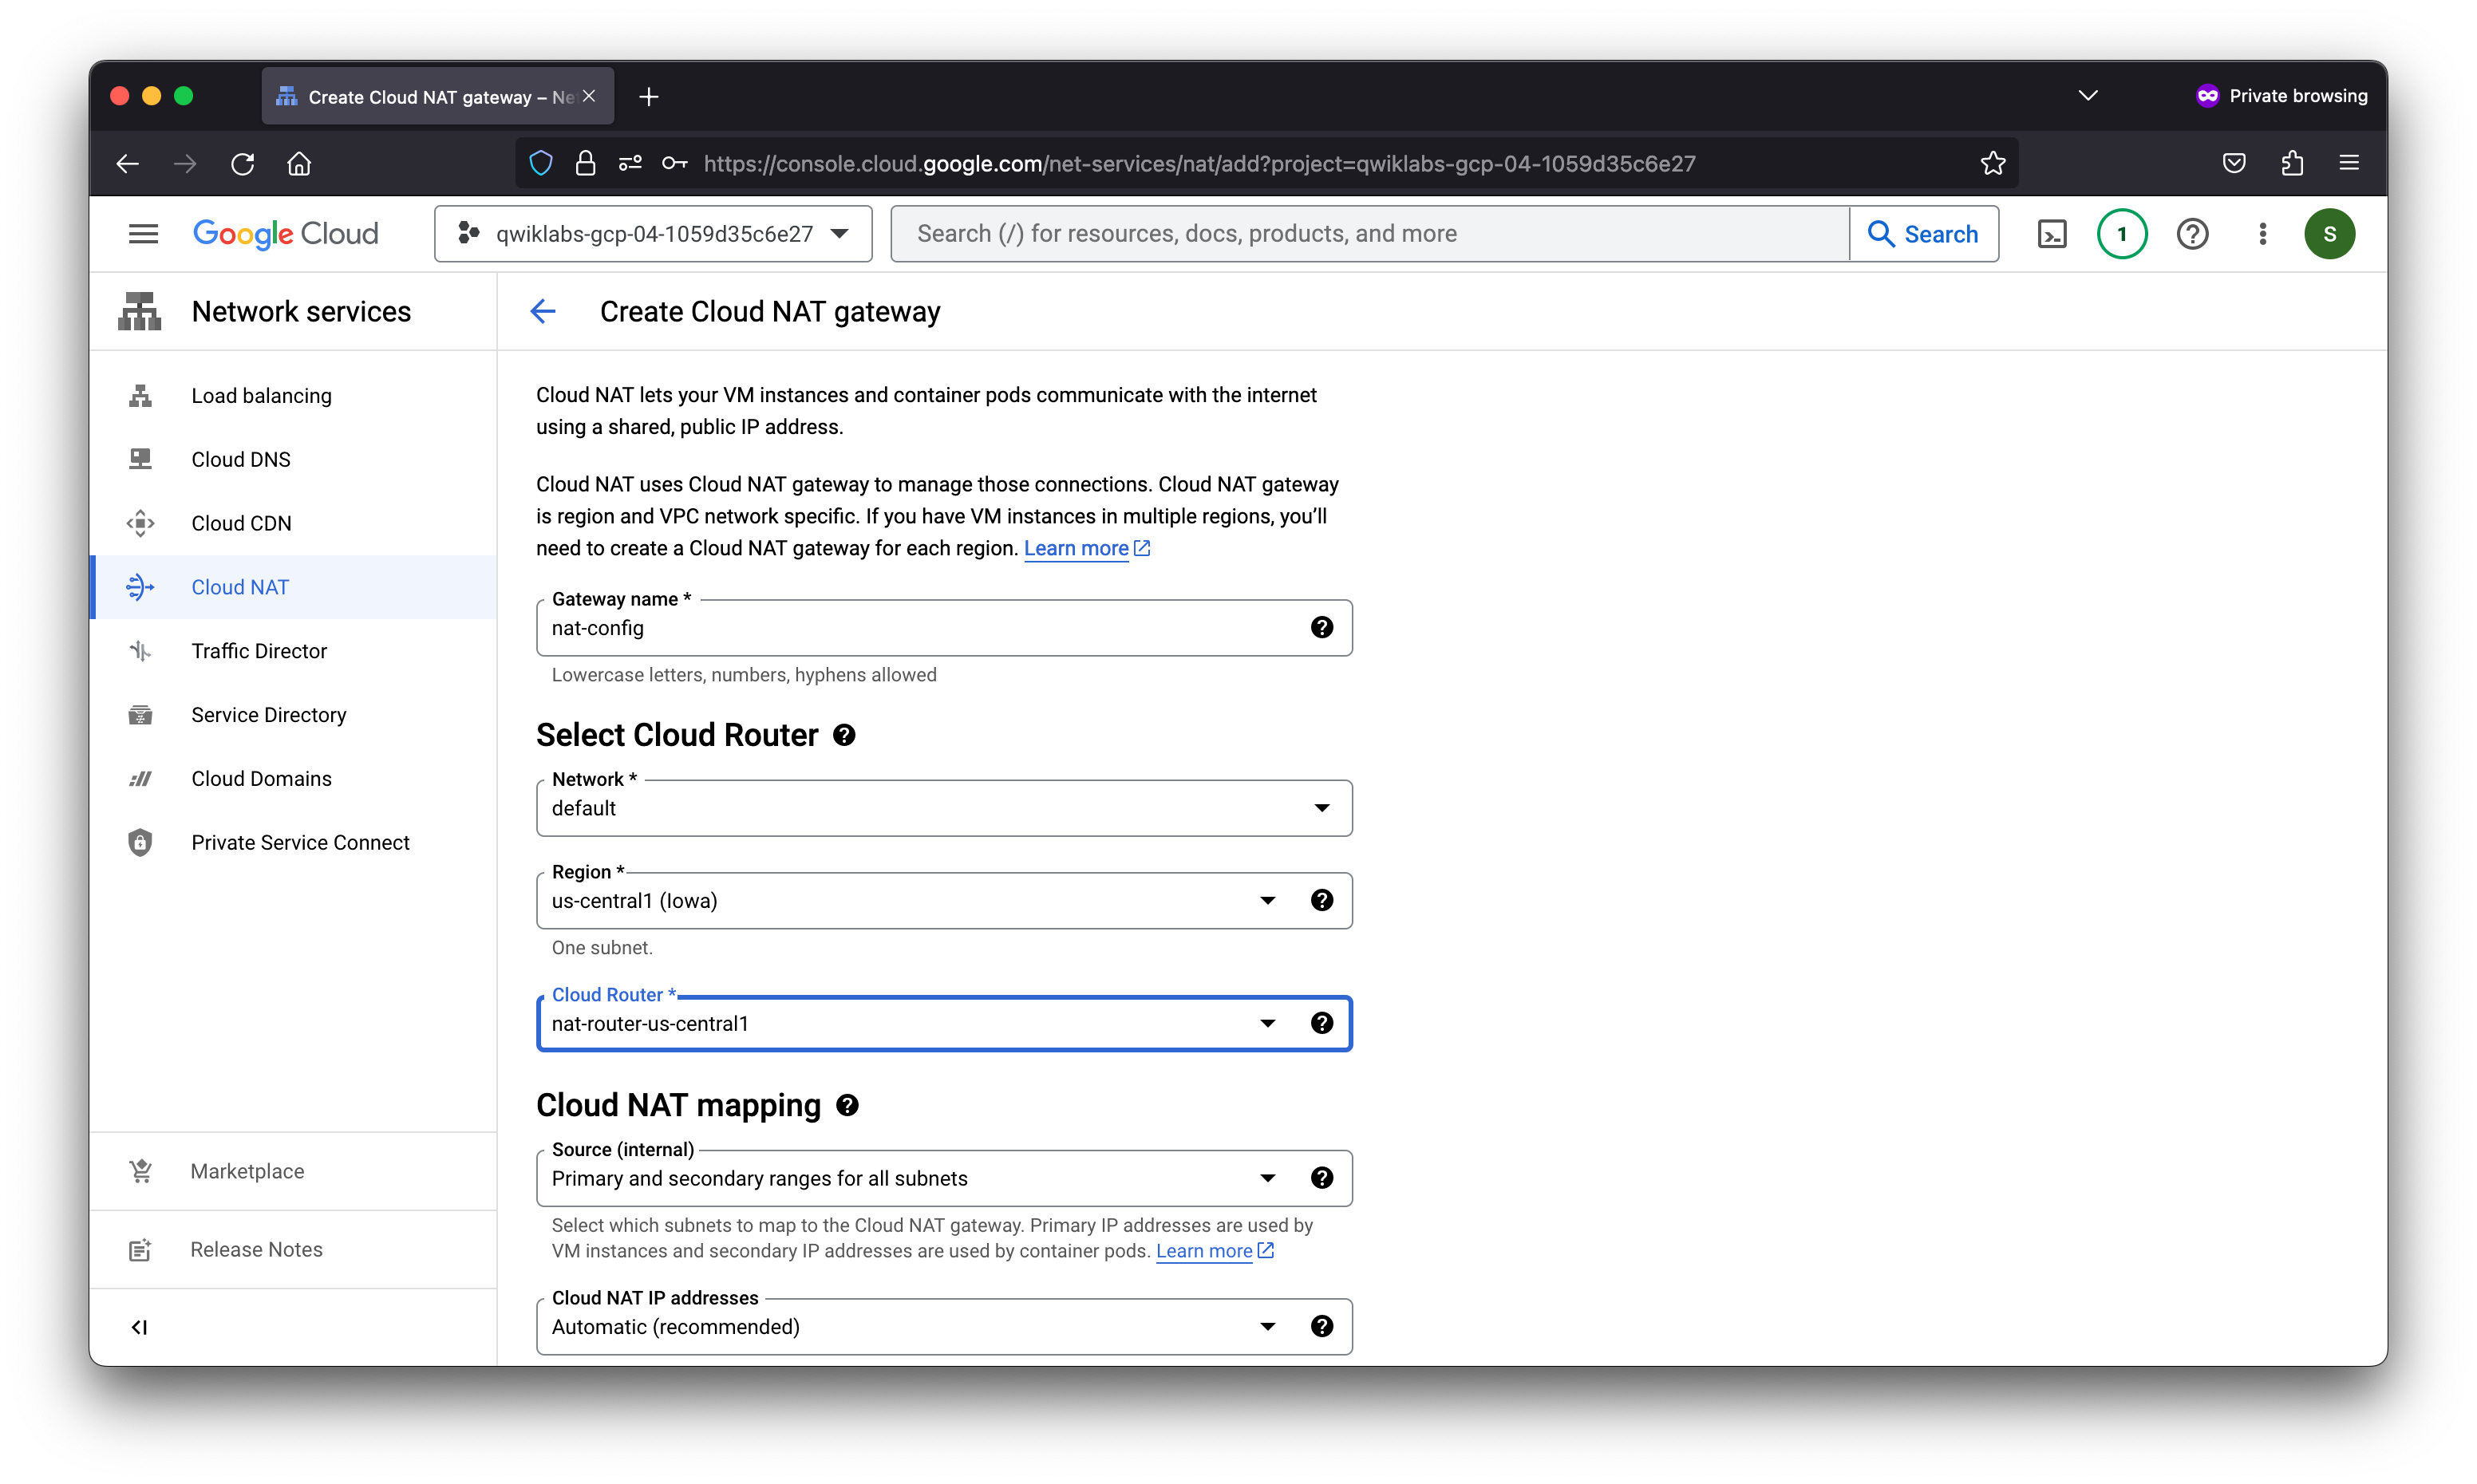
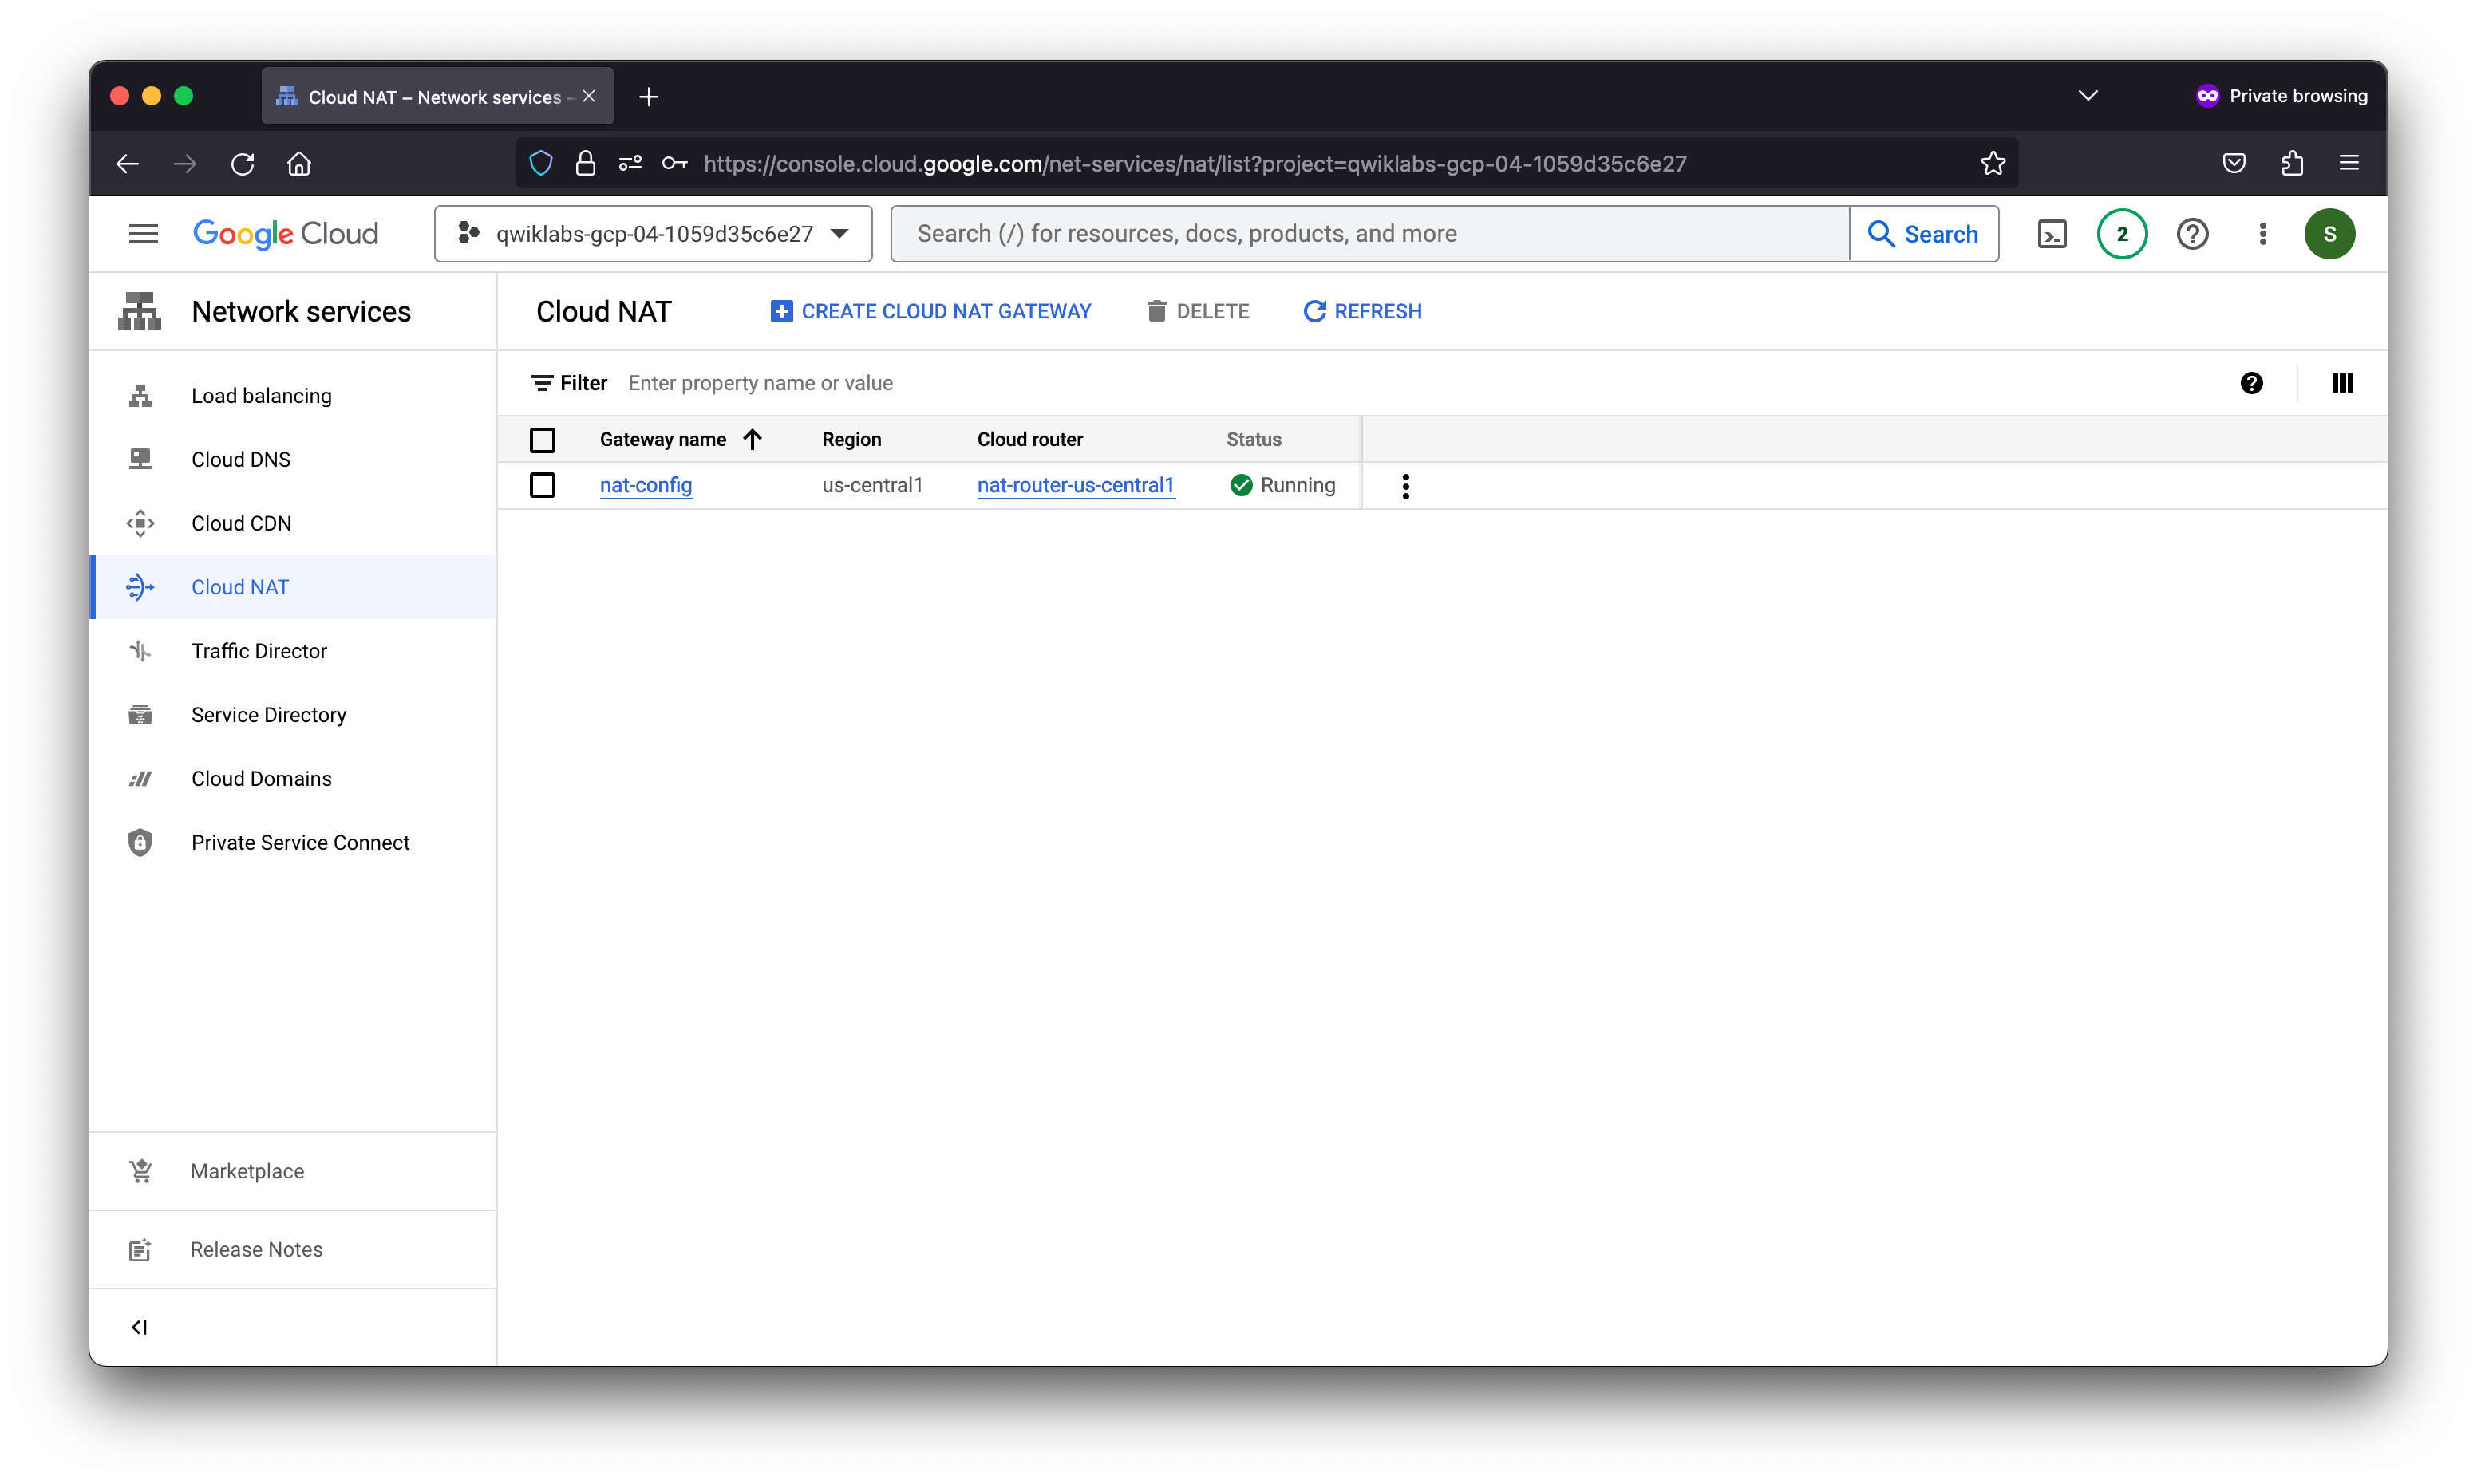
Task 2. Create a NAT configuration using Cloud Router
The Google Cloud VM backend instances that you set up in Task 3 will not be configured with external IP addresses.
Instead, you will set up the Cloud NAT service to allow these VM instances to send outbound traffic only through the Cloud NAT, and receive inbound traffic through the load balancer.
Create the Cloud Router instance
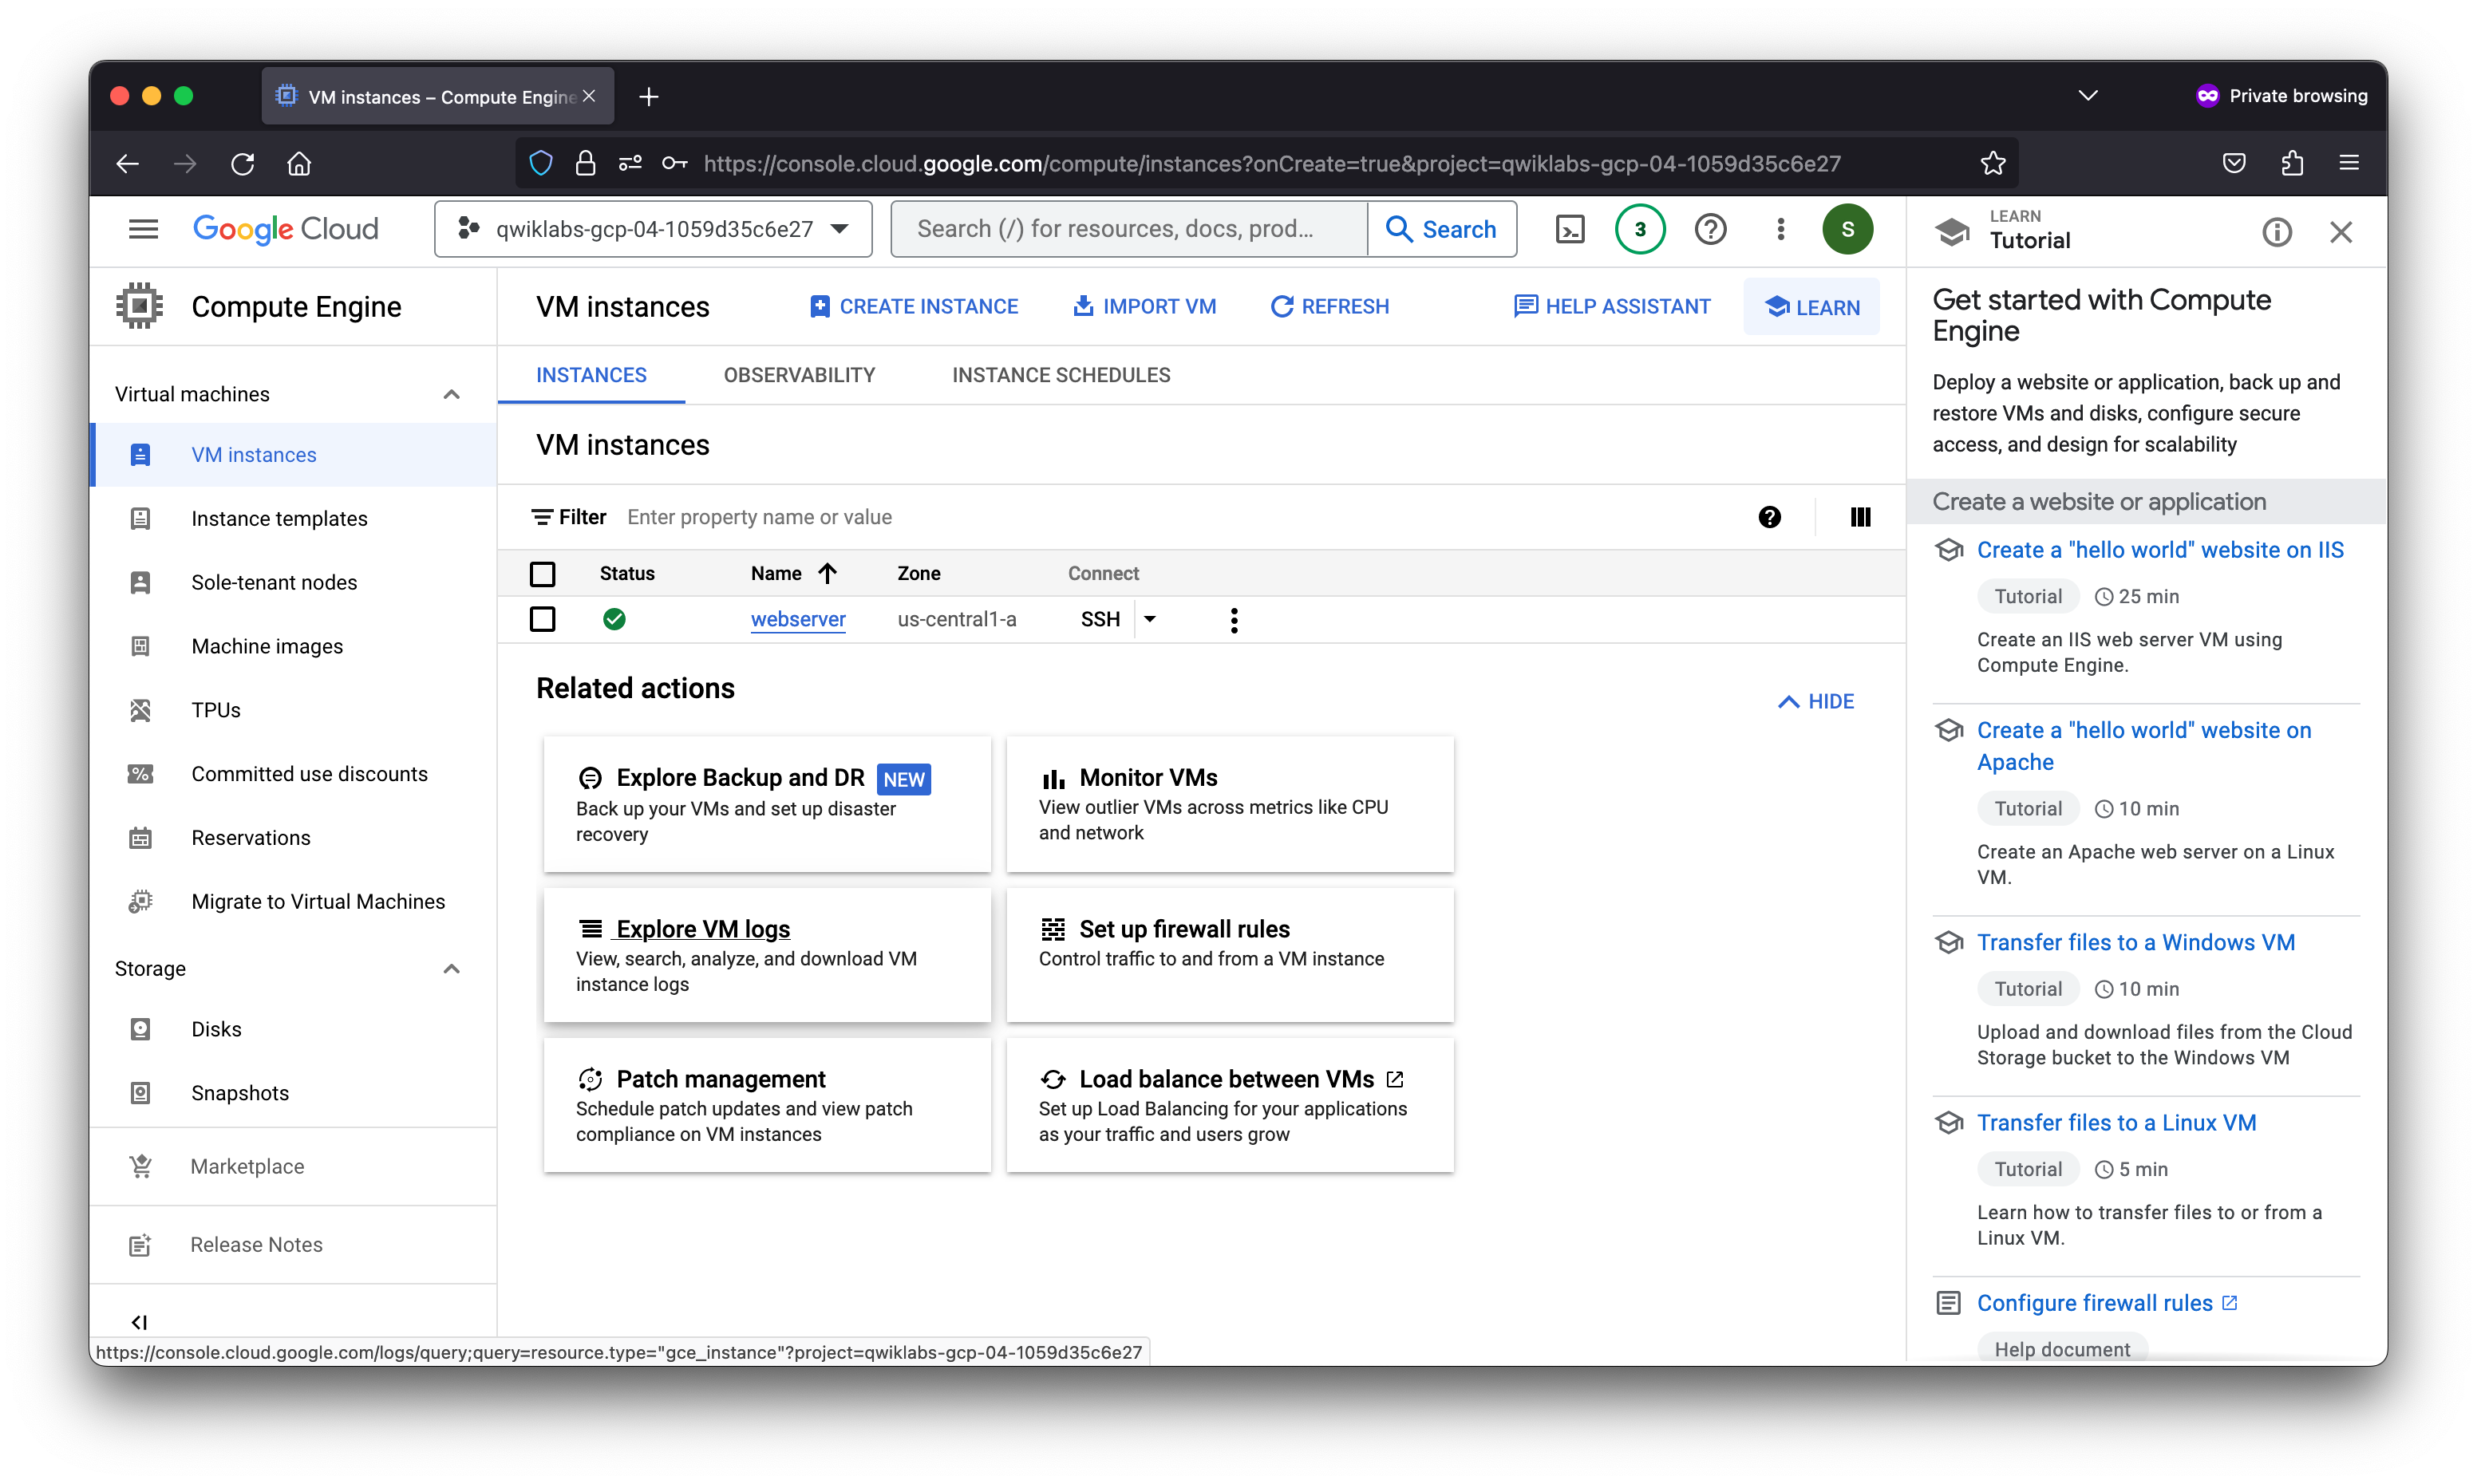
Task 3. Create a custom image for a web server
Create a custom web server image for the backend of the load balancer.
Equivalent Terraform configuration
# This code is compatible with Terraform 4.25.0 and versions that are backwards compatible to 4.25.0.
# For information about validating this Terraform code, see https://developer.hashicorp.com/terraform/tutorials/gcp-get-started/google-cloud-platform-build#format-and-validate-the-configuration

resource "google_compute_instance" "webserver" {
  boot_disk {
    auto_delete = false
    device_name = "webserver"

    initialize_params {
      image = "projects/debian-cloud/global/images/debian-10-buster-v20230411"
      size  = 10
      type  = "pd-balanced"
    }

    mode = "READ_WRITE"
  }

  can_ip_forward      = false
  deletion_protection = false
  enable_display      = false

  labels = {
    ec-src = "vm_add-tf"
  }

  machine_type = "e2-medium"

  metadata = {
    enable-oslogin = "true"
  }

  name = "webserver"

  network_interface {
    subnetwork = "projects/qwiklabs-gcp-04-1059d35c6e27/regions/us-central1/subnetworks/default"
  }

  scheduling {
    automatic_restart   = true
    on_host_maintenance = "MIGRATE"
    preemptible         = false
    provisioning_model  = "STANDARD"
  }

  service_account {
    email  = "425659184878-compute@developer.gserviceaccount.com"
    scopes = ["https://www.googleapis.com/auth/devstorage.read_only", "https://www.googleapis.com/auth/logging.write", "https://www.googleapis.com/auth/monitoring.write", "https://www.googleapis.com/auth/service.management.readonly", "https://www.googleapis.com/auth/servicecontrol", "https://www.googleapis.com/auth/trace.append"]
  }

  shielded_instance_config {
    enable_integrity_monitoring = true
    enable_secure_boot          = false
    enable_vtpm                 = true
  }

  tags = ["allow-health-checks"]
  zone = "us-central1-a"
}
On the Webserver VM
Linux webserver 4.19.0-23-cloud-amd64 #1 SMP Debian 4.19.269-1 (2022-12-20) x86_64

The programs included with the Debian GNU/Linux system are free software;
the exact distribution terms for each program are described in the
individual files in /usr/share/doc/*/copyright.

Debian GNU/Linux comes with ABSOLUTELY NO WARRANTY, to the extent
permitted by applicable law.
Creating directory '/home/student-01-a0075c49c713'.
student-01-a0075c49c713@webserver:~$ sudo apt-get update
Get:1 http://packages.cloud.google.com/apt google-compute-engine-buster-stable InRelease [5136 B]
{snip}
Created symlink /etc/systemd/system/multi-user.target.wants/apache-htcacheclean.service → /lib/systemd/system/apache-htcacheclean.service.
Processing triggers for systemd (241-7~deb10u9) ...
Processing triggers for man-db (2.8.5-2) ...
Processing triggers for libc-bin (2.28-10+deb10u2) ...
student-01-a0075c49c713@webserver:~$
student-01-a0075c49c713@webserver:~$ sudo service apache2 start
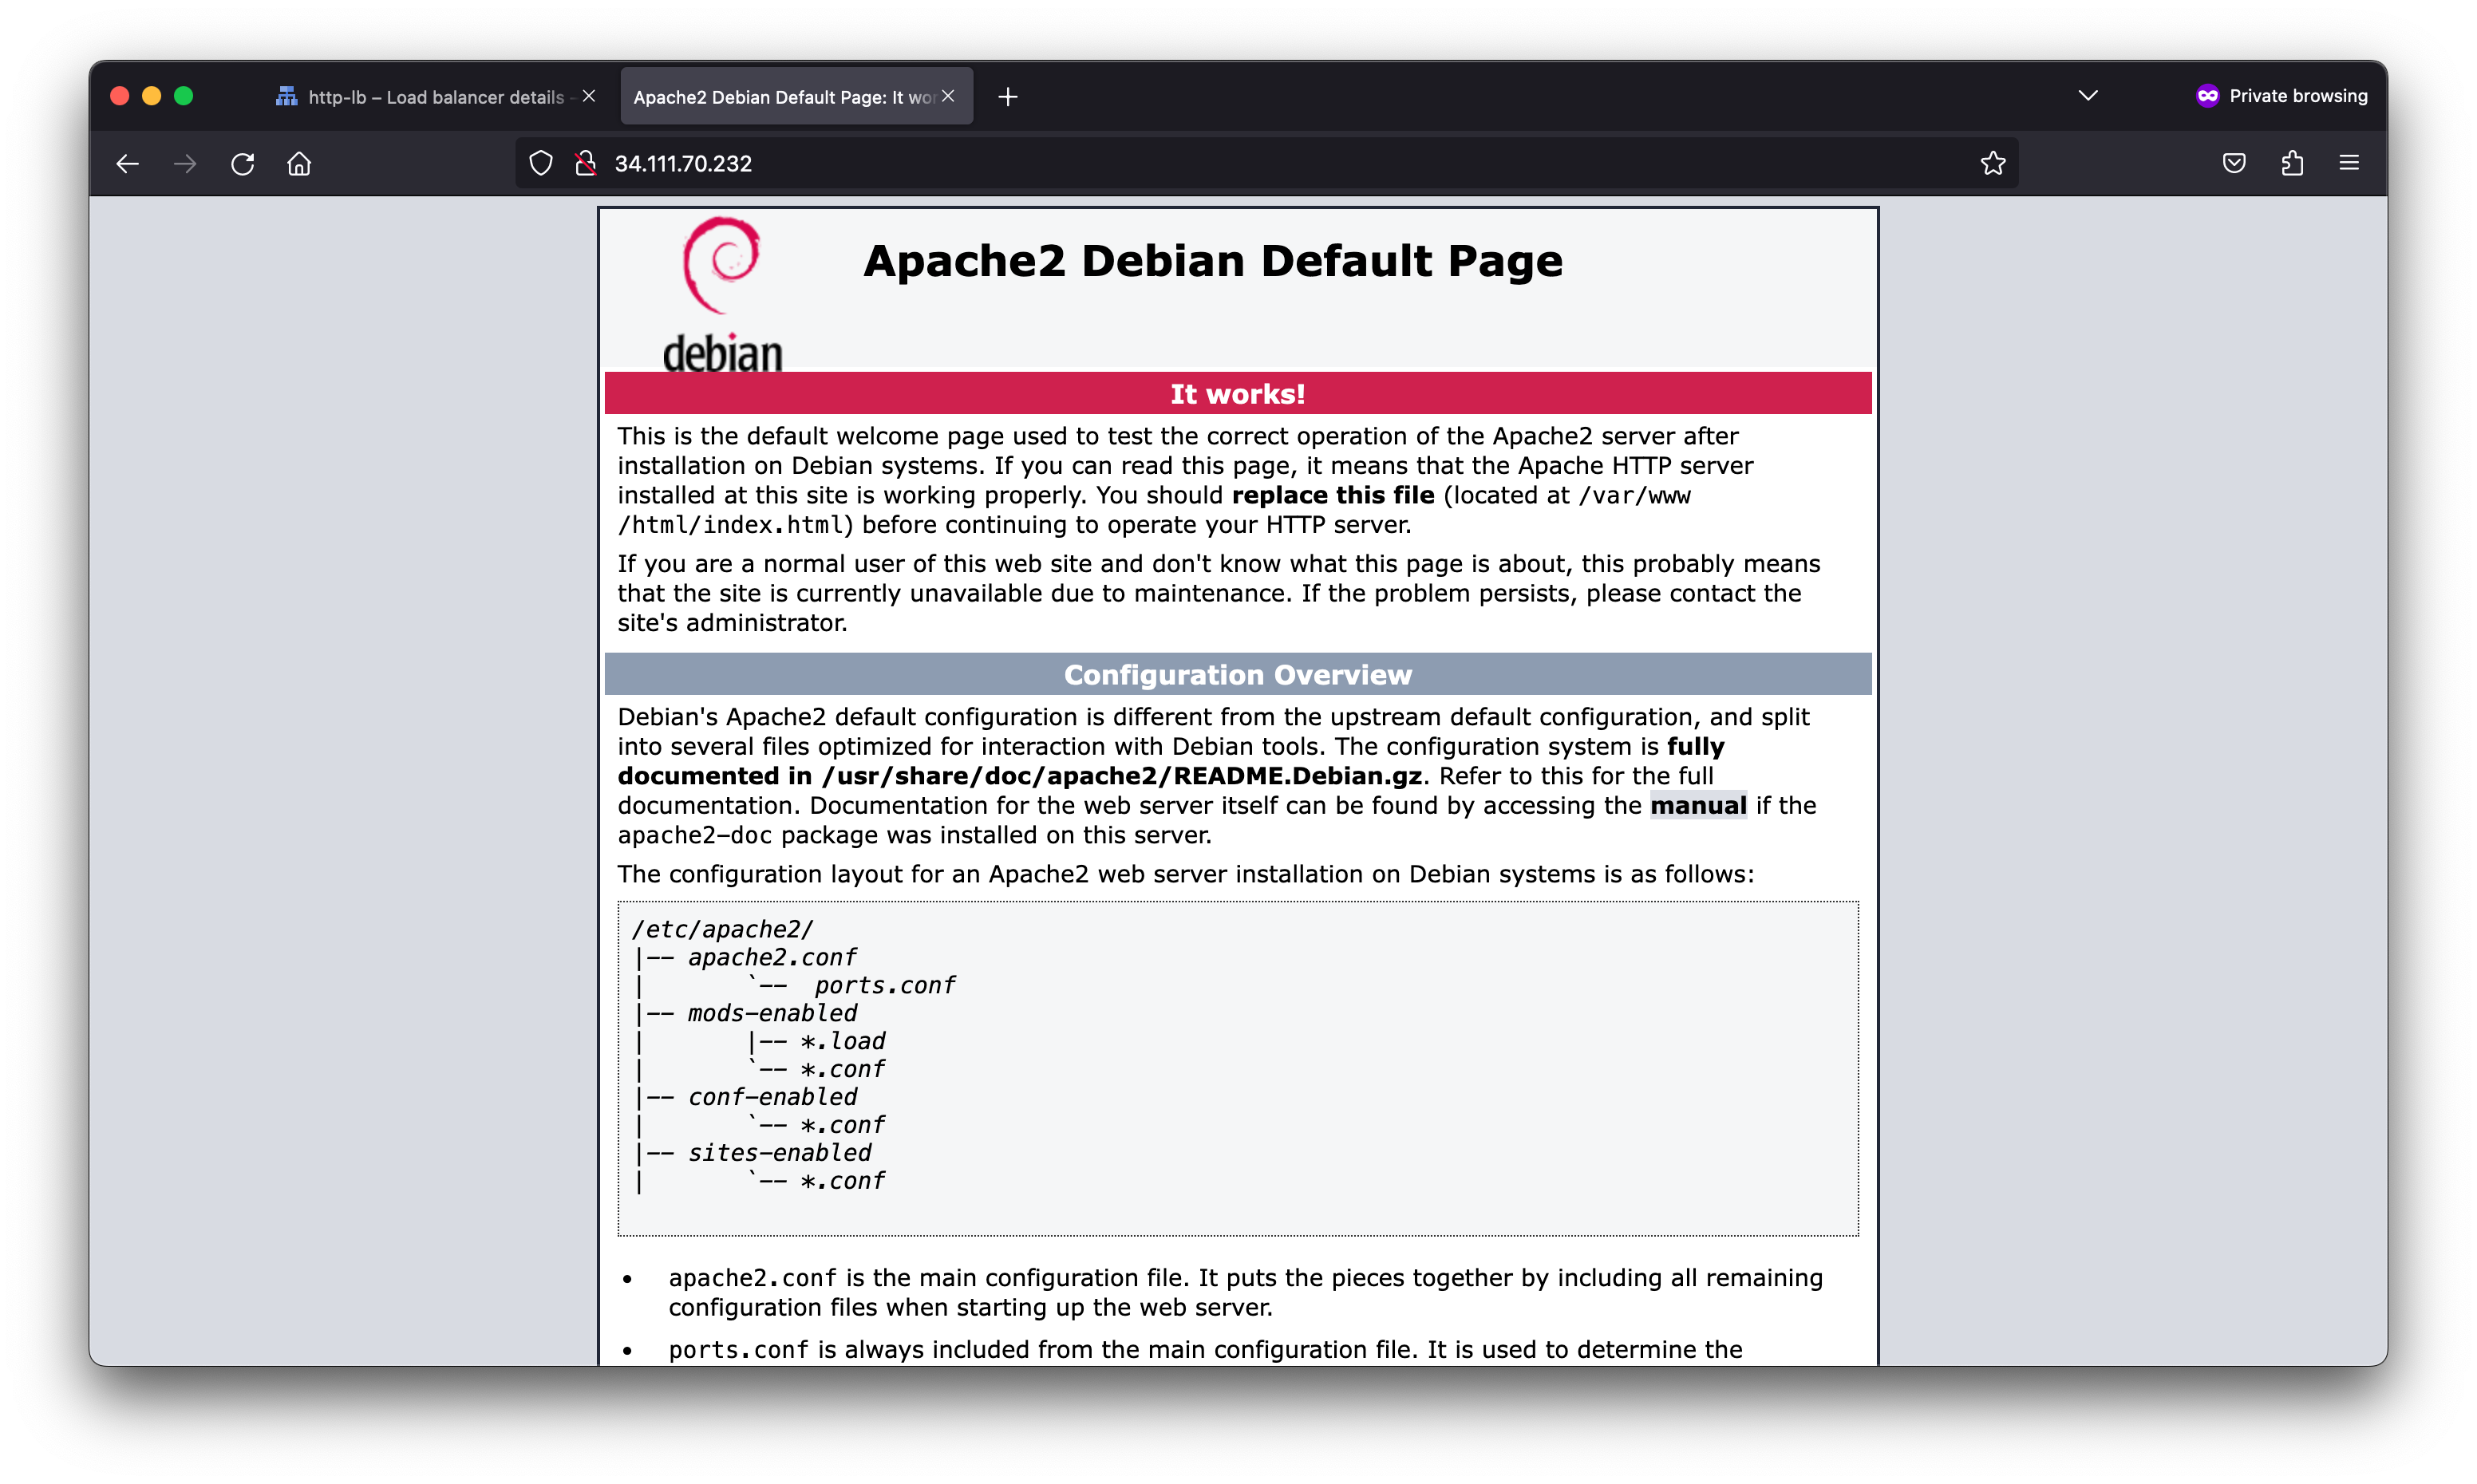
student-01-a0075c49c713@webserver:~$ curl localhost
<!DOCTYPE html PUBLIC "-//W3C//DTD XHTML 1.0 Transitional//EN" "http://www.w3.org/TR/xhtml1/DTD/xhtml1-transitional.dtd">
<html xmlns="http://www.w3.org/1999/xhtml">
<head>
<meta http-equiv="Content-Type" content="text/html; charset=UTF-8" />
<title>Apache2 Debian Default Page: It works</title>
{snip}
<div class="content_section_text">
<p>
Please use the <tt>reportbug</tt> tool to report bugs in the
Apache2 package with Debian. However, check <a
href="http://bugs.debian.org/cgi-bin/pkgreport.cgi?ordering=normal;archive=0;src=apache2;repeatmerged=0"
rel="nofollow">existing bug reports</a> before reporting a new bug.
</p>
<p>
Please report bugs specific to modules (such as PHP and others)
to respective packages, not to the web server itself.
</p>
</div>
</div>
</div>
<div class="validator">
</div>
</body>
</html>
student-01-a0075c49c713@webserver:~$
student-01-a0075c49c713@webserver:~$ sudo update-rc.d apache2 enable
student-01-a0075c49c713@webserver:~$
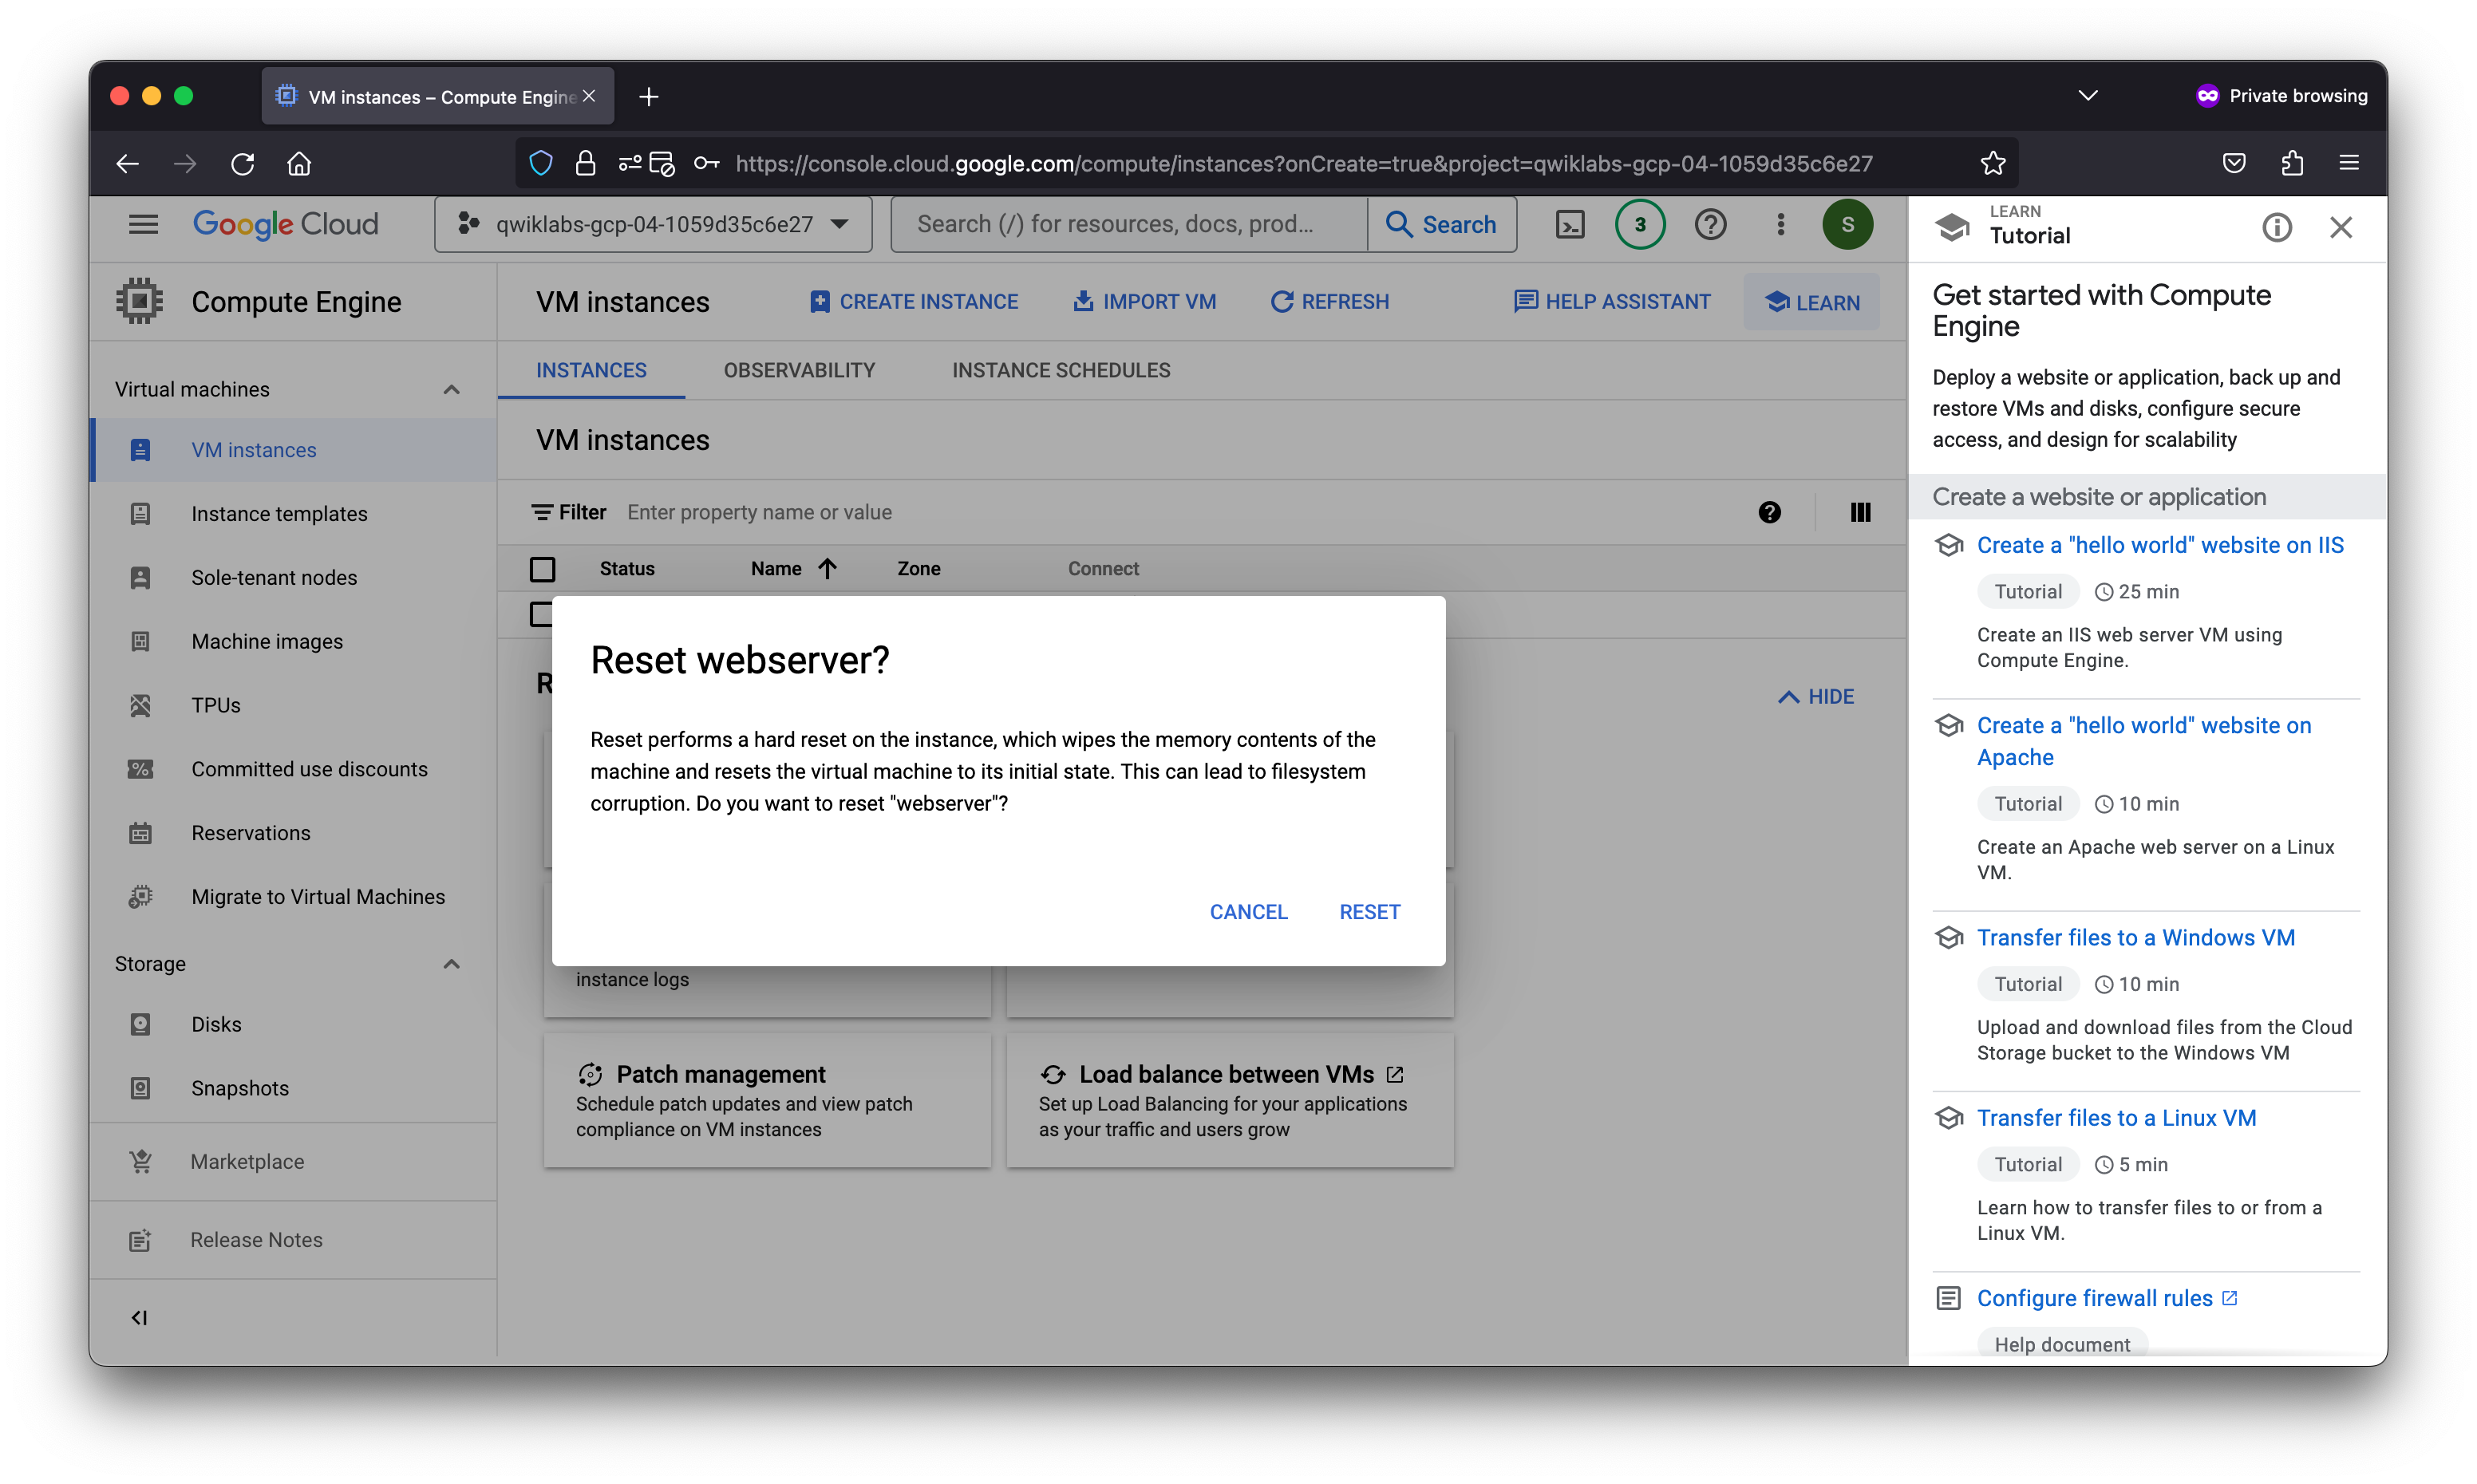
After resetting the VM
Linux webserver 4.19.0-23-cloud-amd64 #1 SMP Debian 4.19.269-1 (2022-12-20) x86_64

The programs included with the Debian GNU/Linux system are free software;
the exact distribution terms for each program are described in the
individual files in /usr/share/doc/*/copyright.

Debian GNU/Linux comes with ABSOLUTELY NO WARRANTY, to the extent
permitted by applicable law.
Last login: Tue May  2 02:36:27 2023 from 35.235.241.19
student-01-a0075c49c713@webserver:~$ sudo service apache2 status
● apache2.service - The Apache HTTP Server
   Loaded: loaded (/lib/systemd/system/apache2.service; enabled; vendor preset: enabled)
   Active: active (running) since Tue 2023-05-02 02:38:59 UTC; 27s ago
     Docs: https://httpd.apache.org/docs/2.4/
  Process: 414 ExecStart=/usr/sbin/apachectl start (code=exited, status=0/SUCCESS)
 Main PID: 459 (apache2)
    Tasks: 55 (limit: 4663)
   Memory: 13.6M
   CGroup: /system.slice/apache2.service
           ├─459 /usr/sbin/apache2 -k start
           ├─460 /usr/sbin/apache2 -k start
           └─461 /usr/sbin/apache2 -k start

May 02 02:38:58 webserver systemd[1]: Starting The Apache HTTP Server...
May 02 02:38:59 webserver systemd[1]: Started The Apache HTTP Server.
student-01-a0075c49c713@webserver:~$
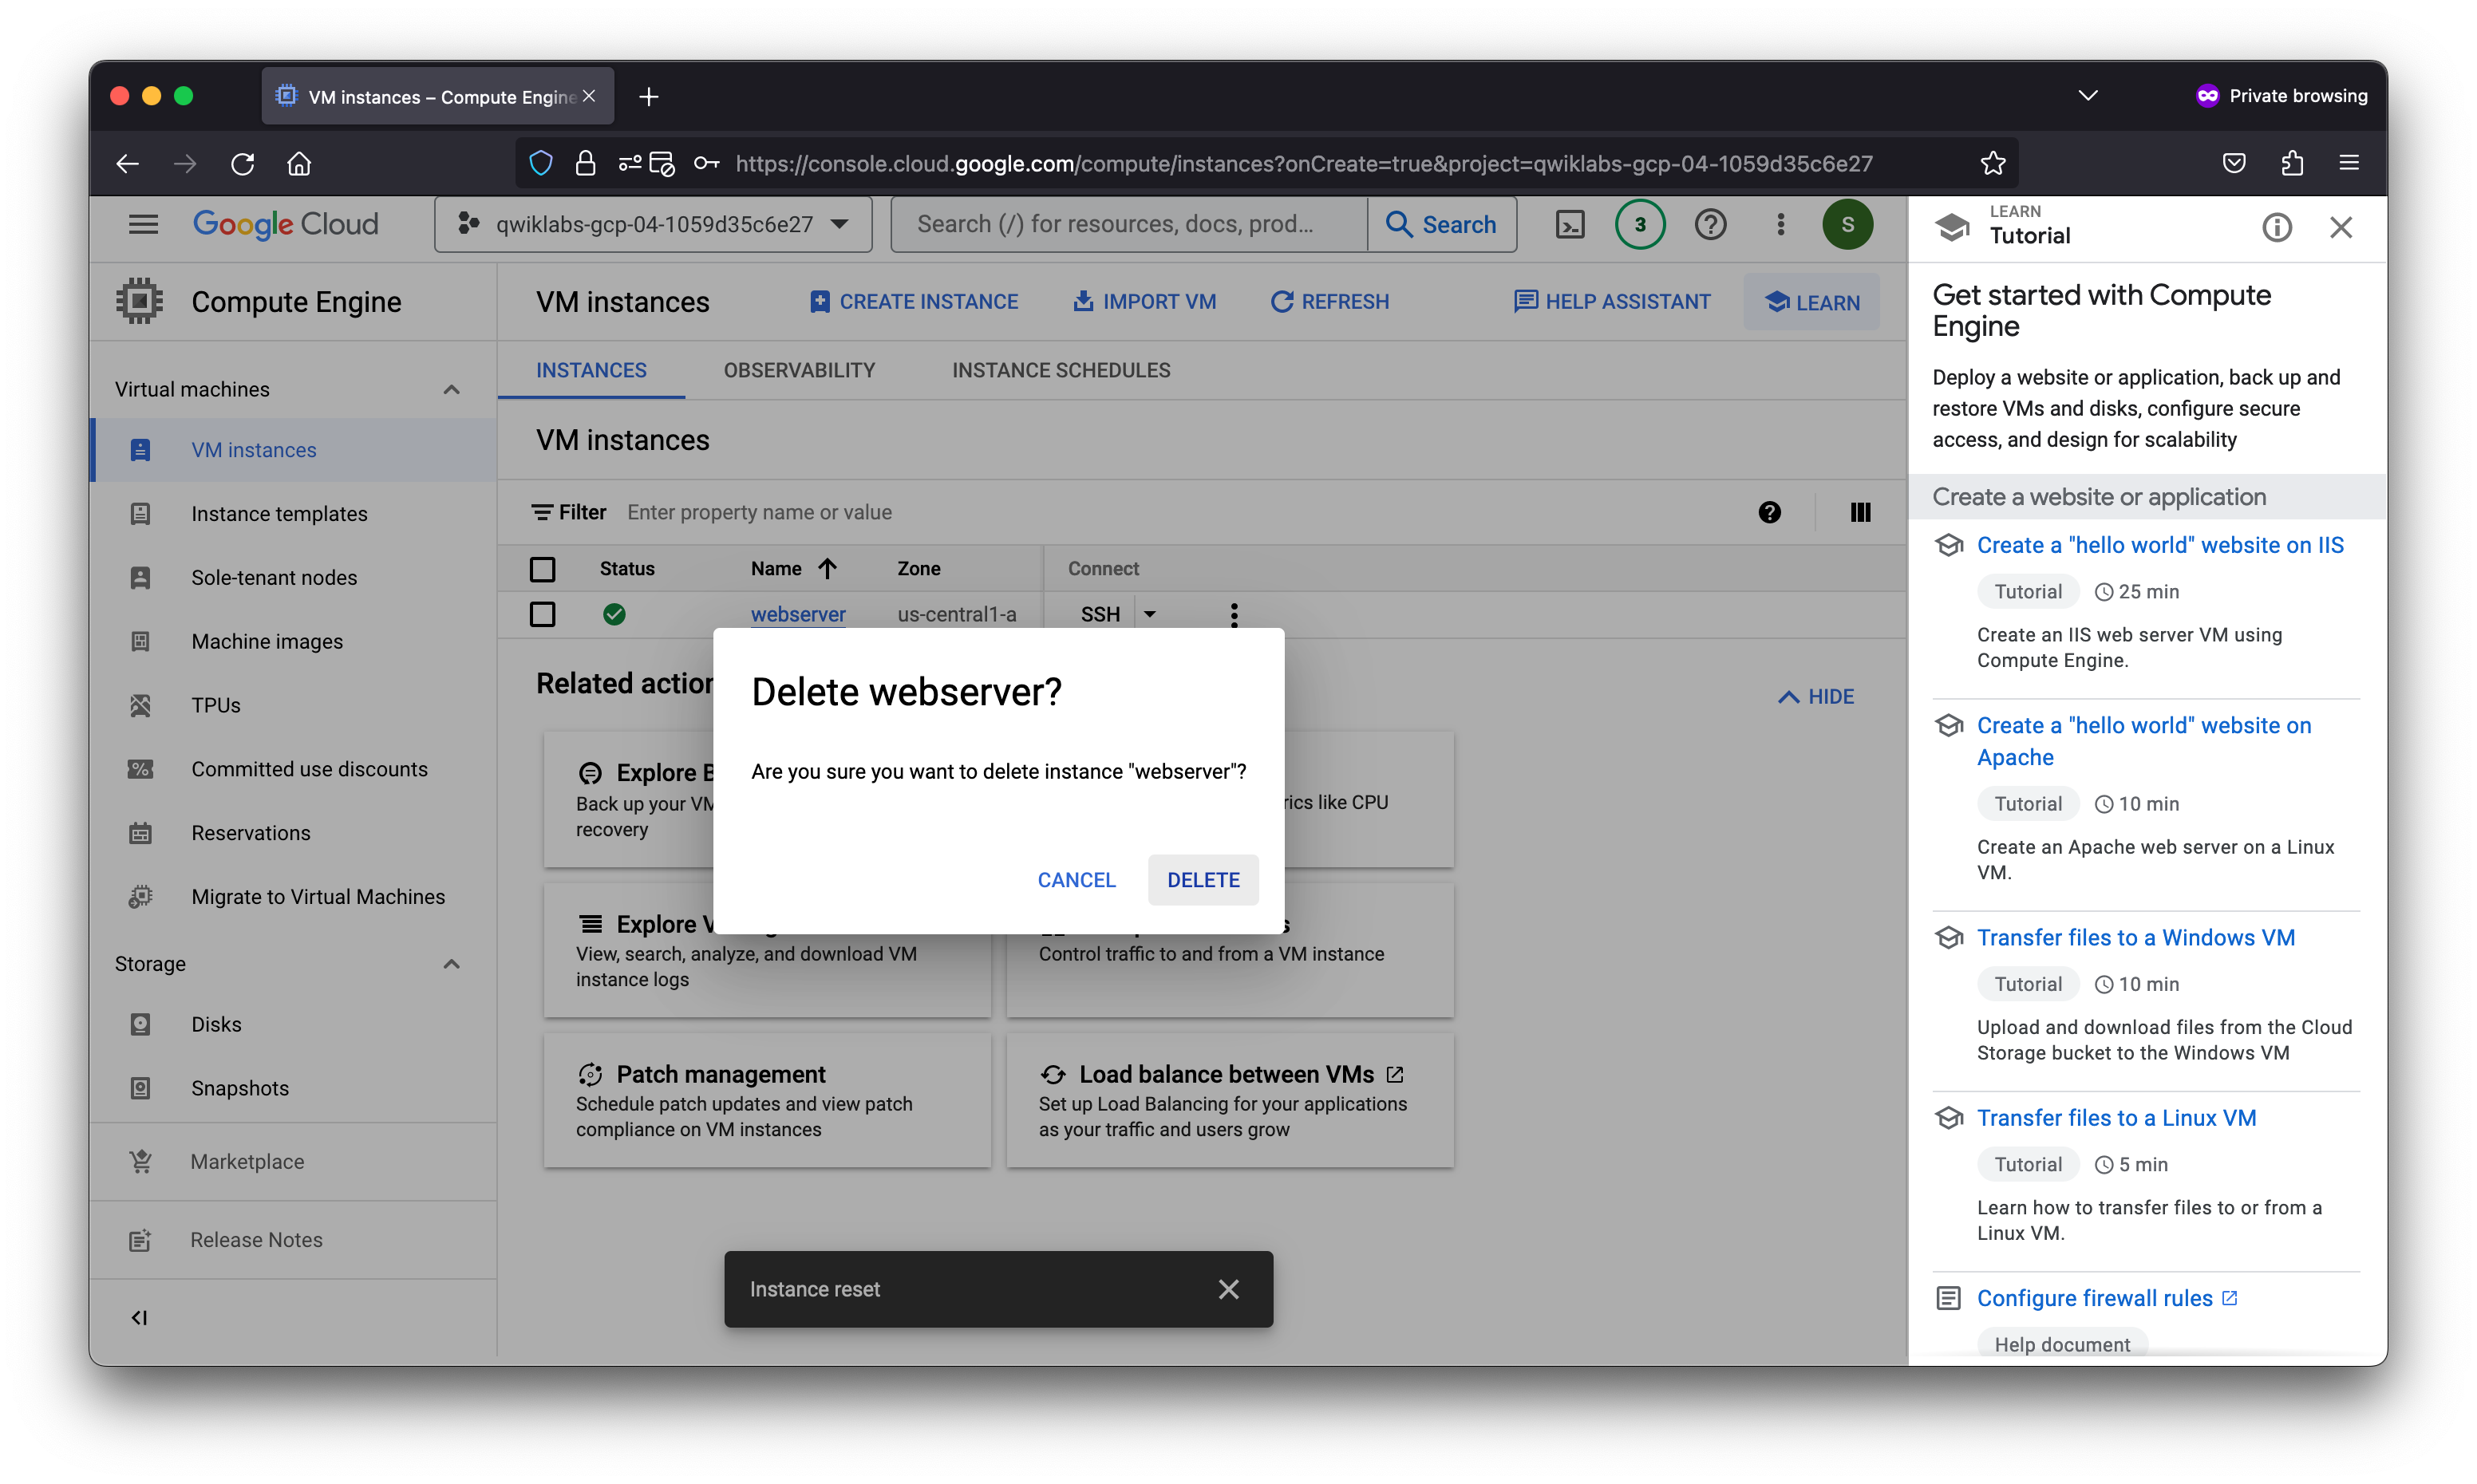
Prepare the disk to create a custom image
Verify that the boot disk will not be deleted when the instance is deleted.
- On the VM instances page, click webserver to view the VM instance details.
- Under Storage > Boot disk, verify that When deleting instance is set to Keep disk.
- Return to the VM instances page, select webserver, and then click More actions (
) .
- Click Delete.
- In the confirmation dialog, click Delete.
- In the left pane, click Disks and verify that the webserver disk exists.
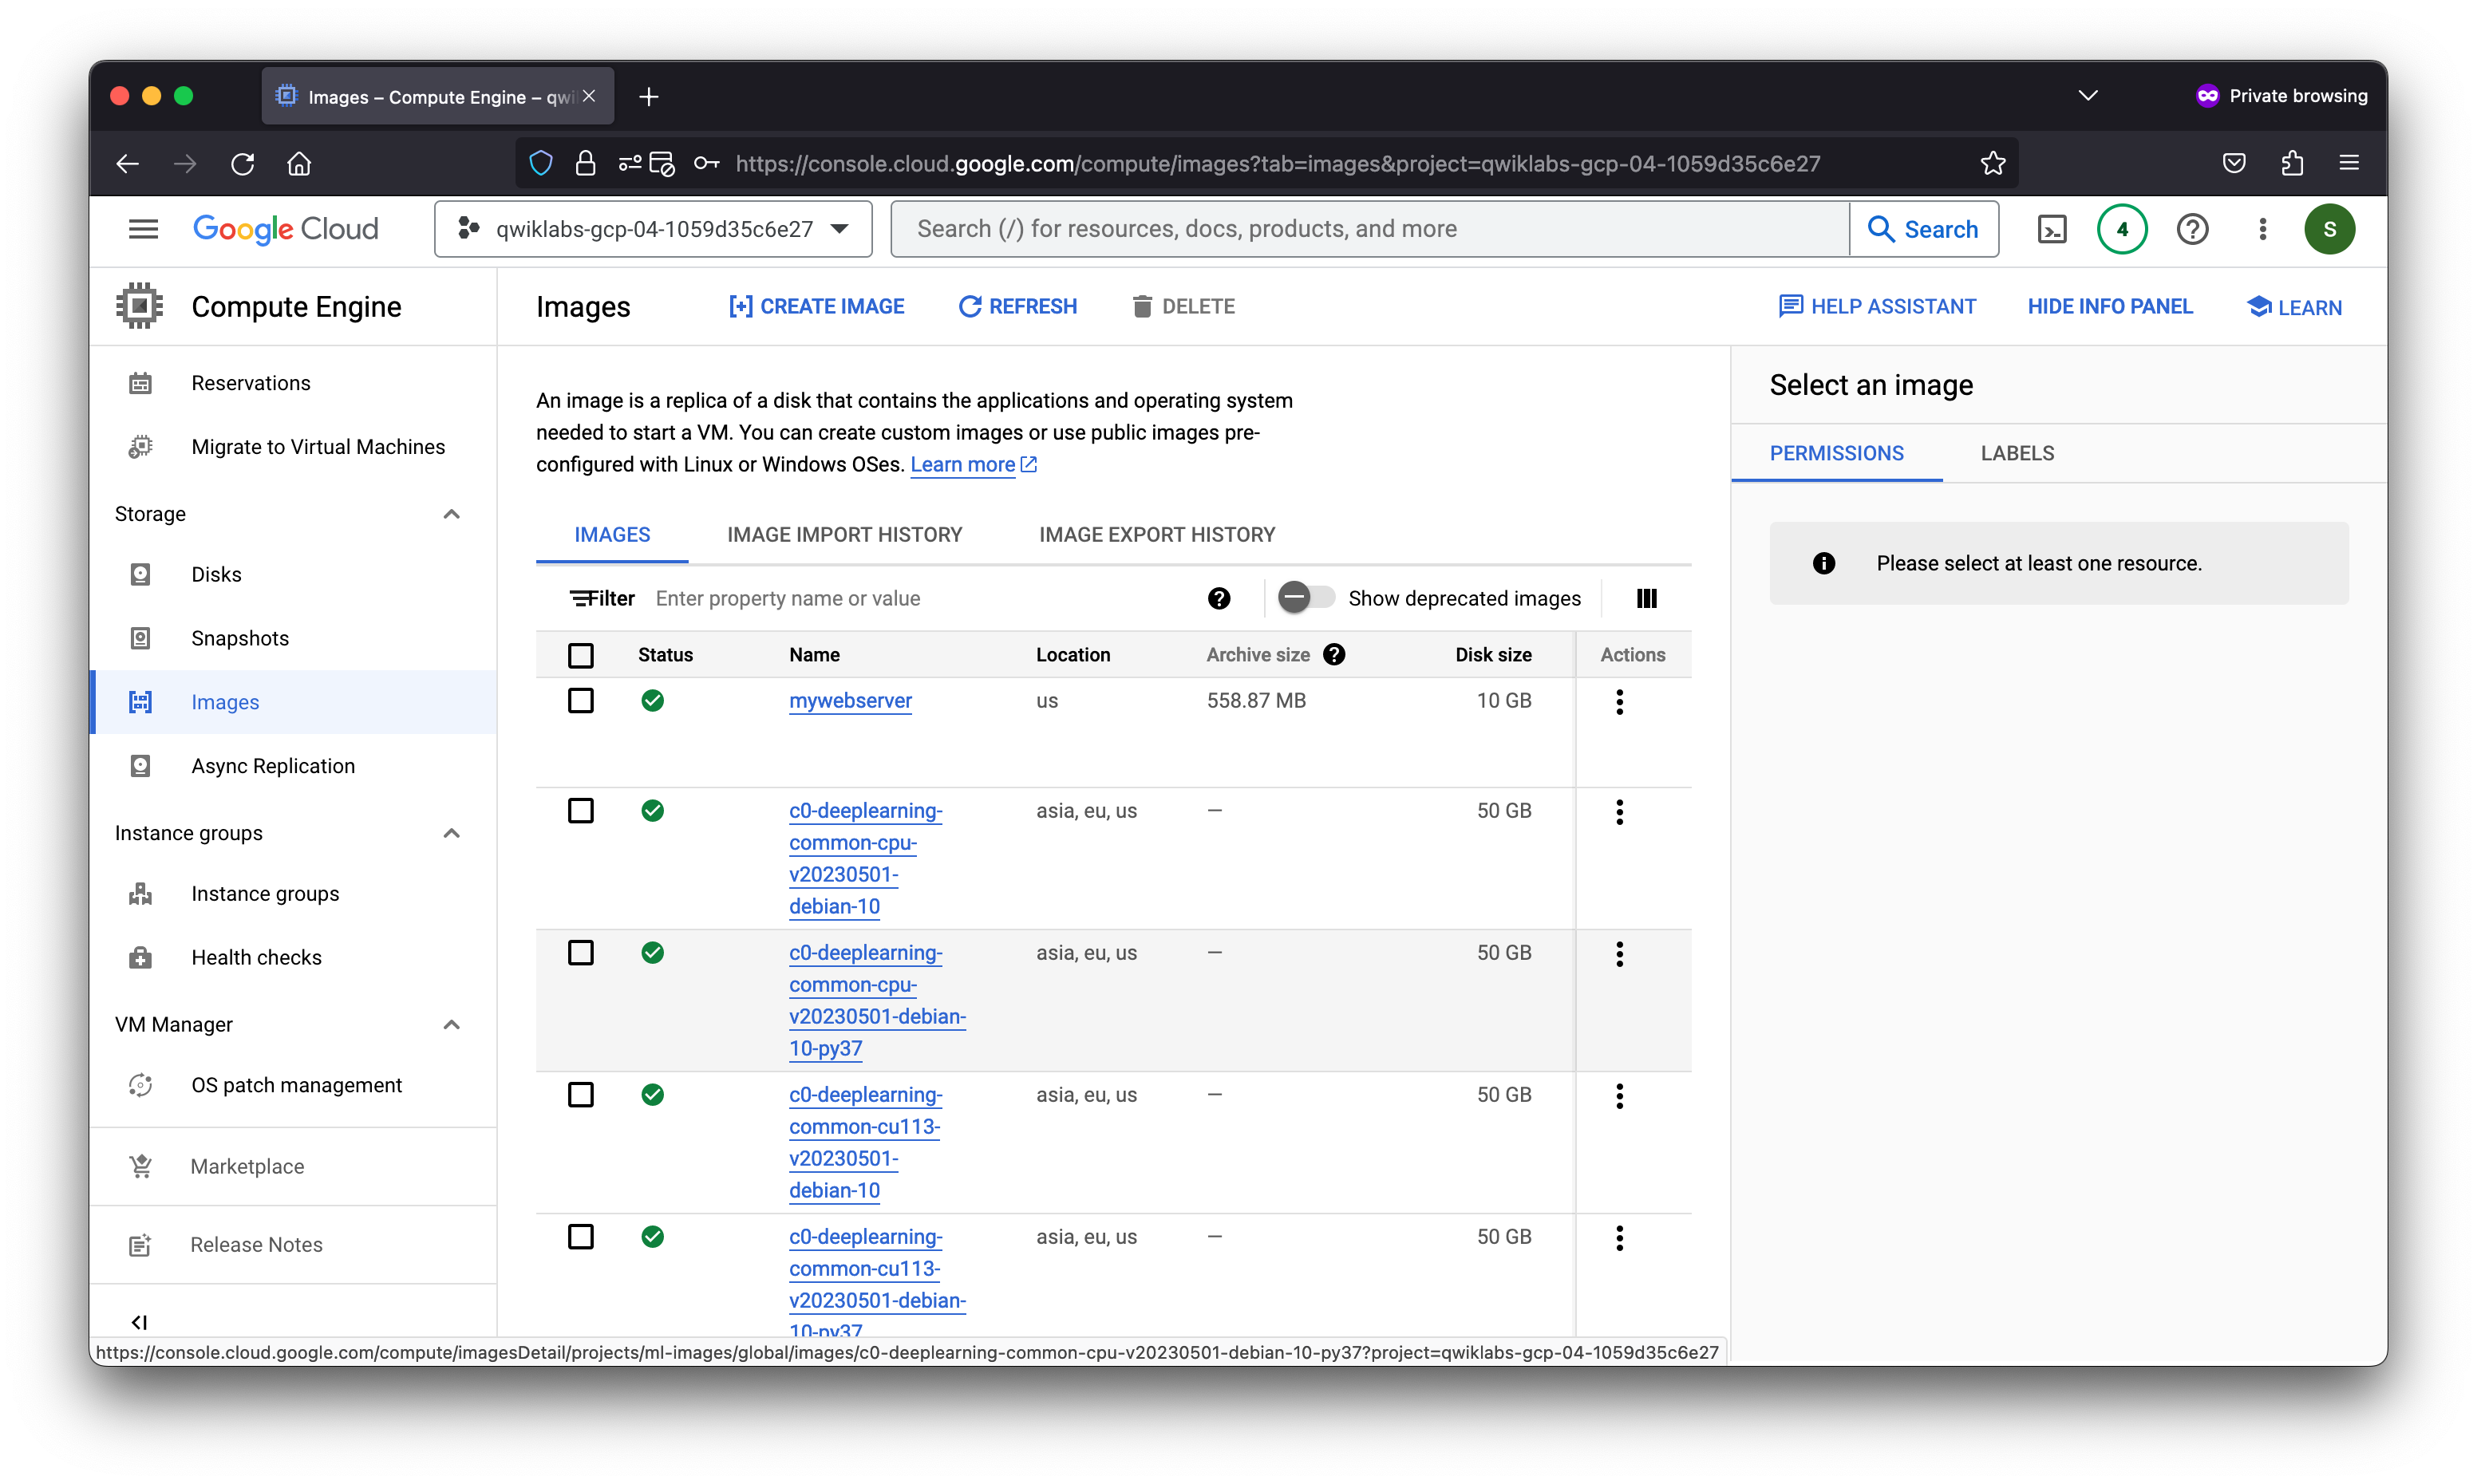
Create the custom image
- In the left pane, click Images.
- Click Create image.
- Specify the following, and leave the remaining settings as their defaults:
gcloud compute images create mywebserver --project=qwiklabs-gcp-04-1059d35c6e27 --source-disk=webserver --source-disk-zone=us-central1-a --storage-location=us
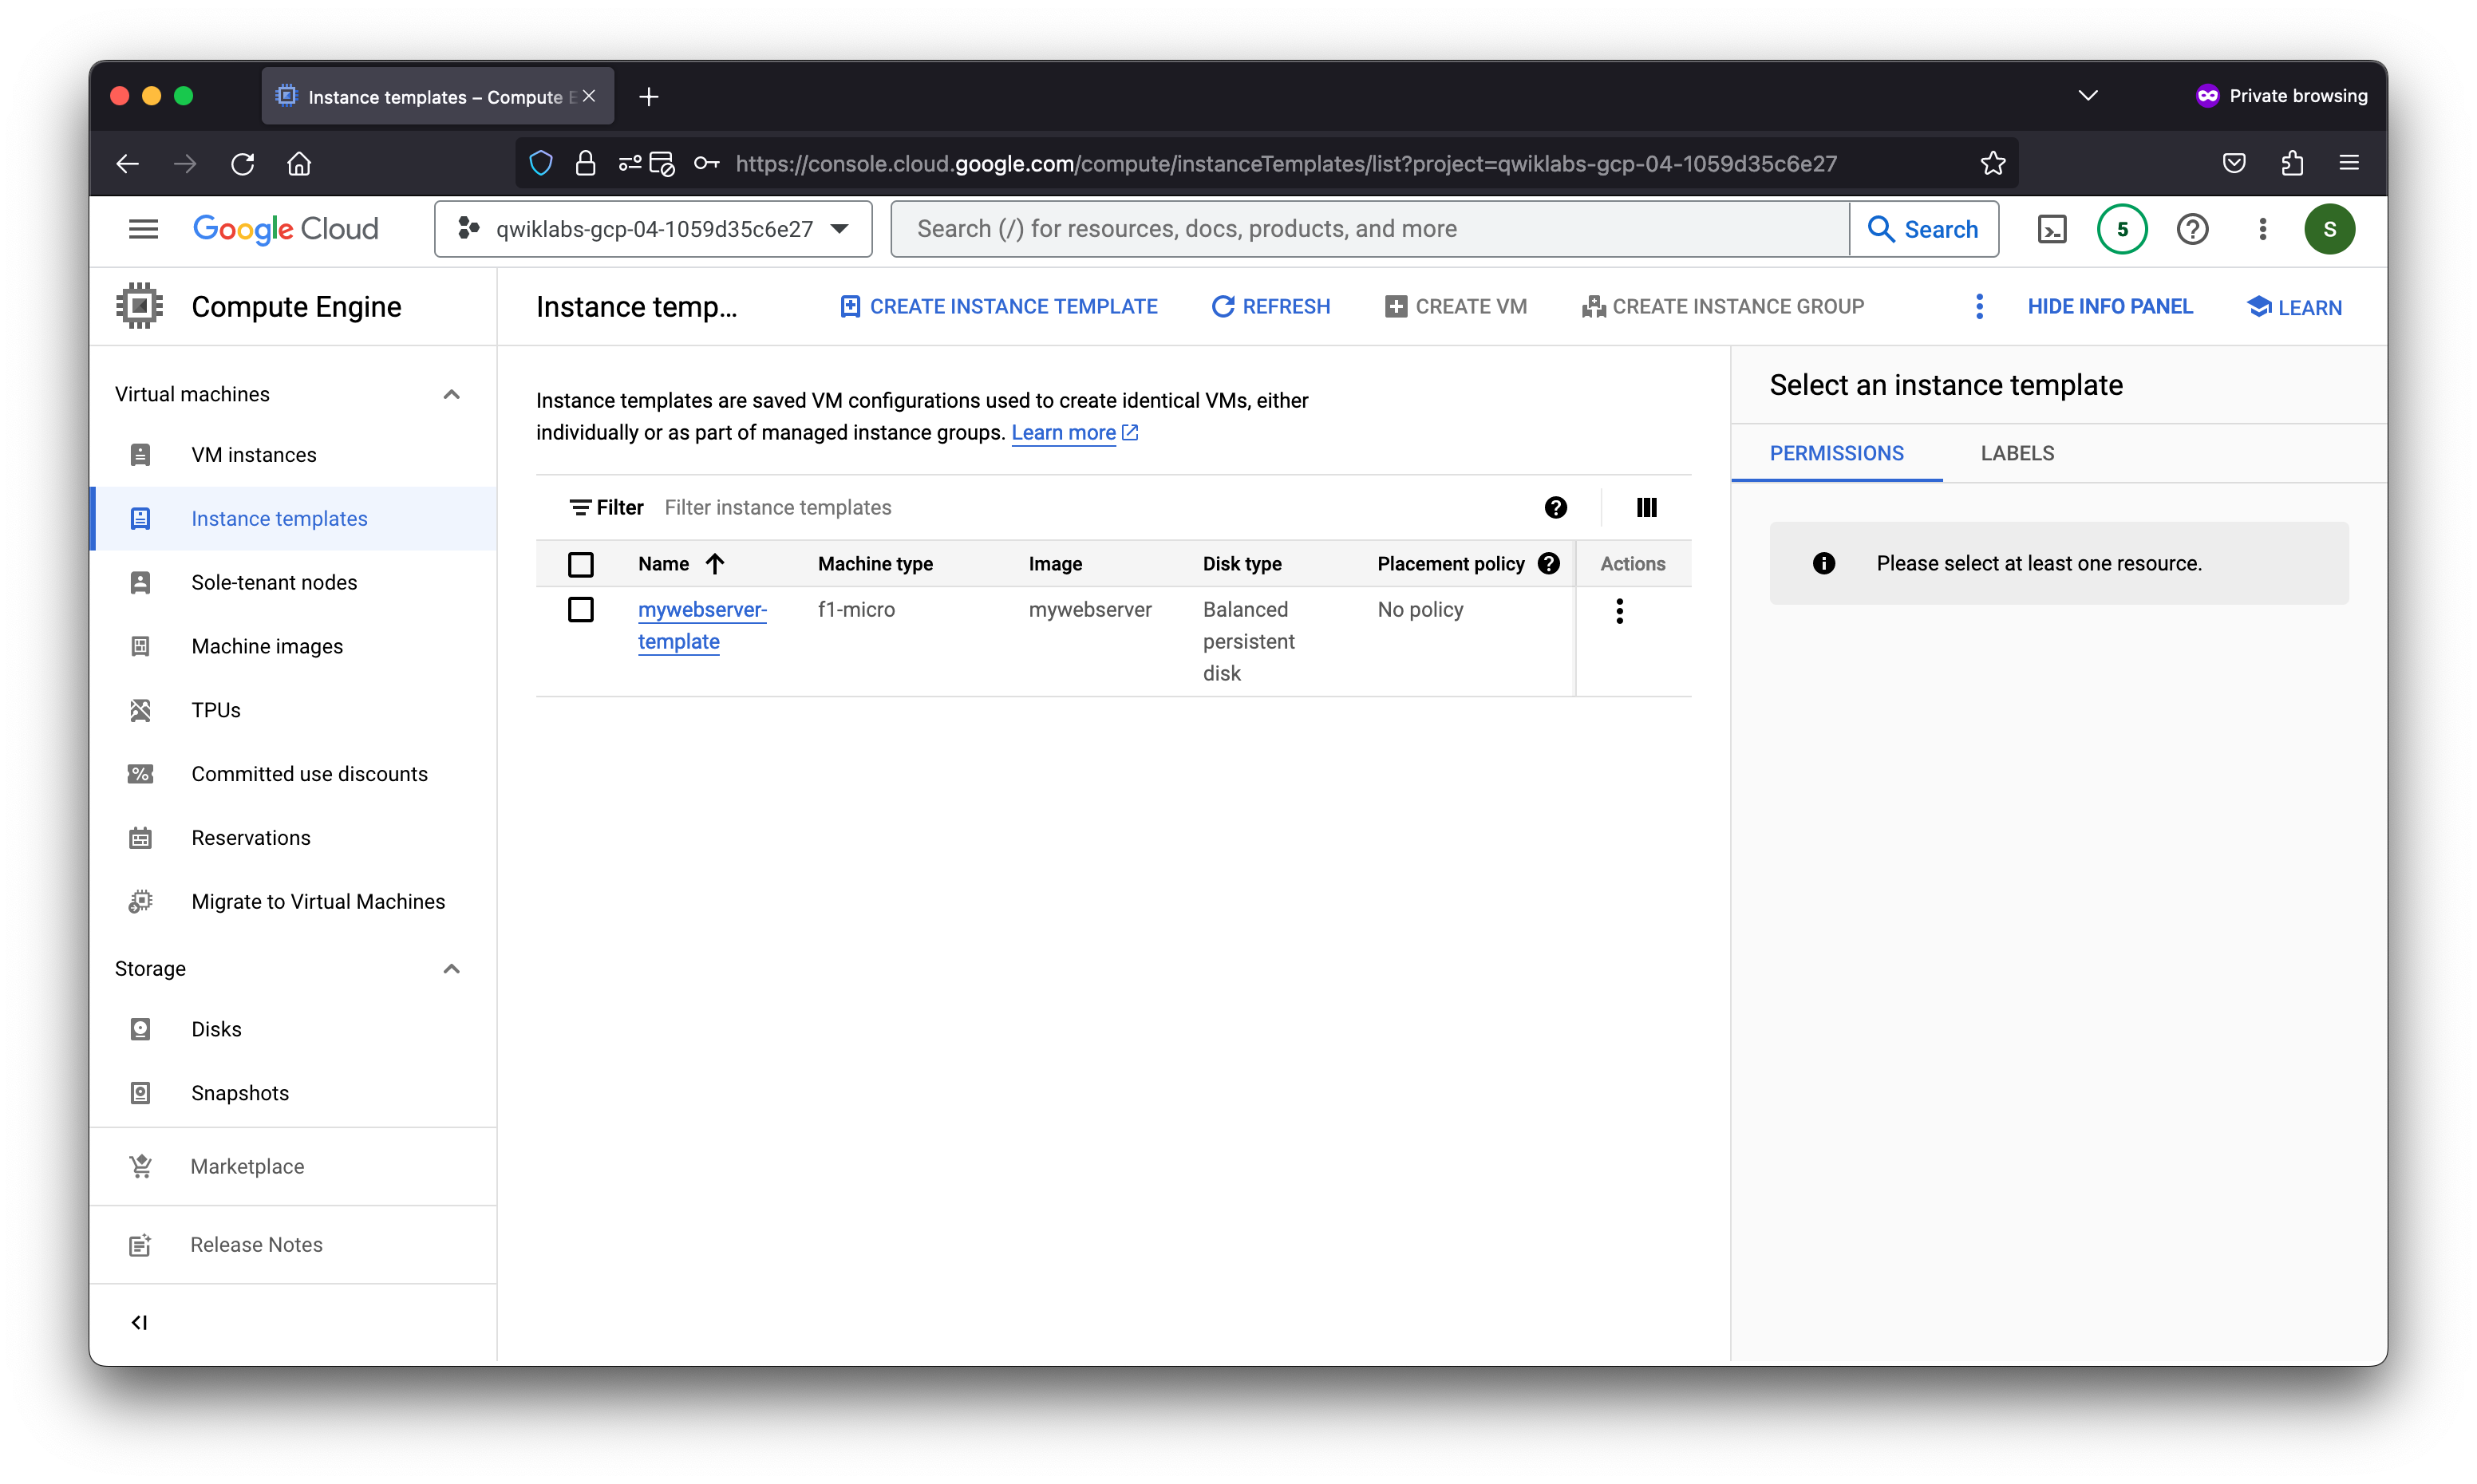
Task 4. Configure an instance template and create instance groups
A managed instance group uses an instance template to create a group of identical instances. Use these to create the backends of the HTTP load balancer.
Configure the instance template
An instance template is an API resource that you can use to create VM instances and managed instance groups. Instance templates define the machine type, boot disk image, subnet, labels, and other instance properties.
- In the Cloud Console, on the Navigation menu (
), click Compute Engine > Instance templates.
gcloud compute instance-templates create mywebserver-template --project=qwiklabs-gcp-04-1059d35c6e27 --machine-type=f1-micro --network-interface=network=default,no-address --metadata=enable-oslogin=true --maintenance-policy=MIGRATE --provisioning-model=STANDARD --service-account=425659184878-compute@developer.gserviceaccount.com --scopes=https://www.googleapis.com/auth/devstorage.read_only,https://www.googleapis.com/auth/logging.write,https://www.googleapis.com/auth/monitoring.write,https://www.googleapis.com/auth/servicecontrol,https://www.googleapis.com/auth/service.management.readonly,https://www.googleapis.com/auth/trace.append --tags=allow-health-checks --create-disk=auto-delete=yes,boot=yes,device-name=mywebserver-template,image=projects/qwiklabs-gcp-04-1059d35c6e27/global/images/mywebserver,mode=rw,size=10,type=pd-balanced --no-shielded-secure-boot --shielded-vtpm --shielded-integrity-monitoring --reservation-affinity=any
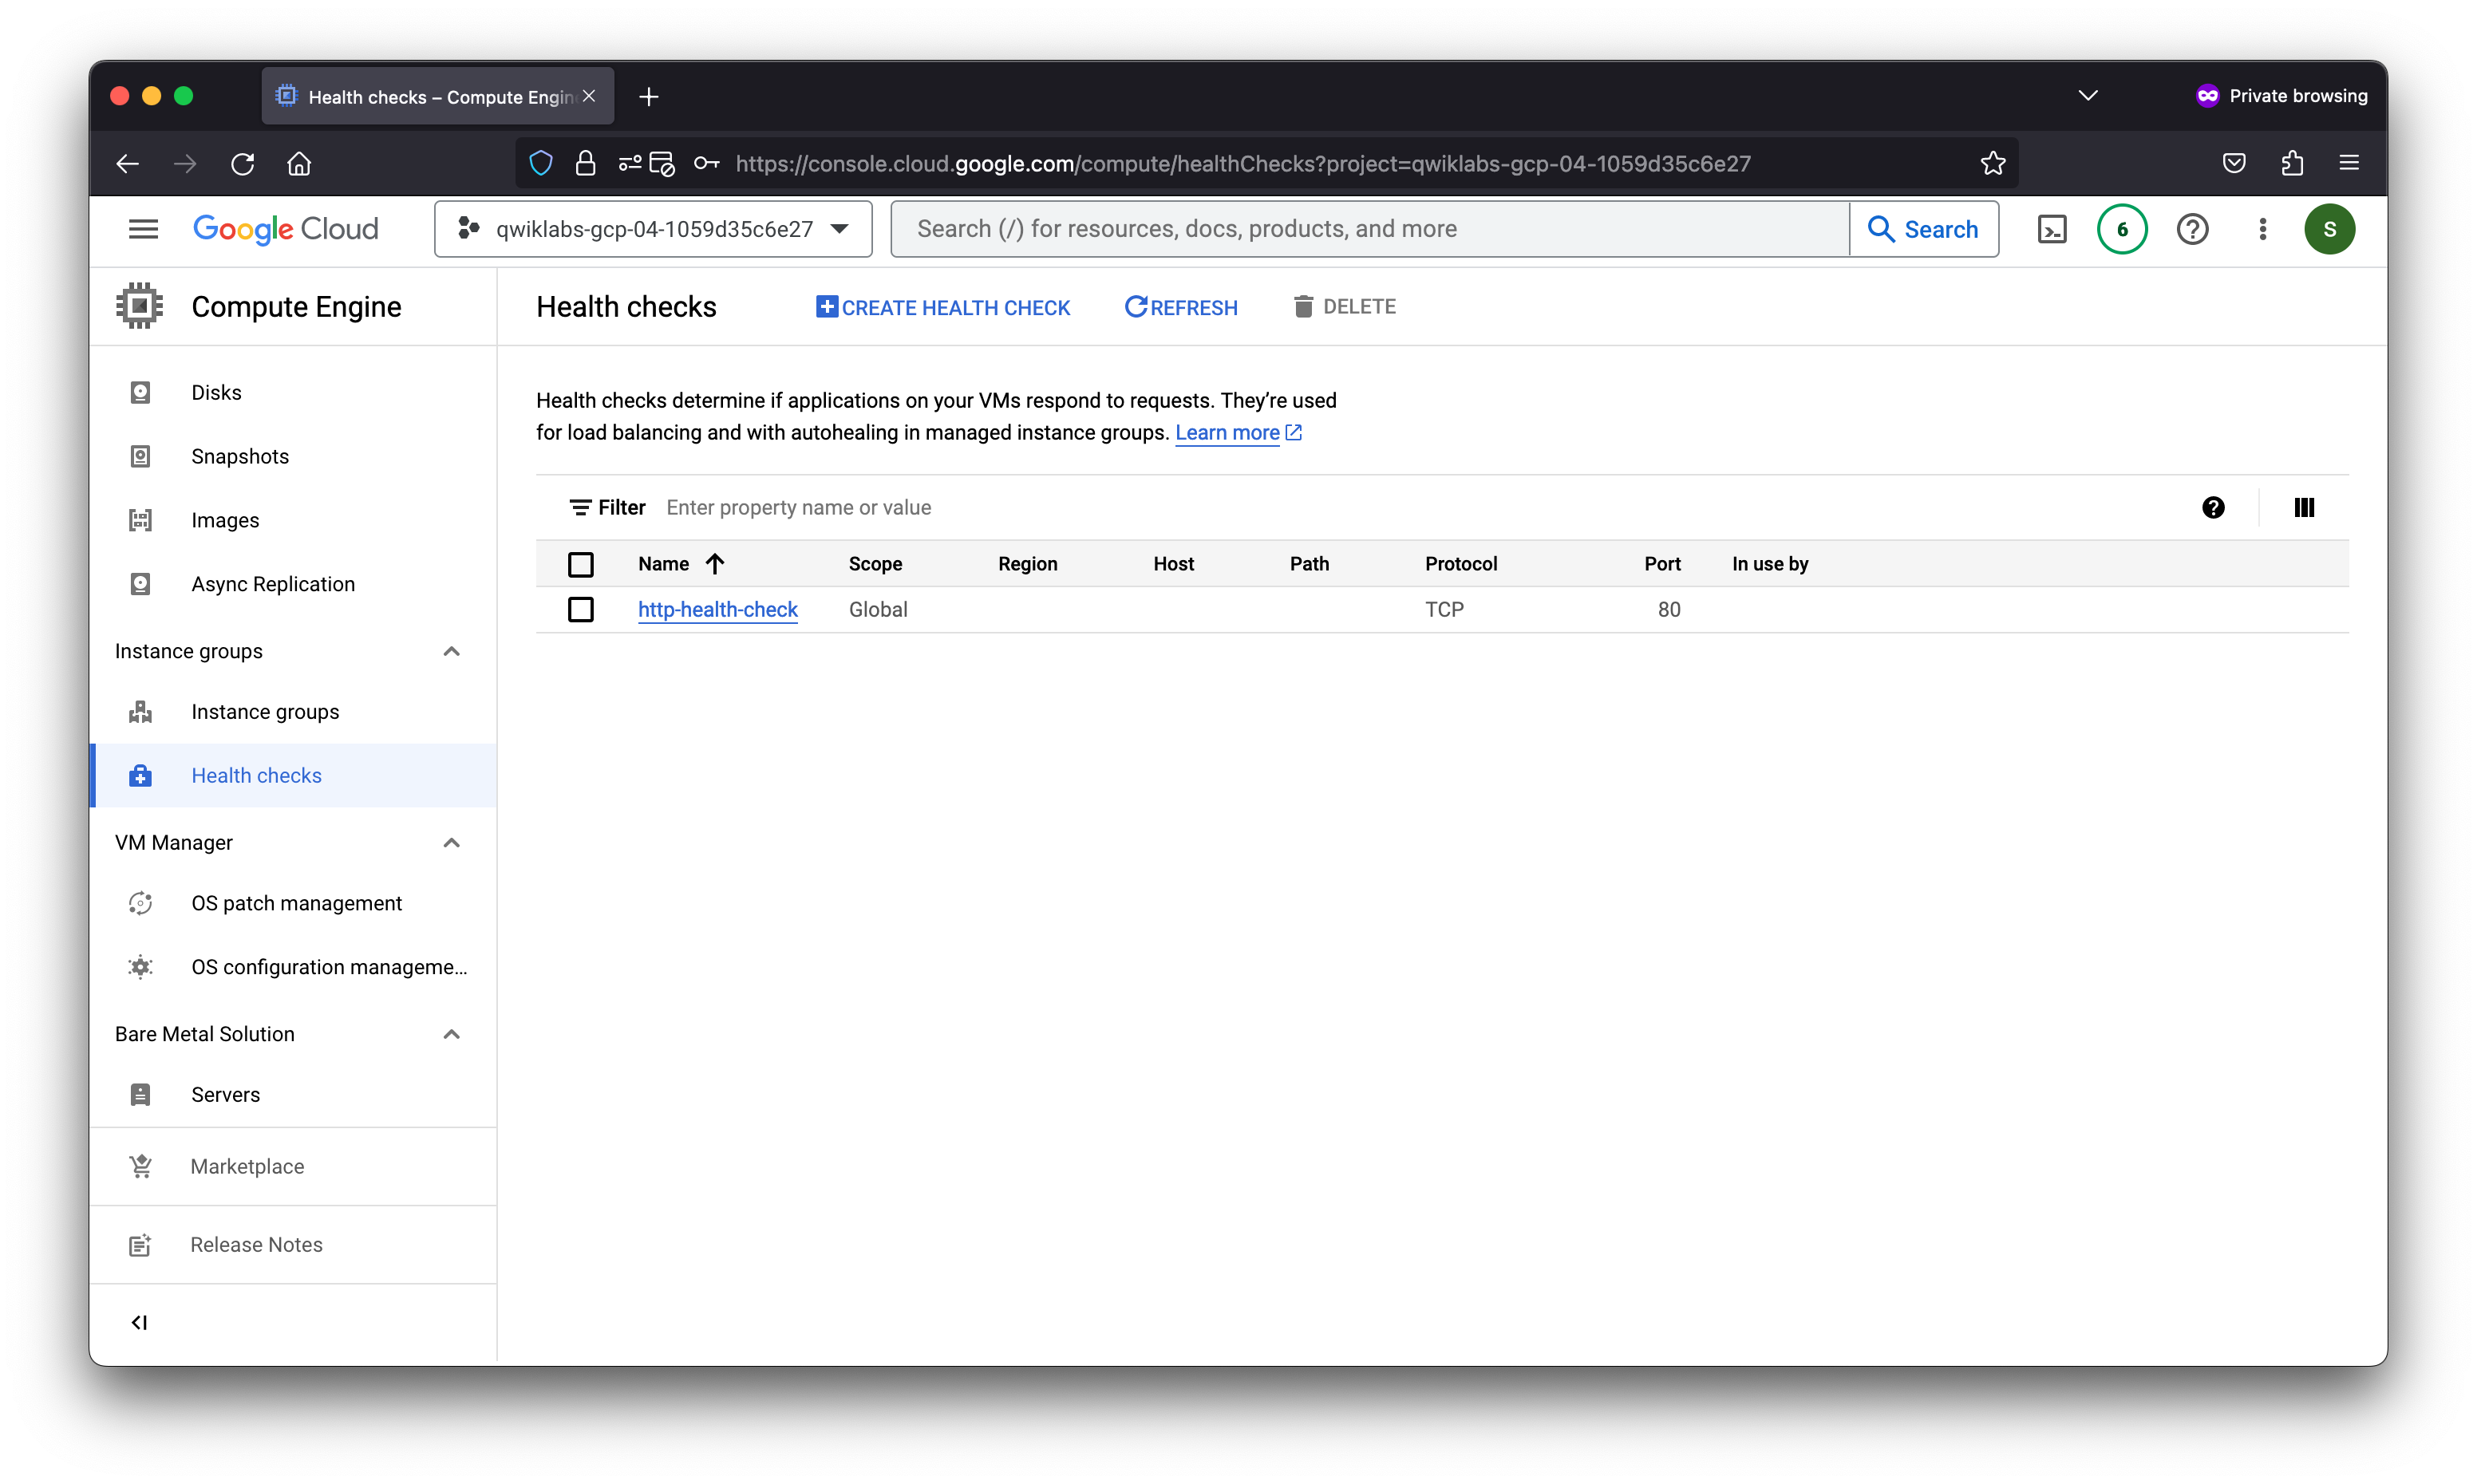
Create the health check for managed instance groups
- On the Navigation menu, click Compute Engine > Health checks.
- Click Create health check.
- Specify the following, and leave the remaining settings as their defaults:
gcloud beta compute health-checks create tcp http-health-check --project=qwiklabs-gcp-04-1059d35c6e27 --port=80 --proxy-header=NONE --no-enable-logging --check-interval=5 --timeout=5 --unhealthy-threshold=2 --healthy-threshold=2
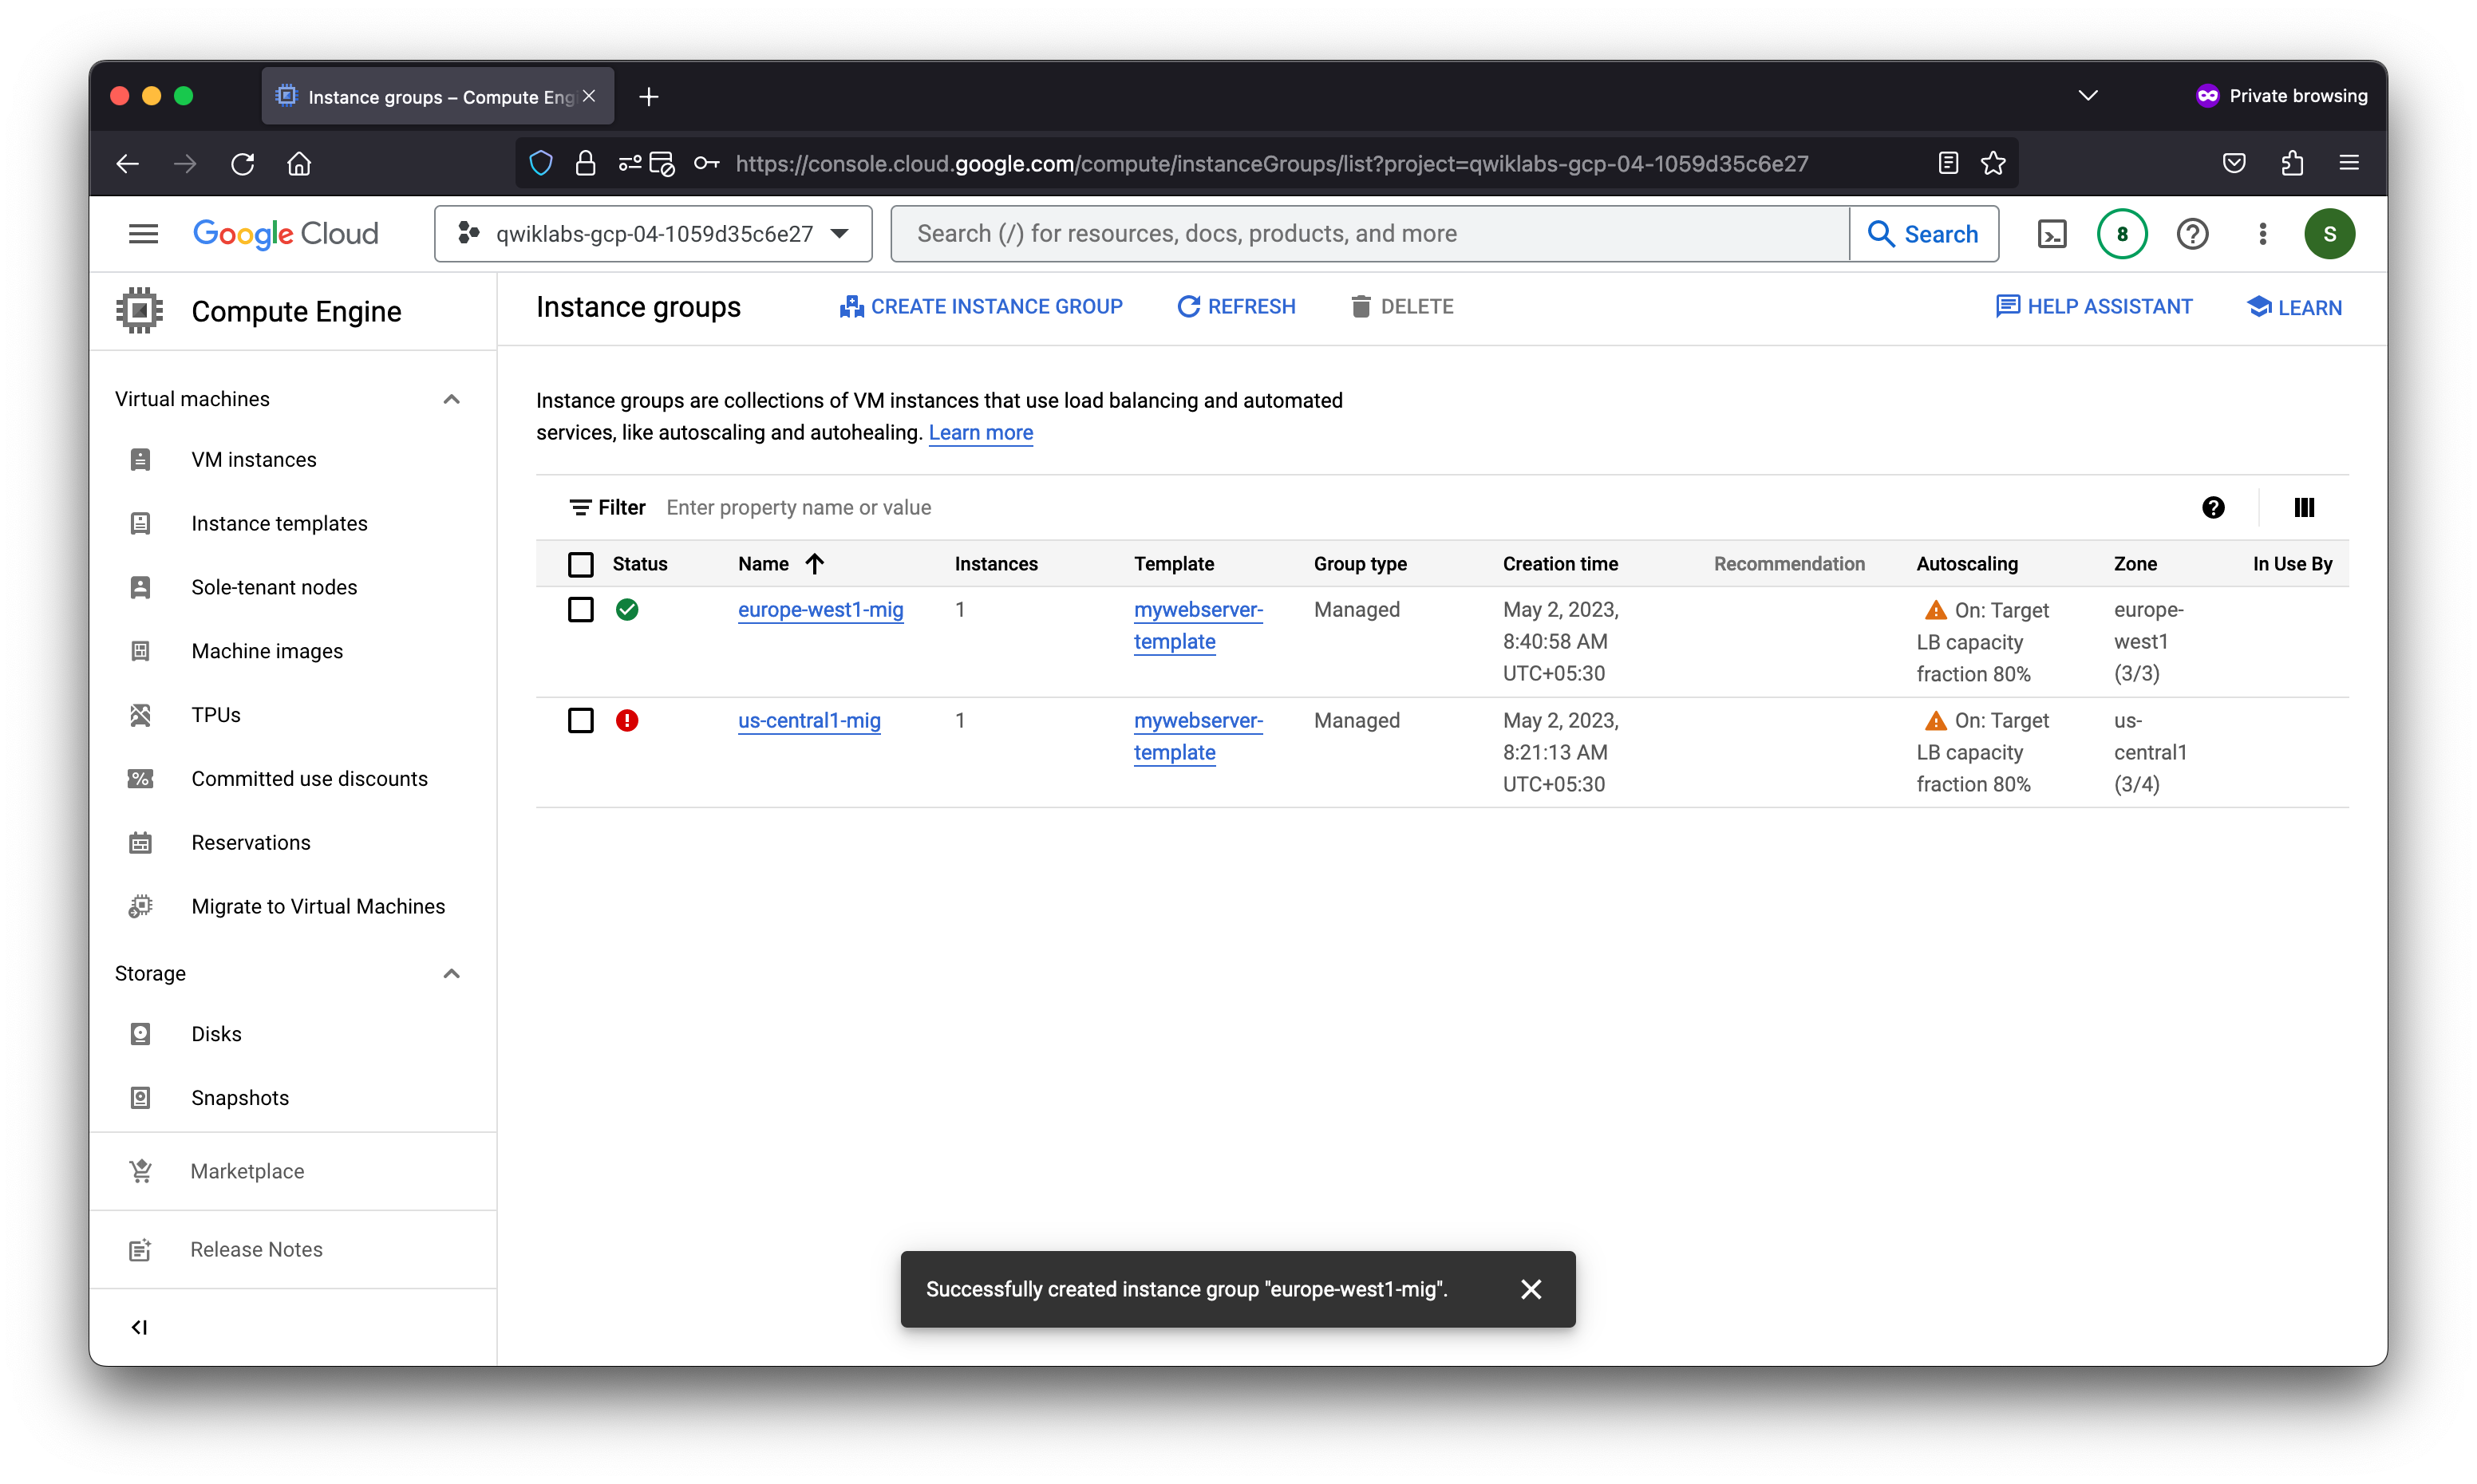
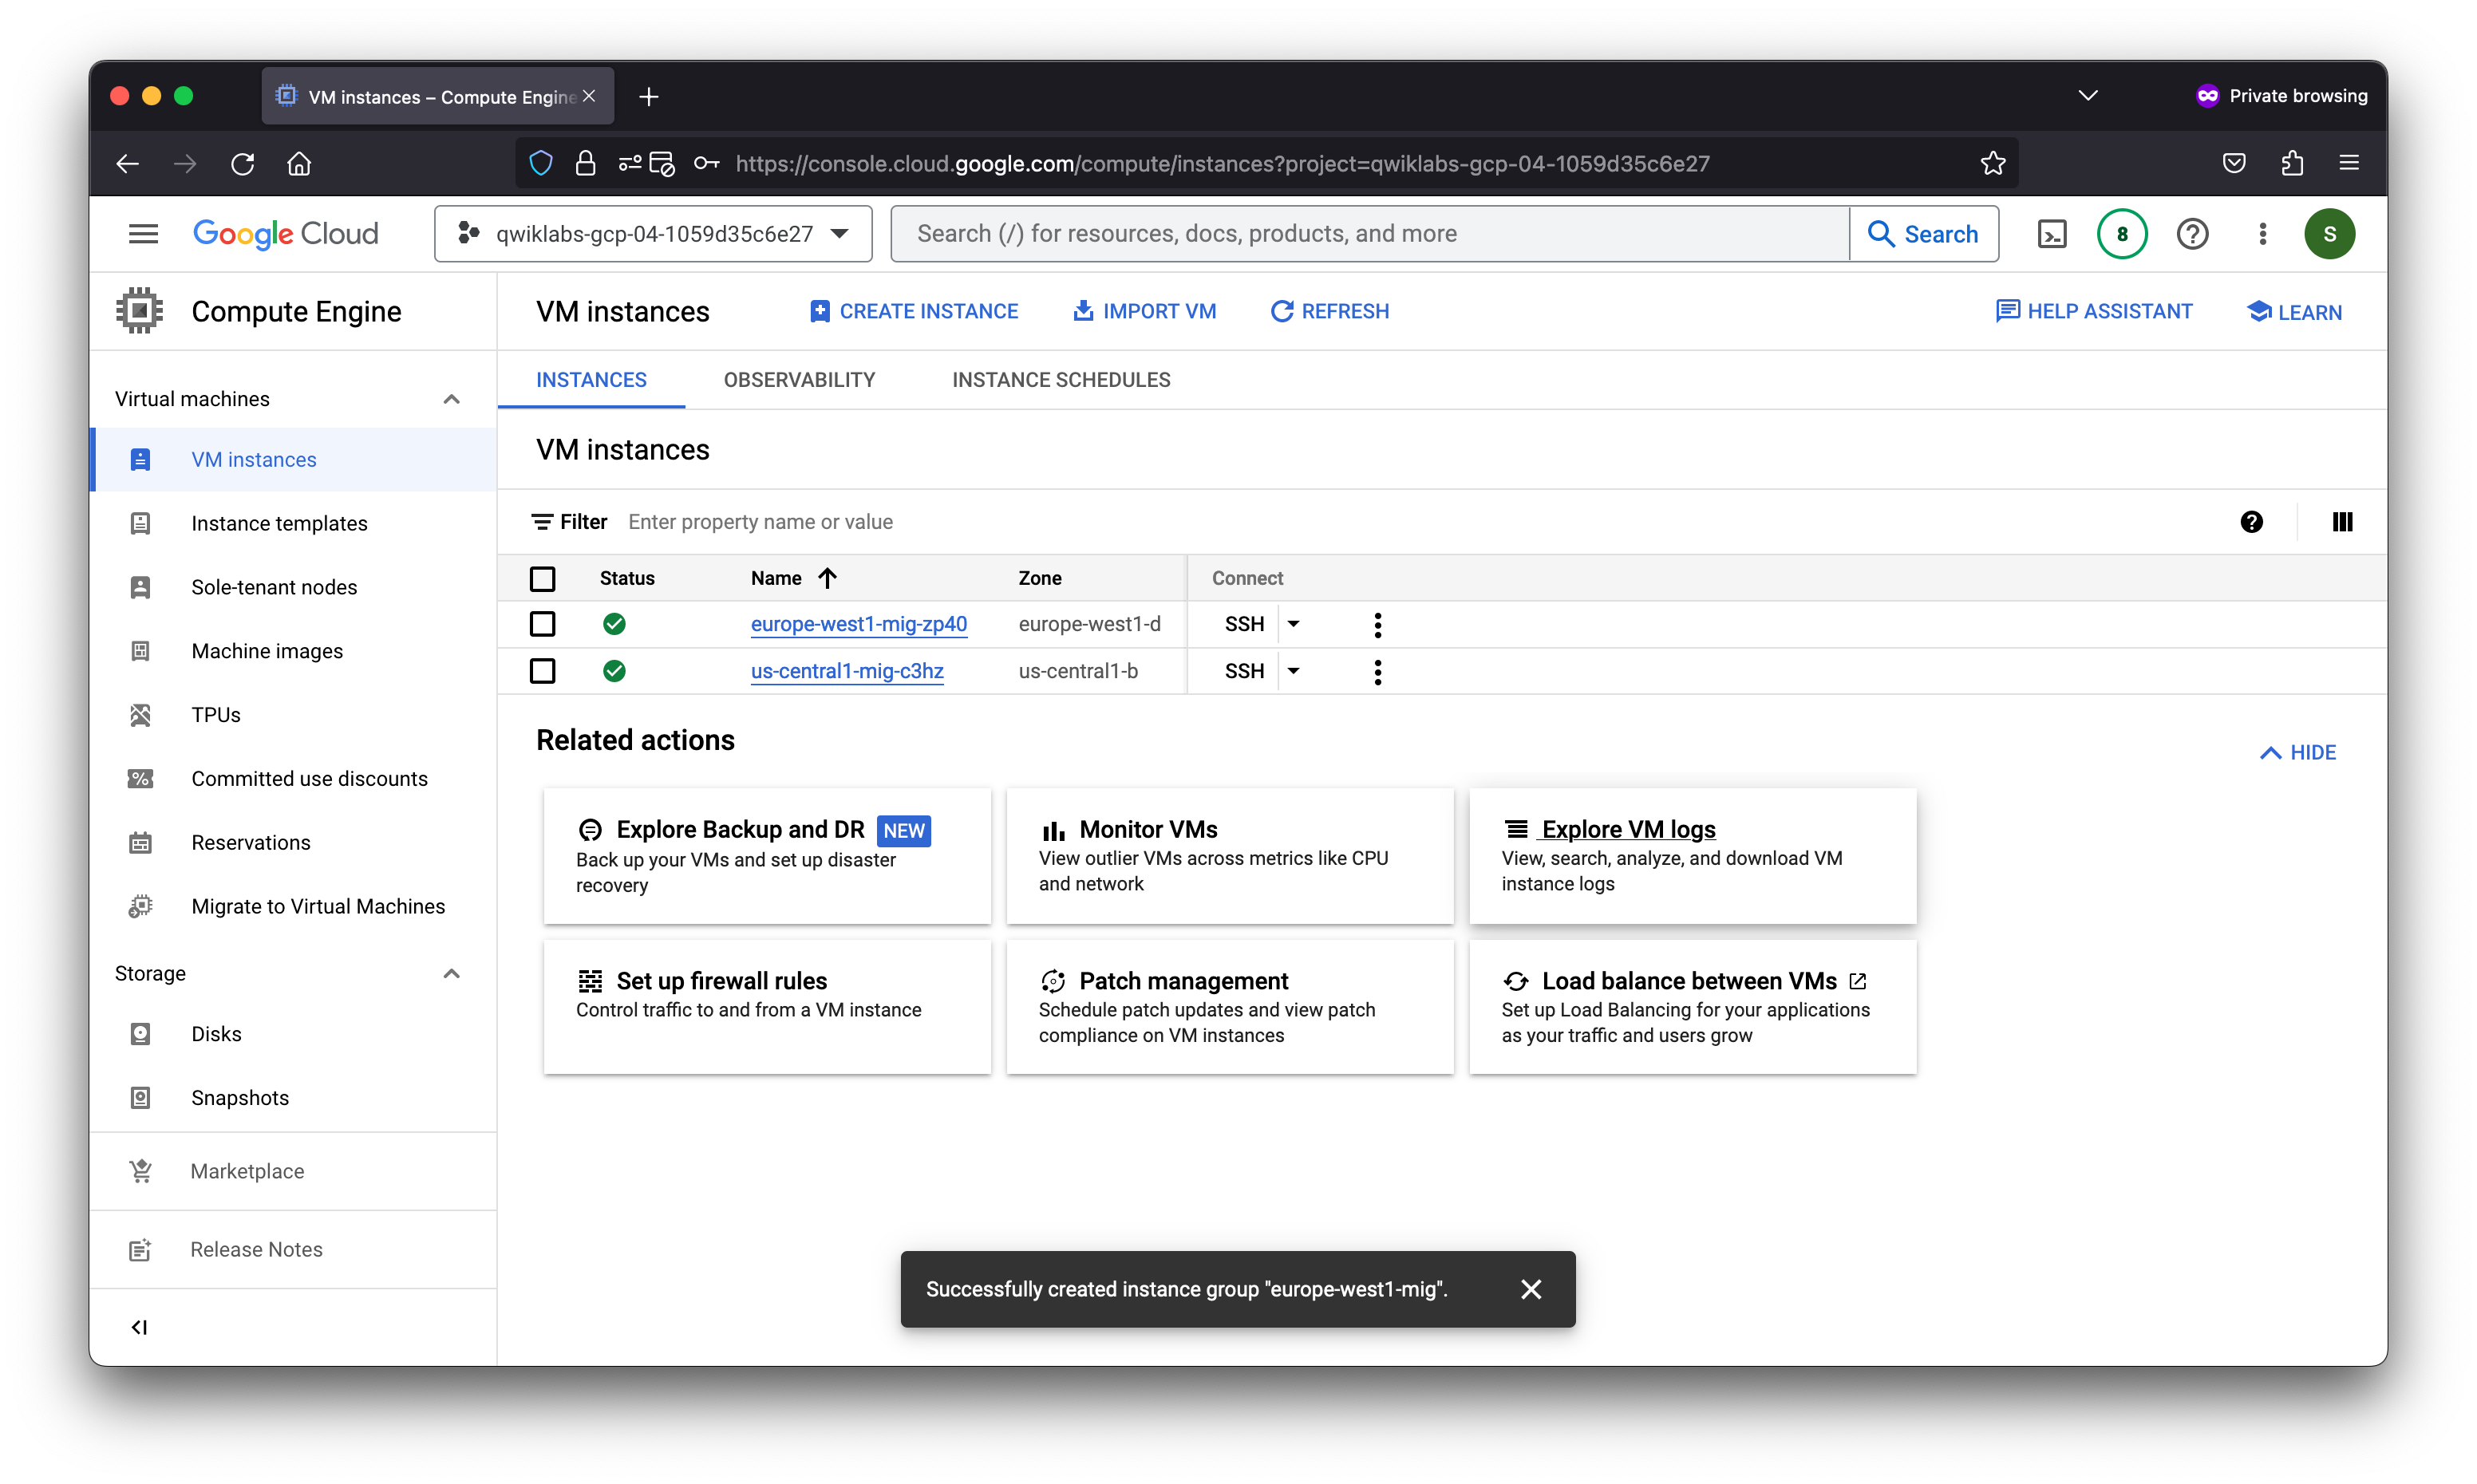
Create the managed instance groups
Create a managed instance group in us-central1 and one in europe-west1.
- On the Navigation menu, click Compute Engine > Instance groups.
- Click Create Instance Group.
Verify the backends
Verify that VM instances are being created in both regions.
- On the Navigation menu, click Compute Engine > VM instances. Notice the instances that start with us-central1-mig and europe-west1-mig. These instances are part of the managed instance groups.
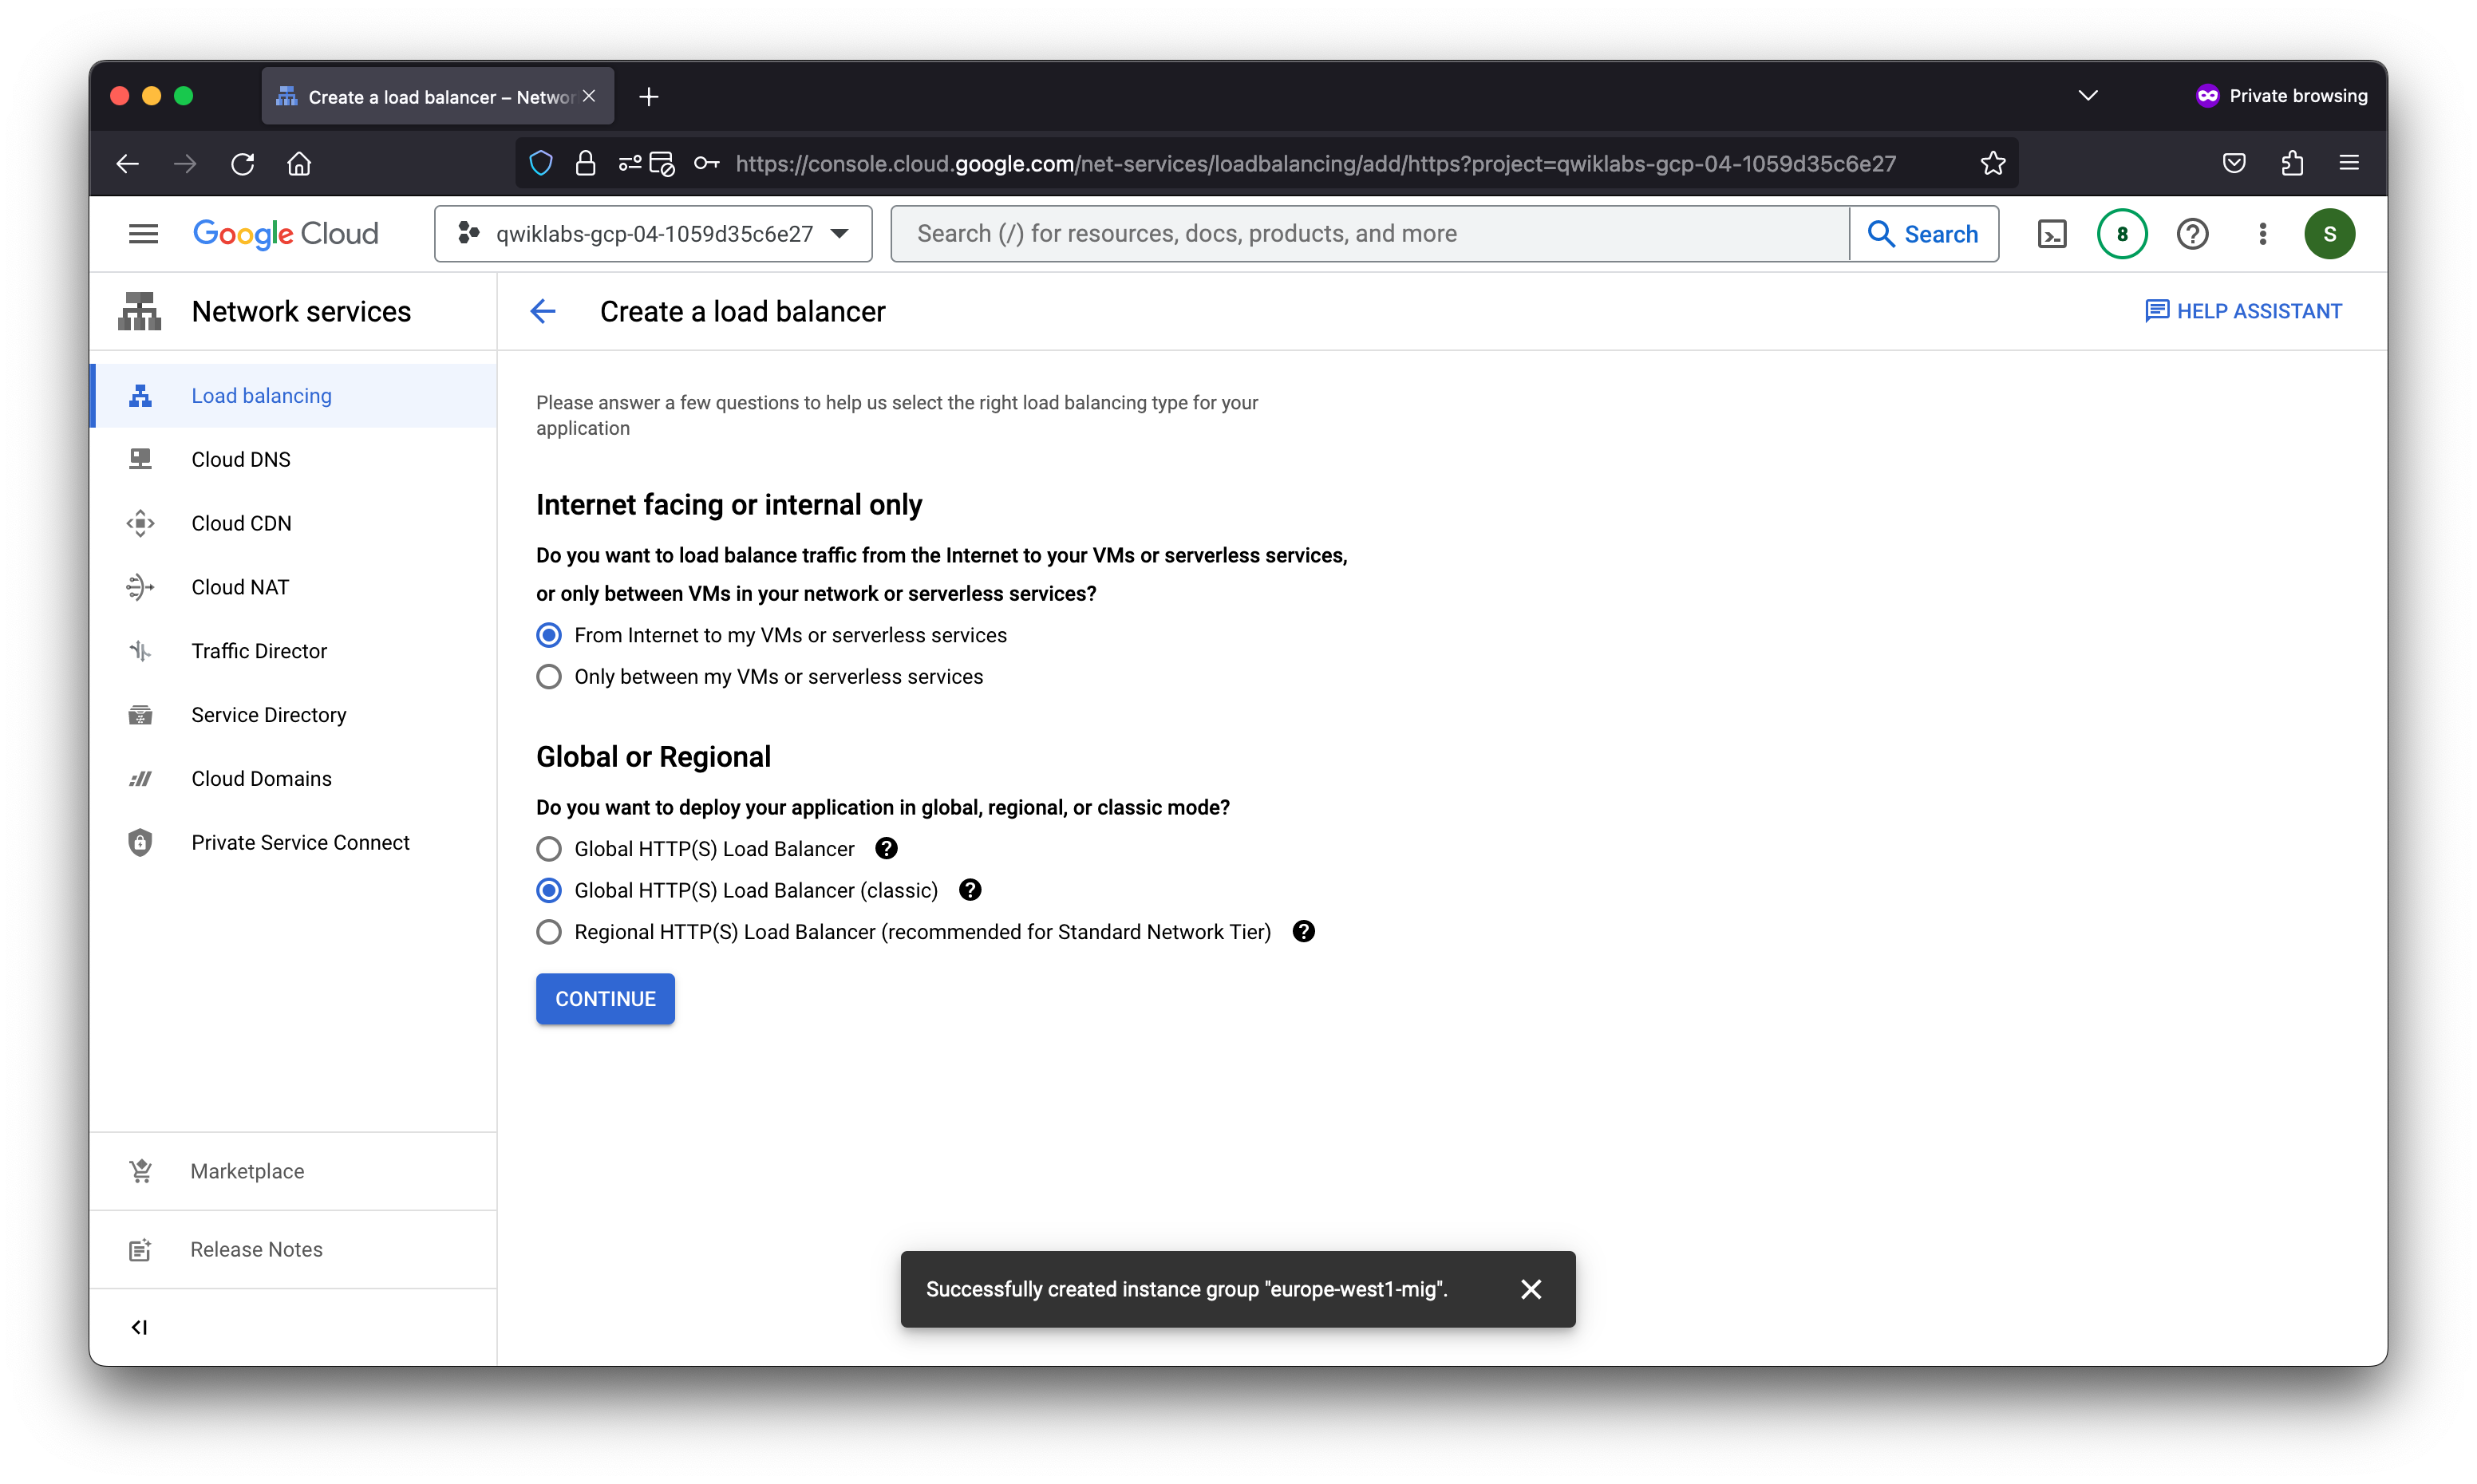
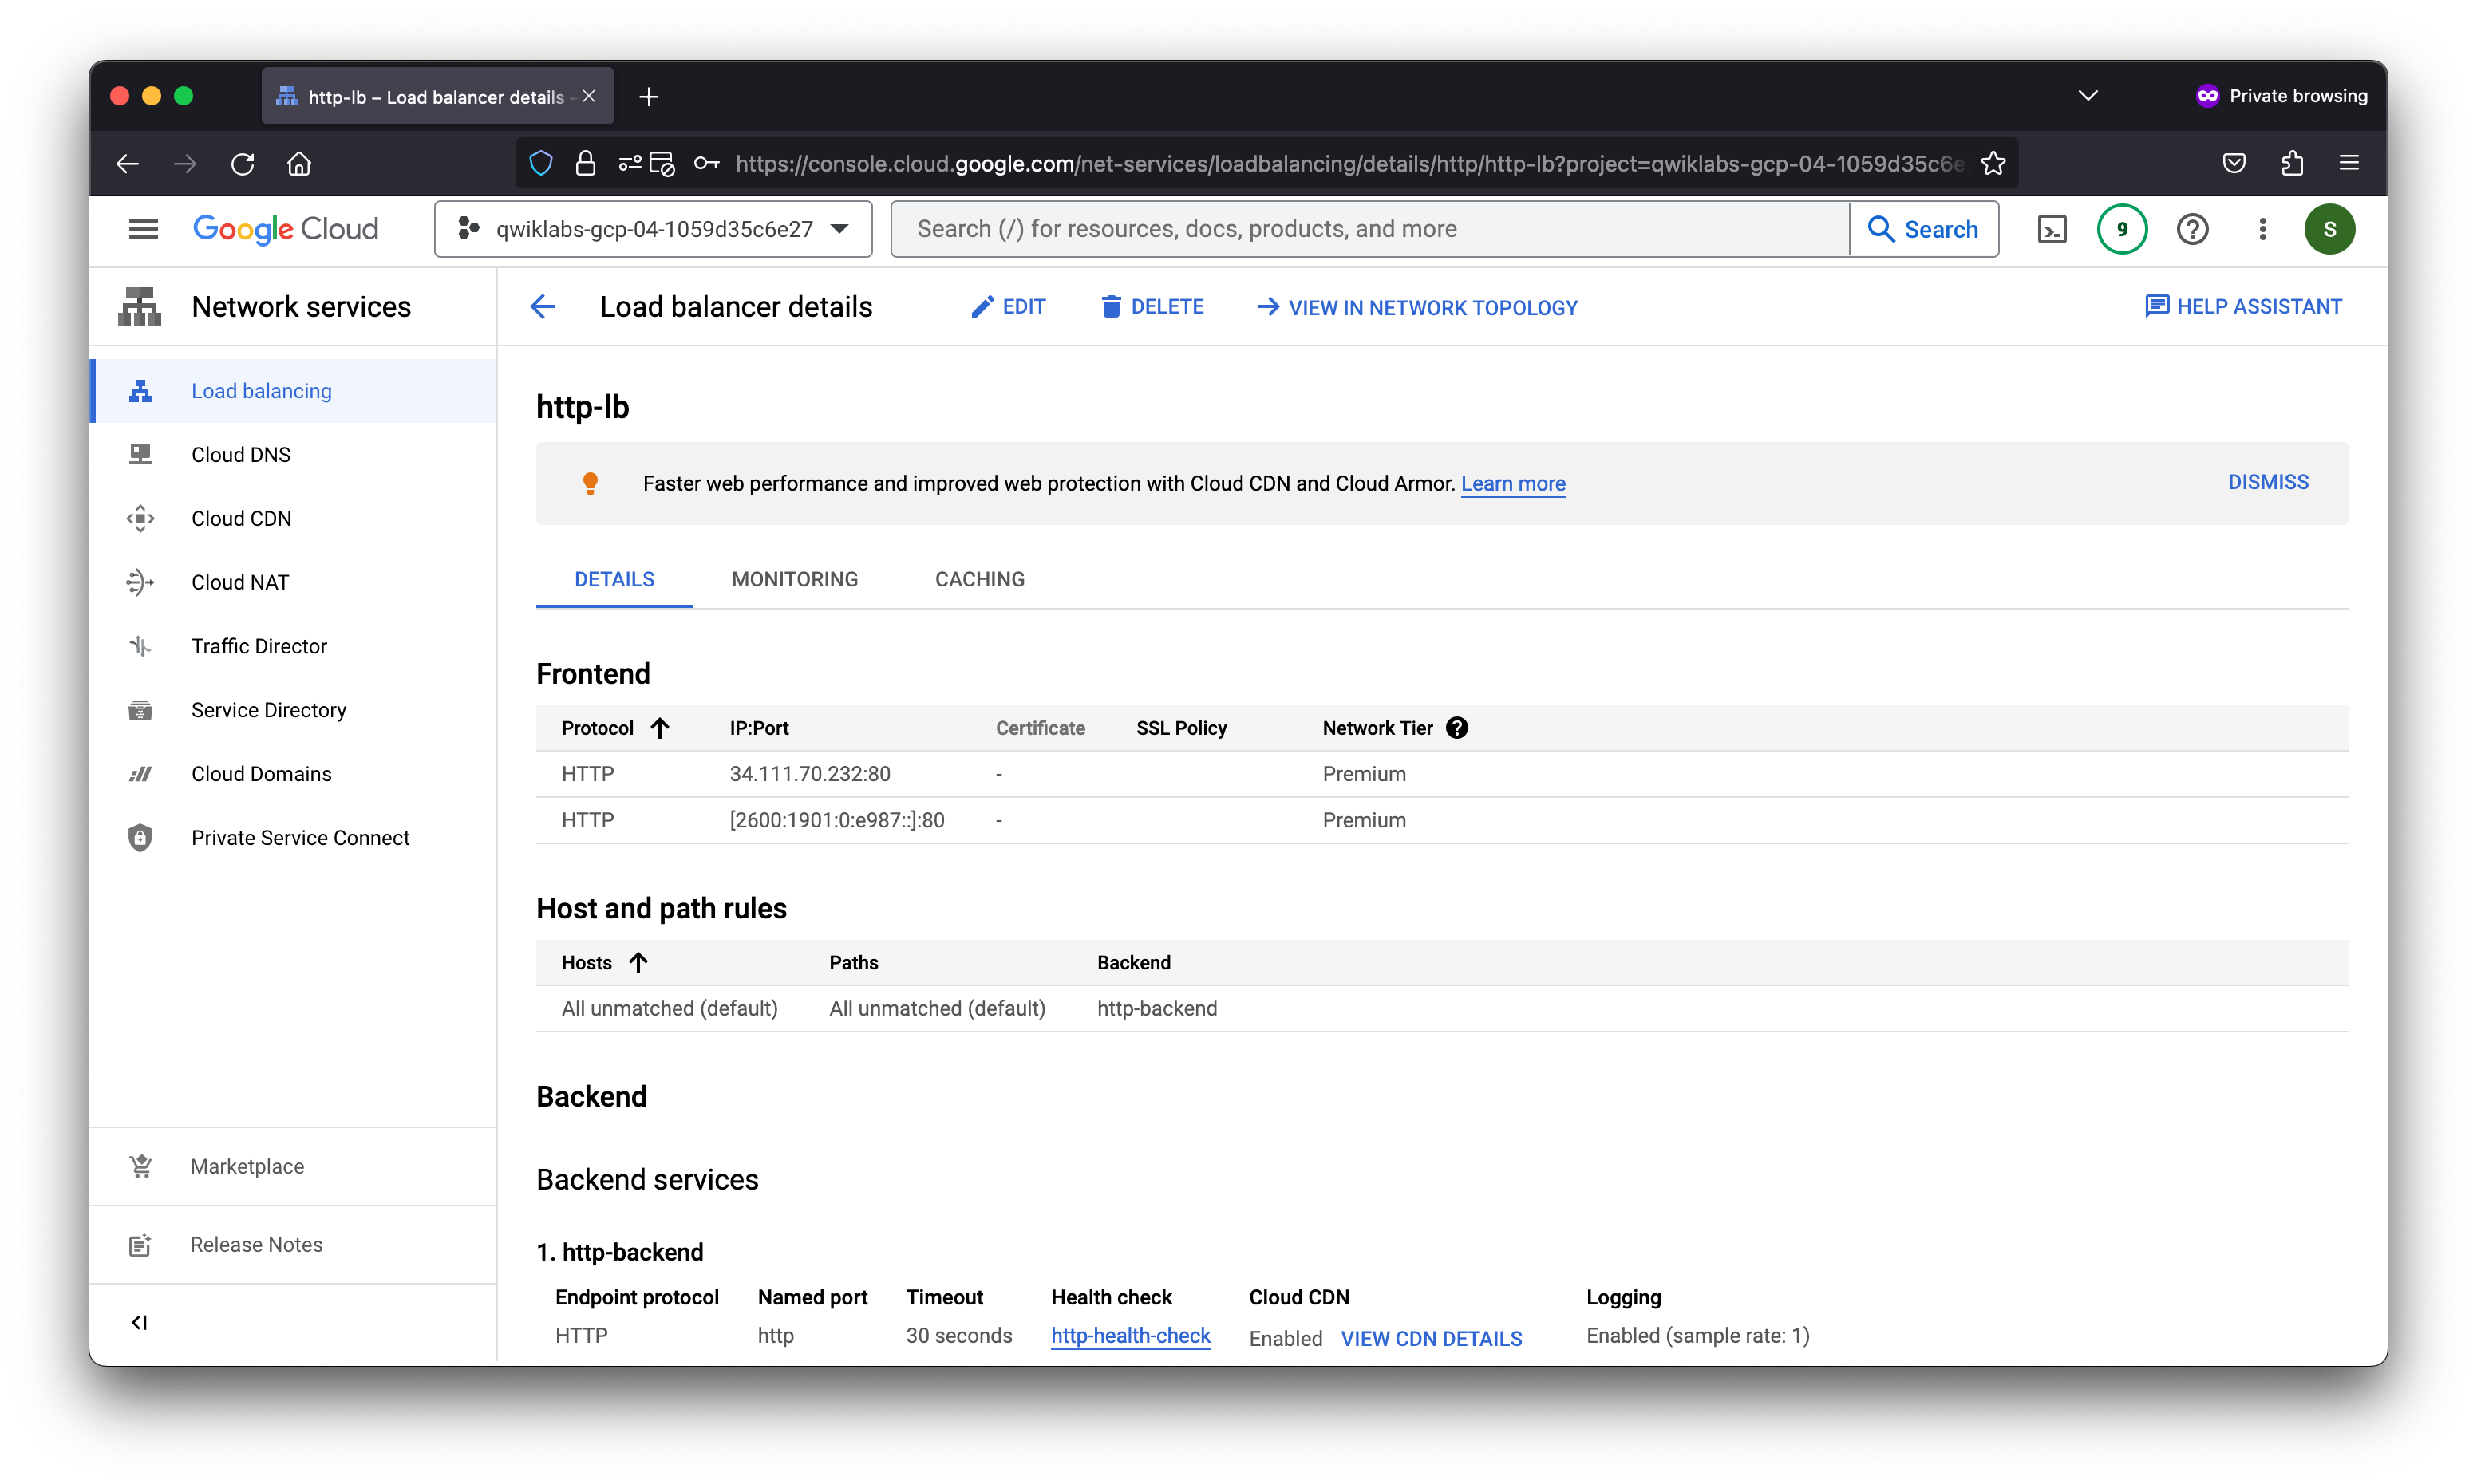
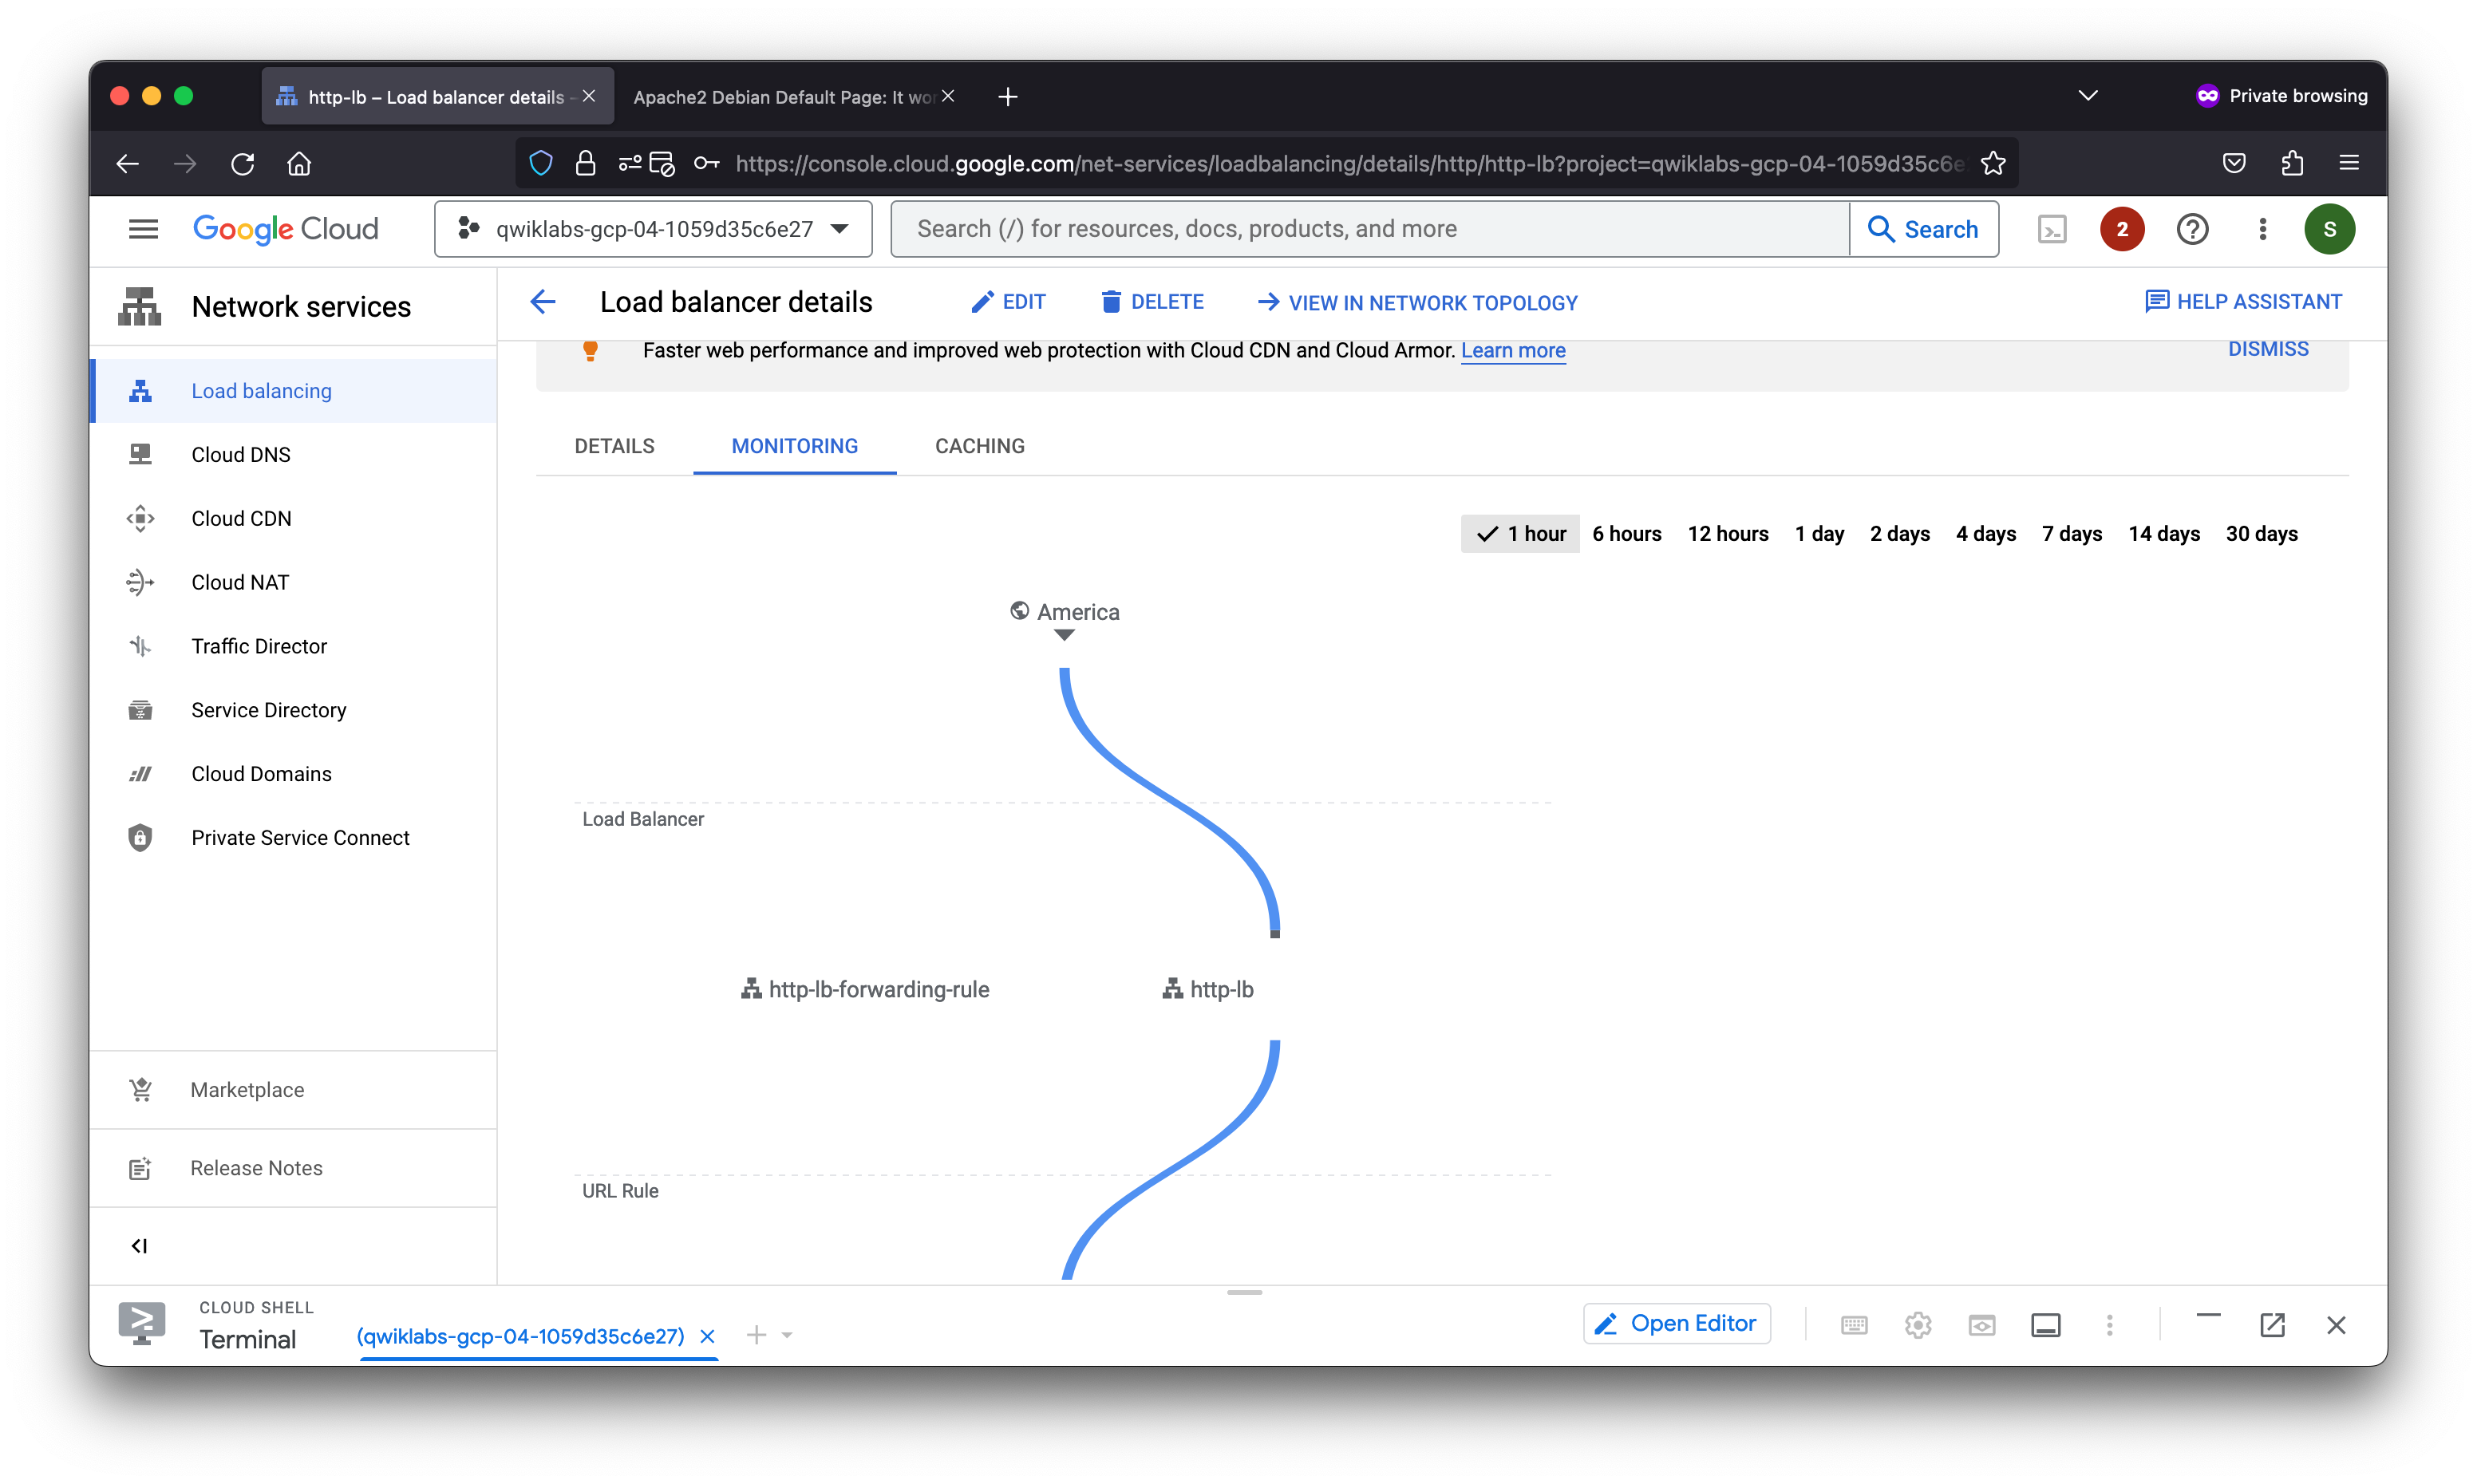
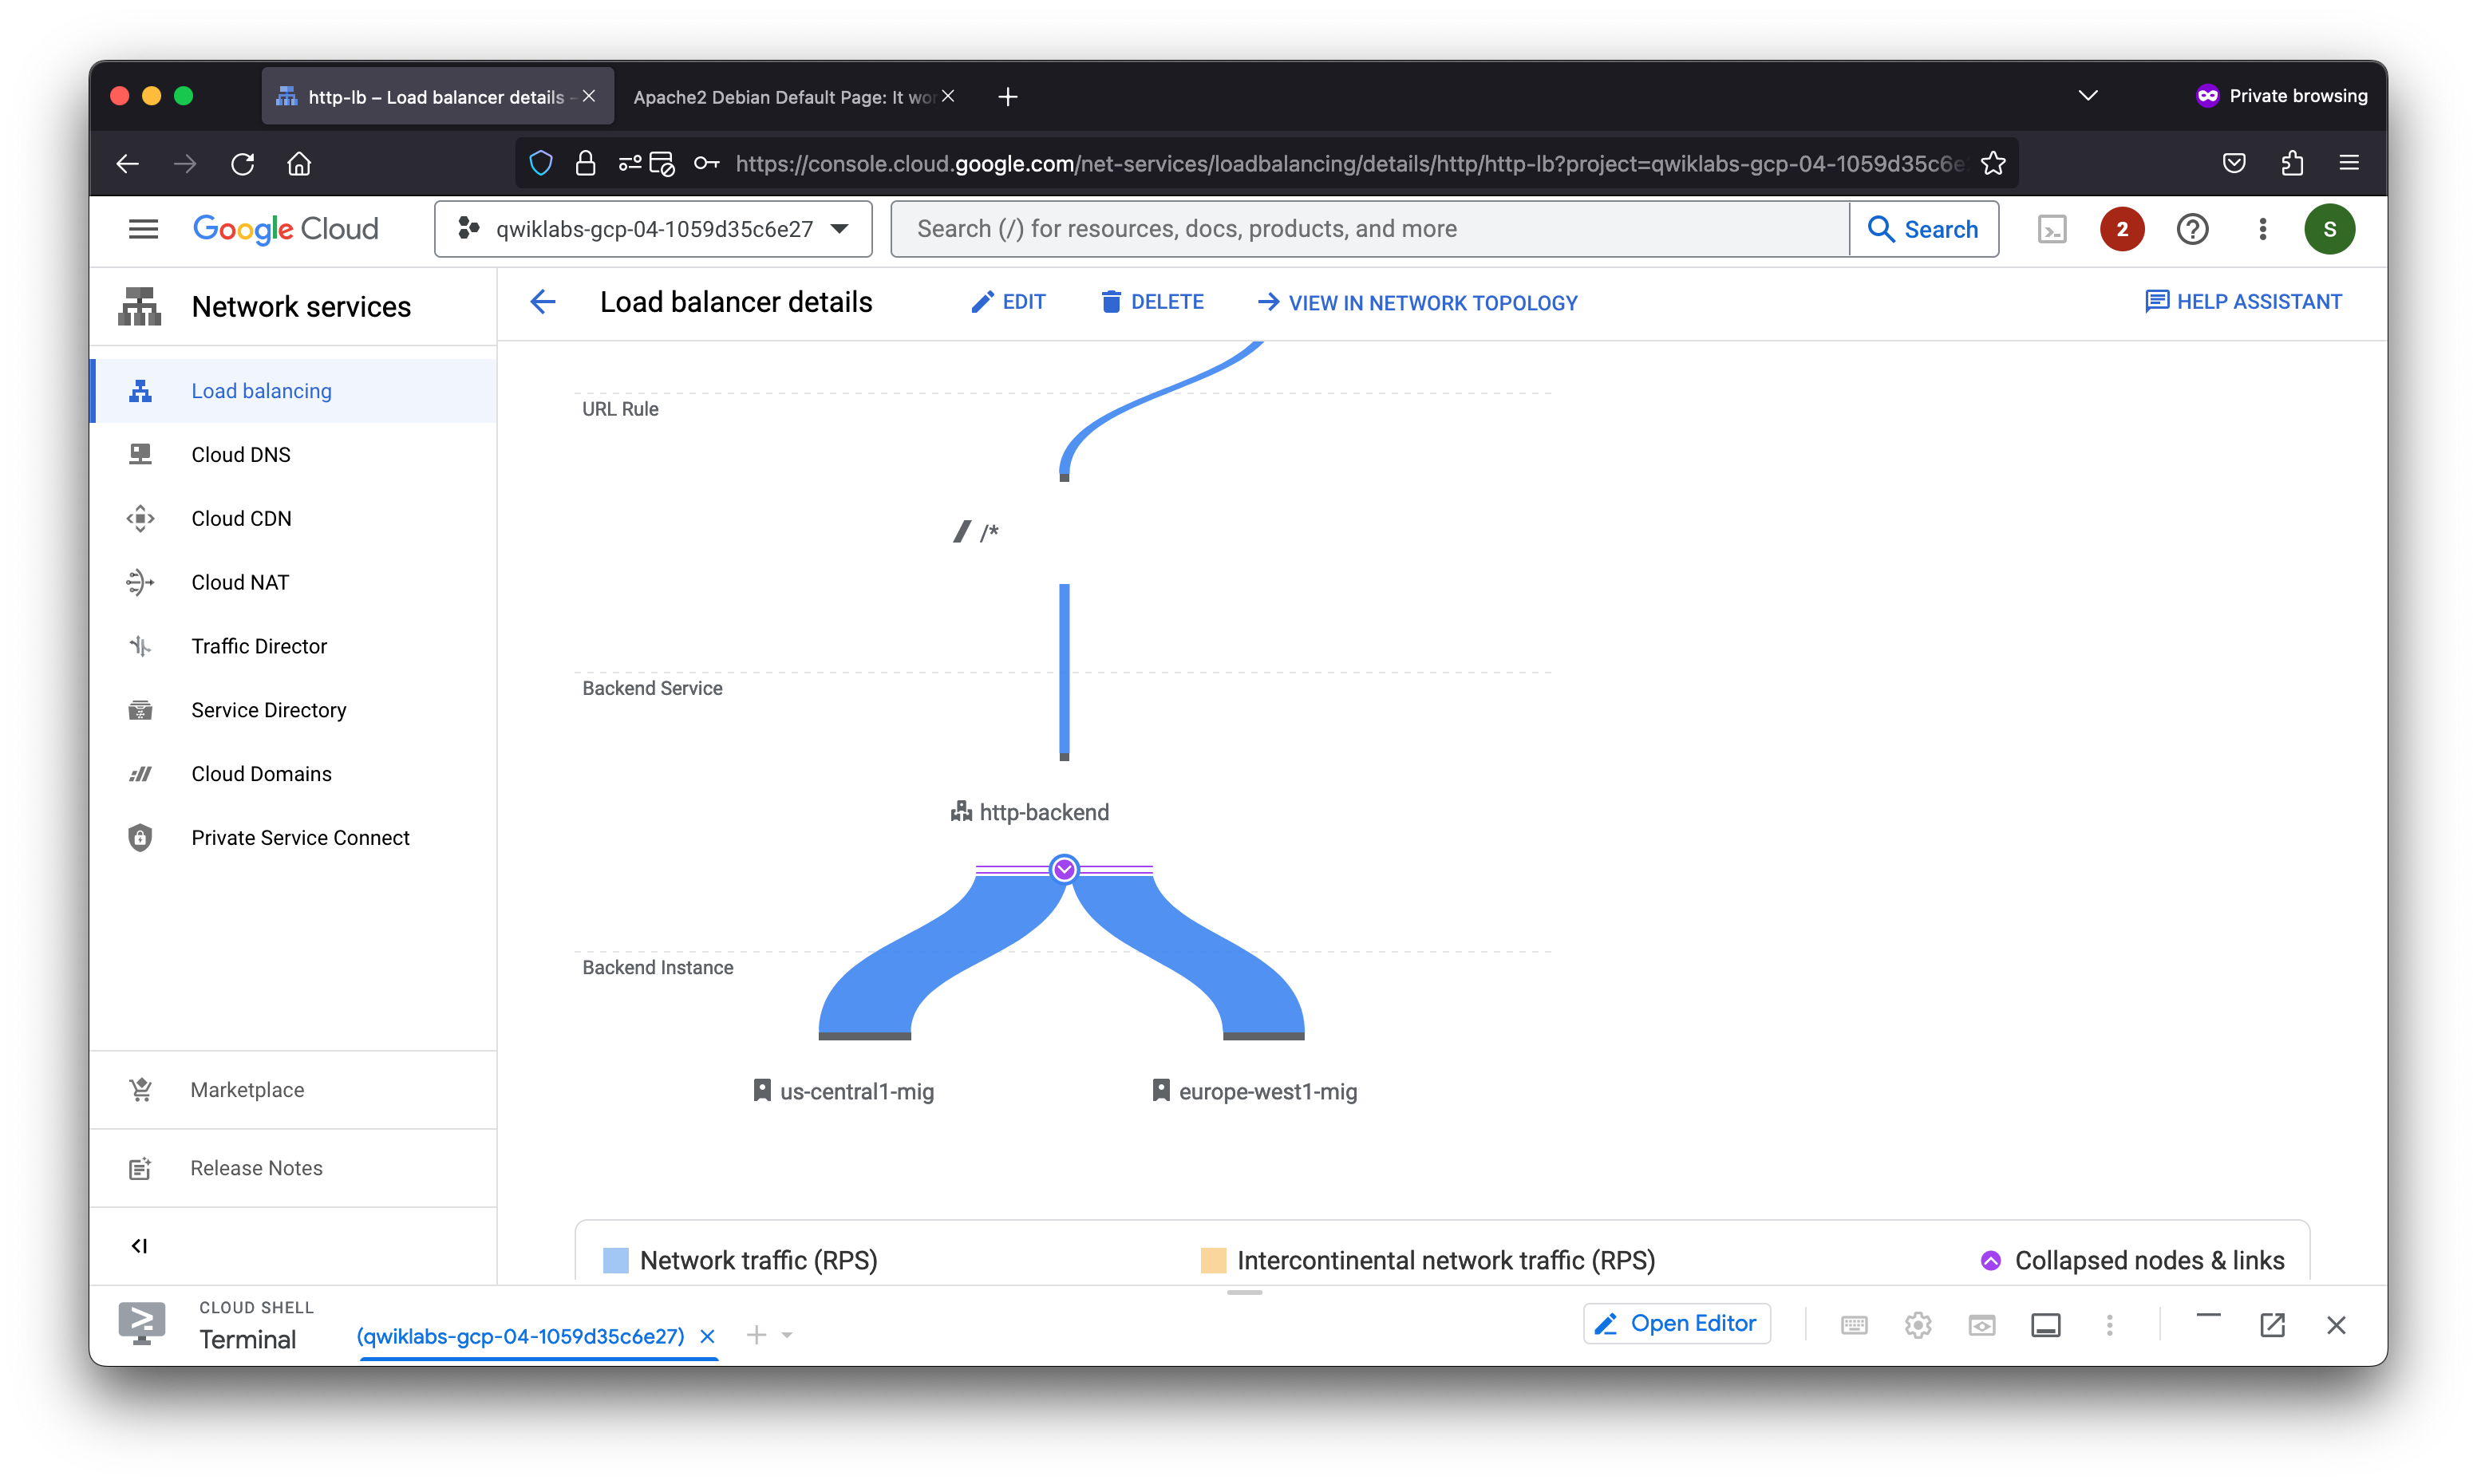
Task 5. Configure the HTTP load balancer
Configure the HTTP load balancer to balance traffic between the two backends (us-central1-mig in us-central1 and europe-west1-mig in europe-west1) as illustrated in the network diagram:
Start the configuration
- On the Navigation menu, click Network Services > Load balancing.
- Click Create Load Balancer.
- Under HTTP(S) Load Balancing, click Start configuration.
- Under Internet facing or internal only, select From Internet to my VMs or serverless services.
- Under Global or Regional, select Global HTTP(S) Load Balancer (classic).
- Click Continue.
- For Name, type http-lb.
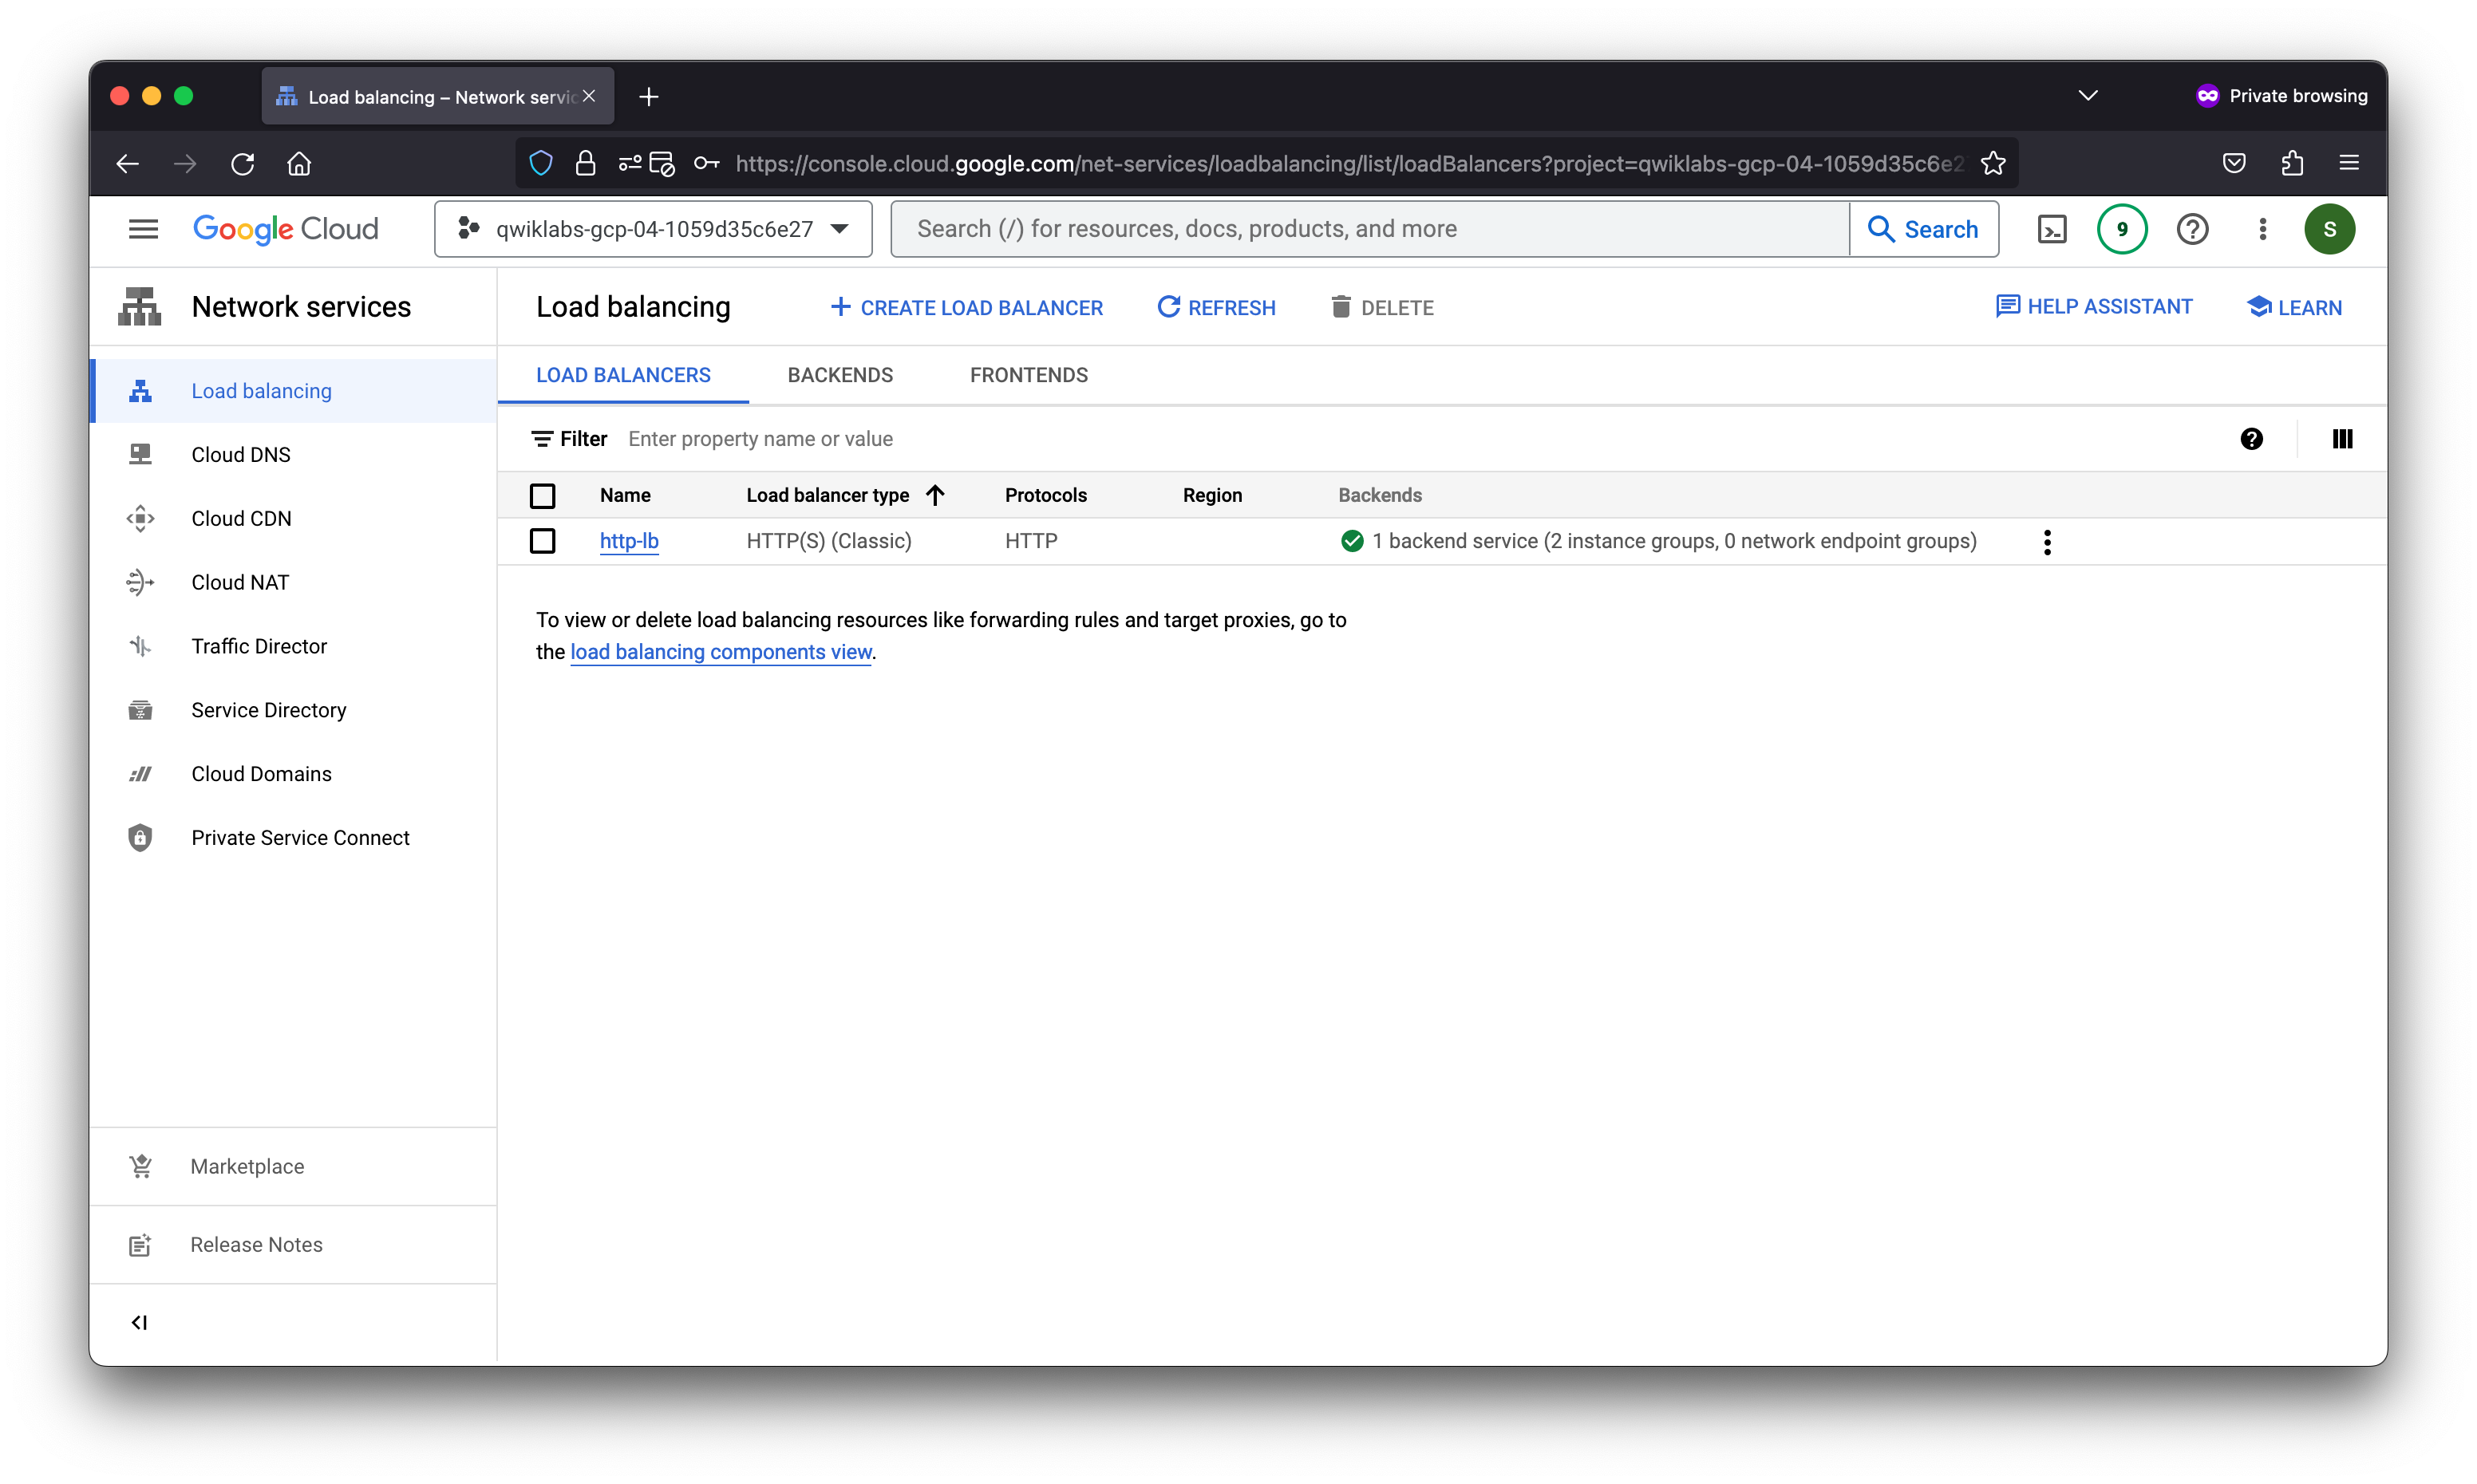
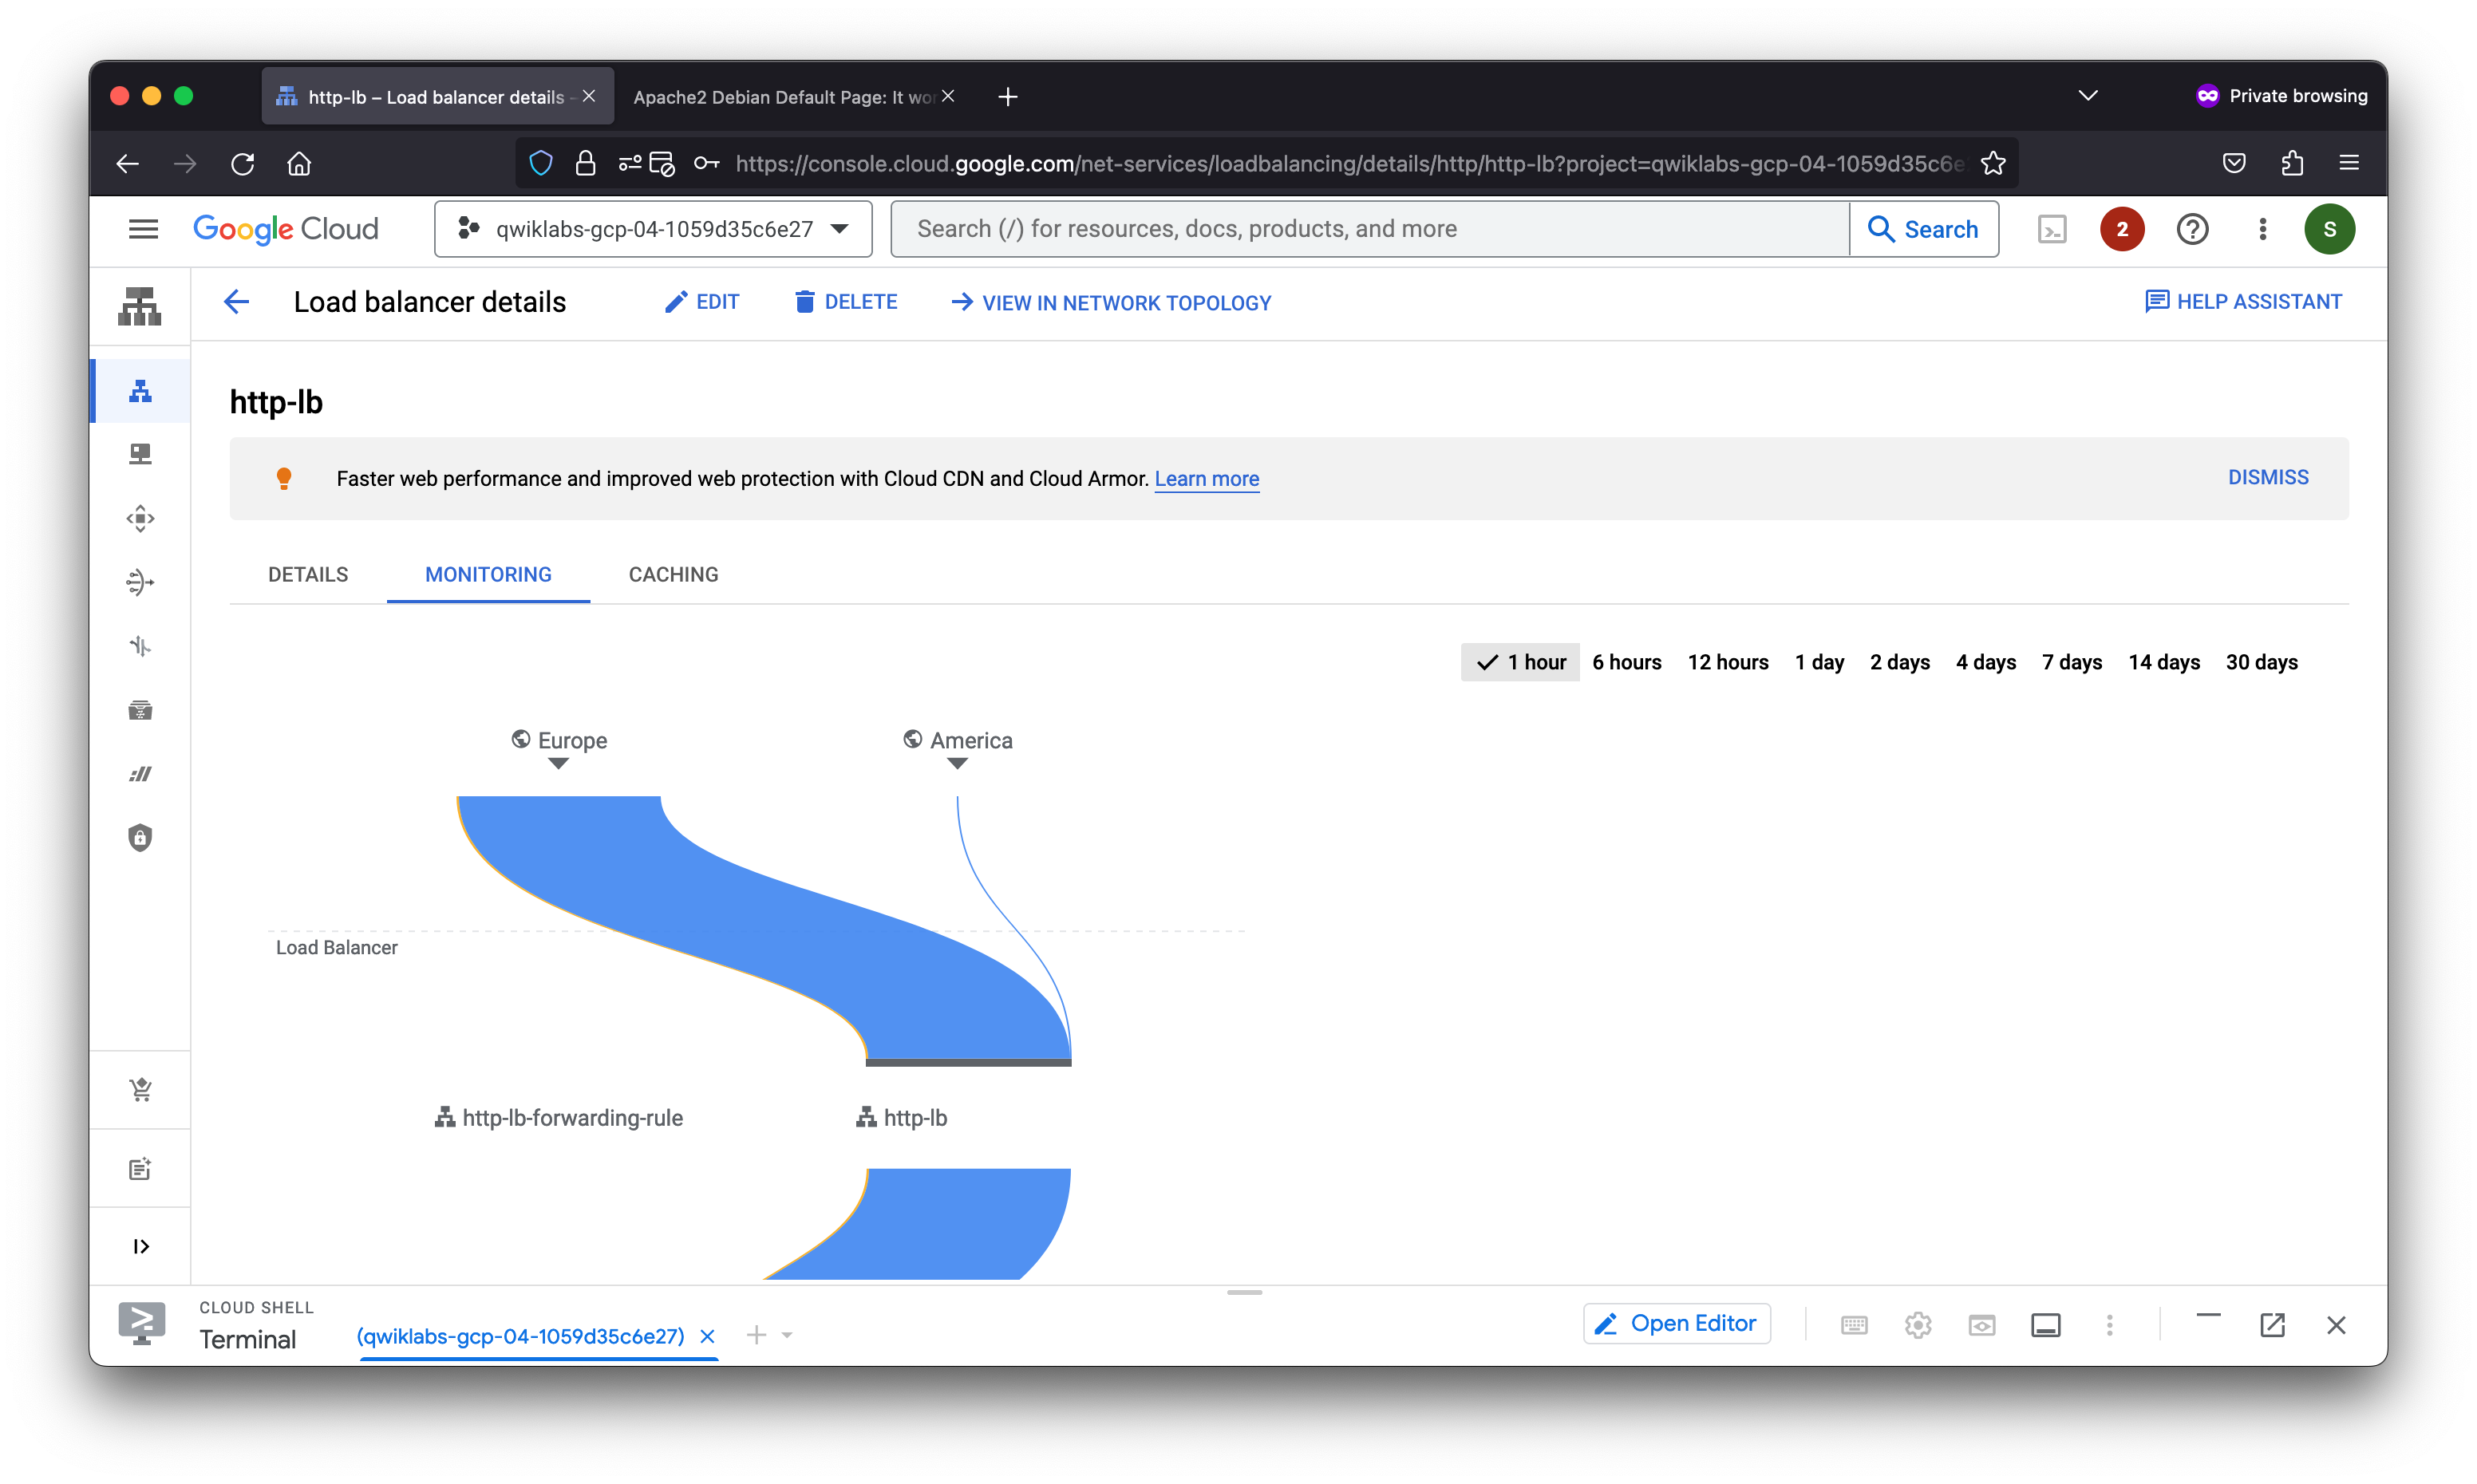
Task 6. Stress test the HTTP load balancer
Now that you have created the HTTP load balancer for your backends, it is time to verify that traffic is forwarded to the backend service.
Welcome to Cloud Shell! Type "help" to get started.
Your Cloud Platform project in this session is set to qwiklabs-gcp-04-1059d35c6e27.
Use “gcloud config set project [PROJECT_ID]” to change to a different project.
student_01_a0075c49c713@cloudshell:~ (qwiklabs-gcp-04-1059d35c6e27)$ LB_IP=34.111.70.232
while [ -z "$RESULT" ] ;
do
  echo "Waiting for Load Balancer";
  sleep 5;
  RESULT=$(curl -m1 -s $LB_IP | grep Apache);
done
Waiting for Load Balancer
student_01_a0075c49c713@cloudshell:~ (qwiklabs-gcp-04-1059d35c6e27)$
Stress test the HTTP load balancer
Create a new VM to simulate a load on the HTTP load balancer. Then determine whether traffic is balanced across both backends when the load is high.
- In the Cloud Console, on the Navigation menu (
- Click Create instance.
Linux stress-test 4.19.0-23-cloud-amd64 #1 SMP Debian 4.19.269-1 (2022-12-20) x86_64

The programs included with the Debian GNU/Linux system are free software;
the exact distribution terms for each program are described in the
individual files in /usr/share/doc/*/copyright.

Debian GNU/Linux comes with ABSOLUTELY NO WARRANTY, to the extent
permitted by applicable law.
Last login: Tue May  2 02:39:23 2023 from 35.235.241.16
student-01-a0075c49c713@stress-test:~$ export LB_IP=http://34.111.70.232/
student-01-a0075c49c713@stress-test:~$ export LB_IP=34.111.70.232
student-01-a0075c49c713@stress-test:~$ echo $LB_IP
34.111.70.232
student-01-a0075c49c713@stress-test:~$ ab -n 500000 -c 1000 http://$LB_IP/
This is ApacheBench, Version 2.3 <$Revision: 1843412 $>
Copyright 1996 Adam Twiss, Zeus Technology Ltd, http://www.zeustech.net/
Licensed to The Apache Software Foundation, http://www.apache.org/

Benchmarking 34.111.70.232 (be patient)
Completed 50000 requests
Completed 100000 requests
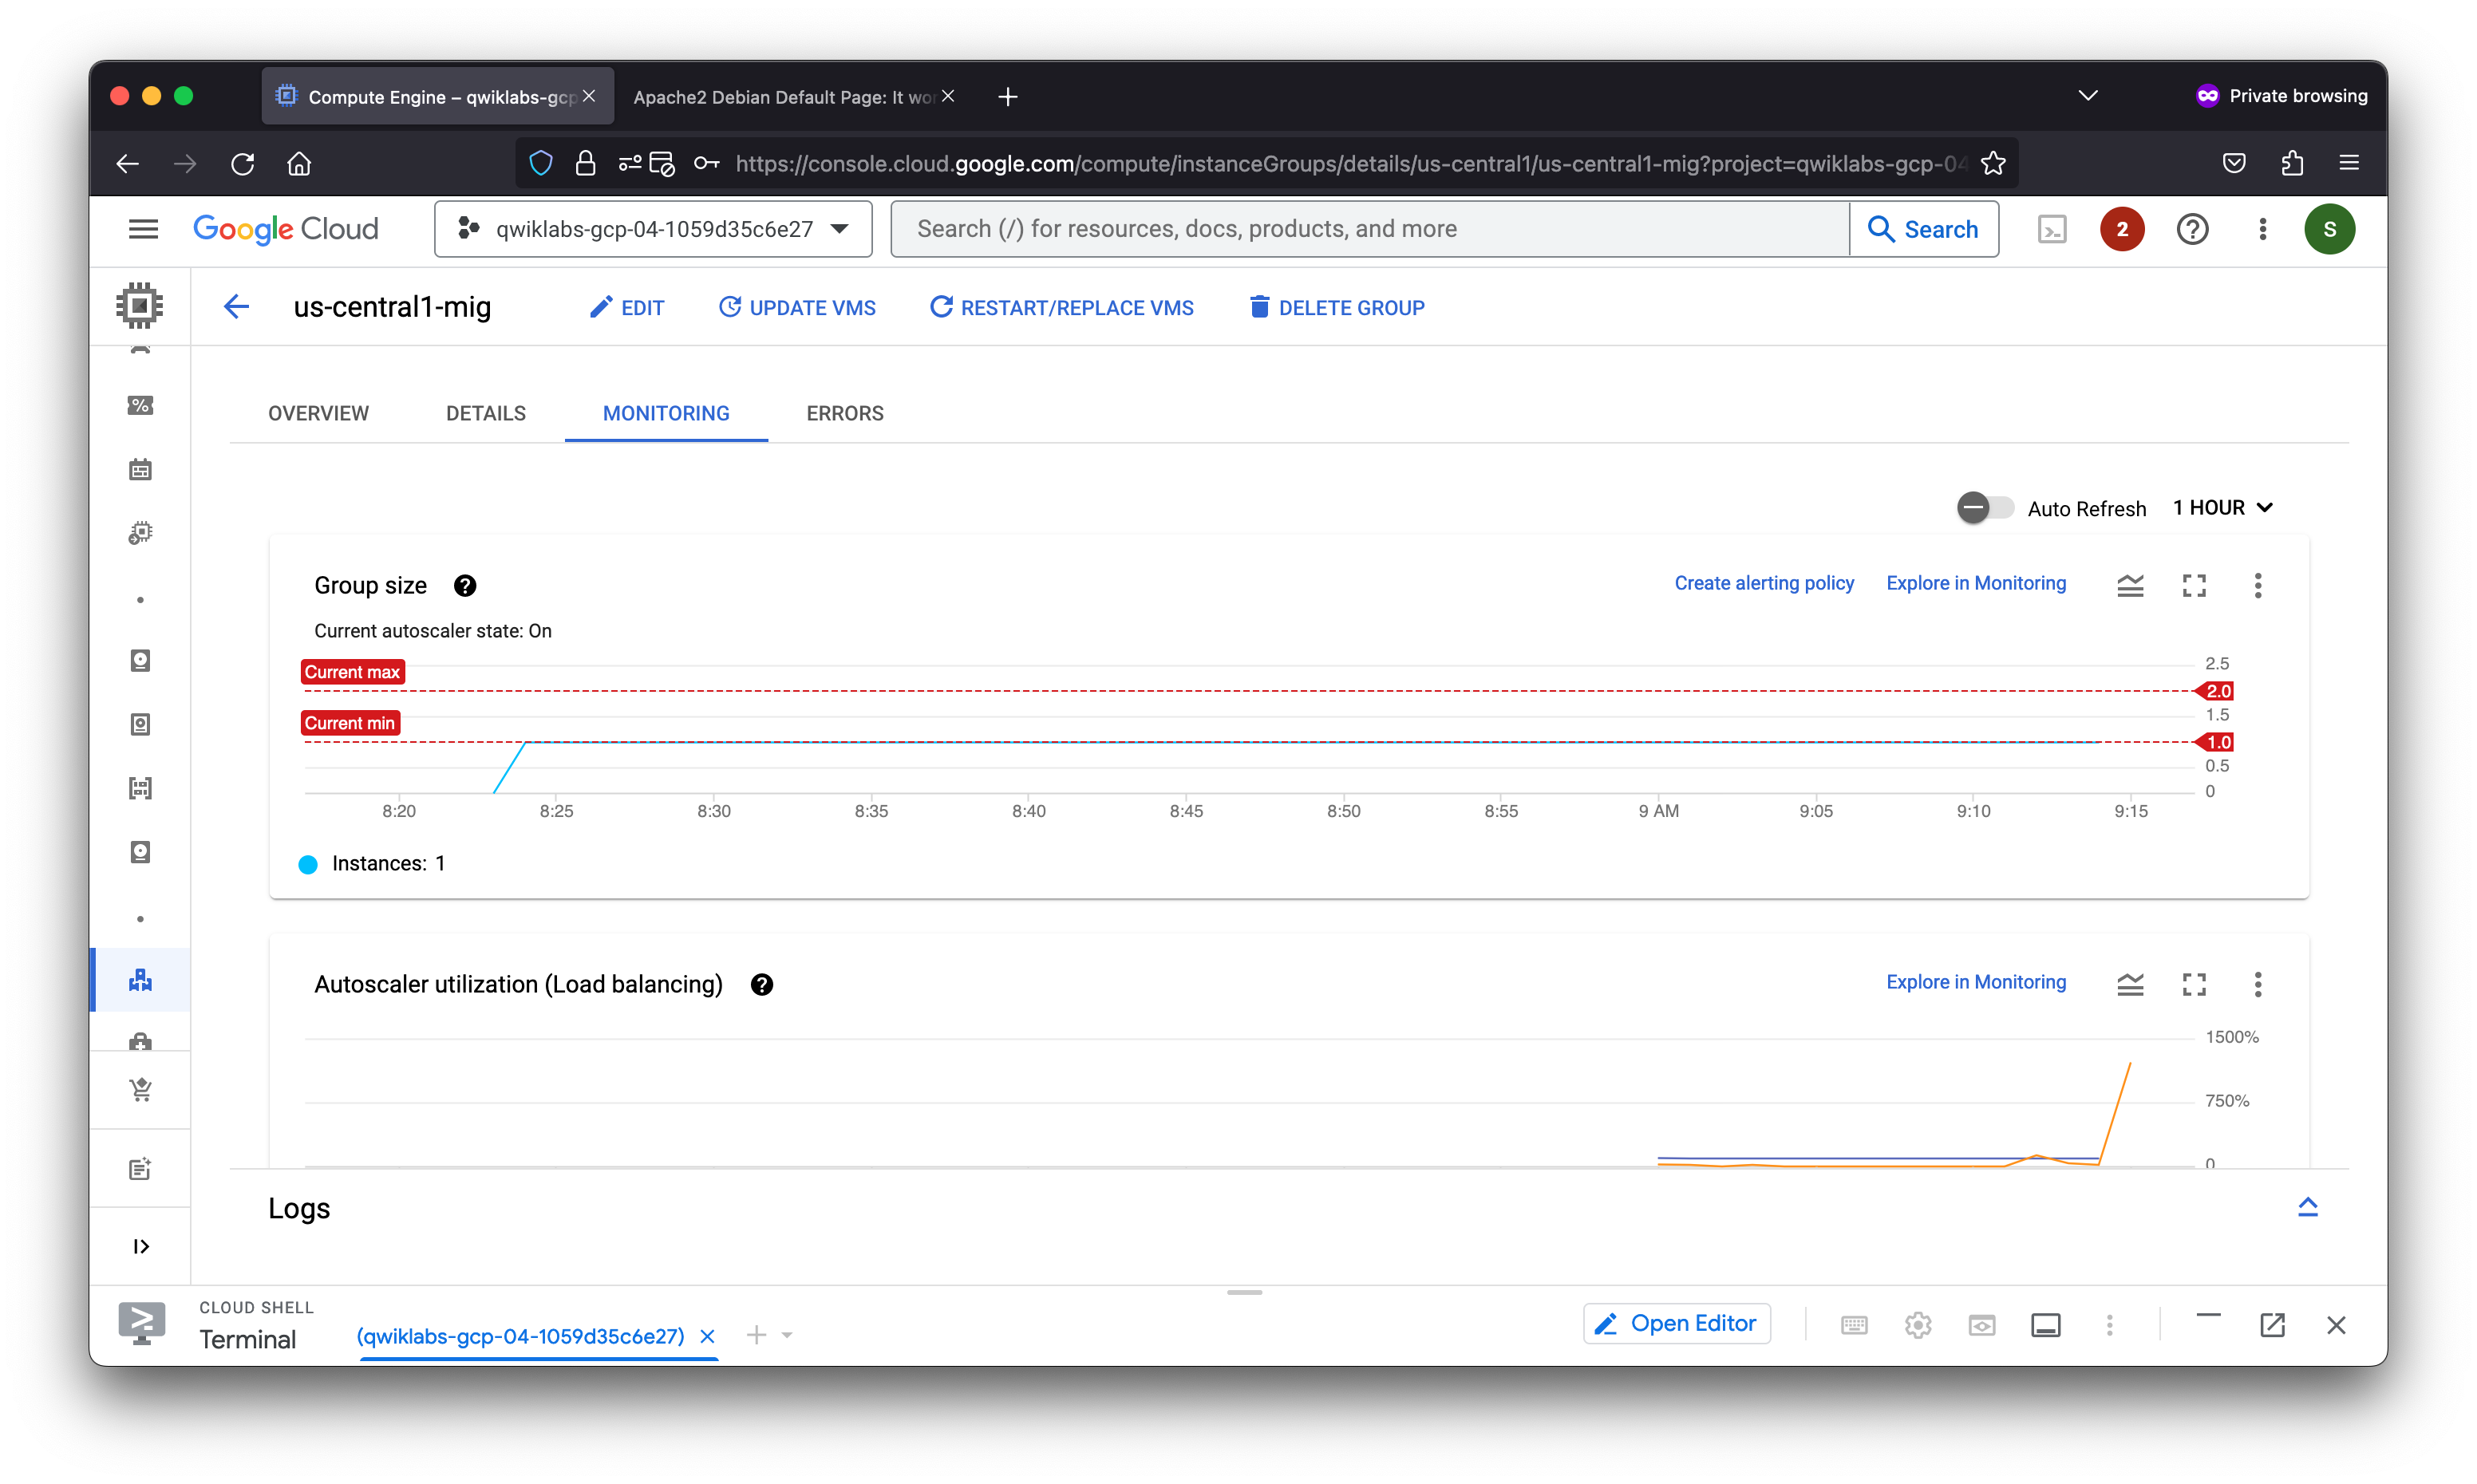
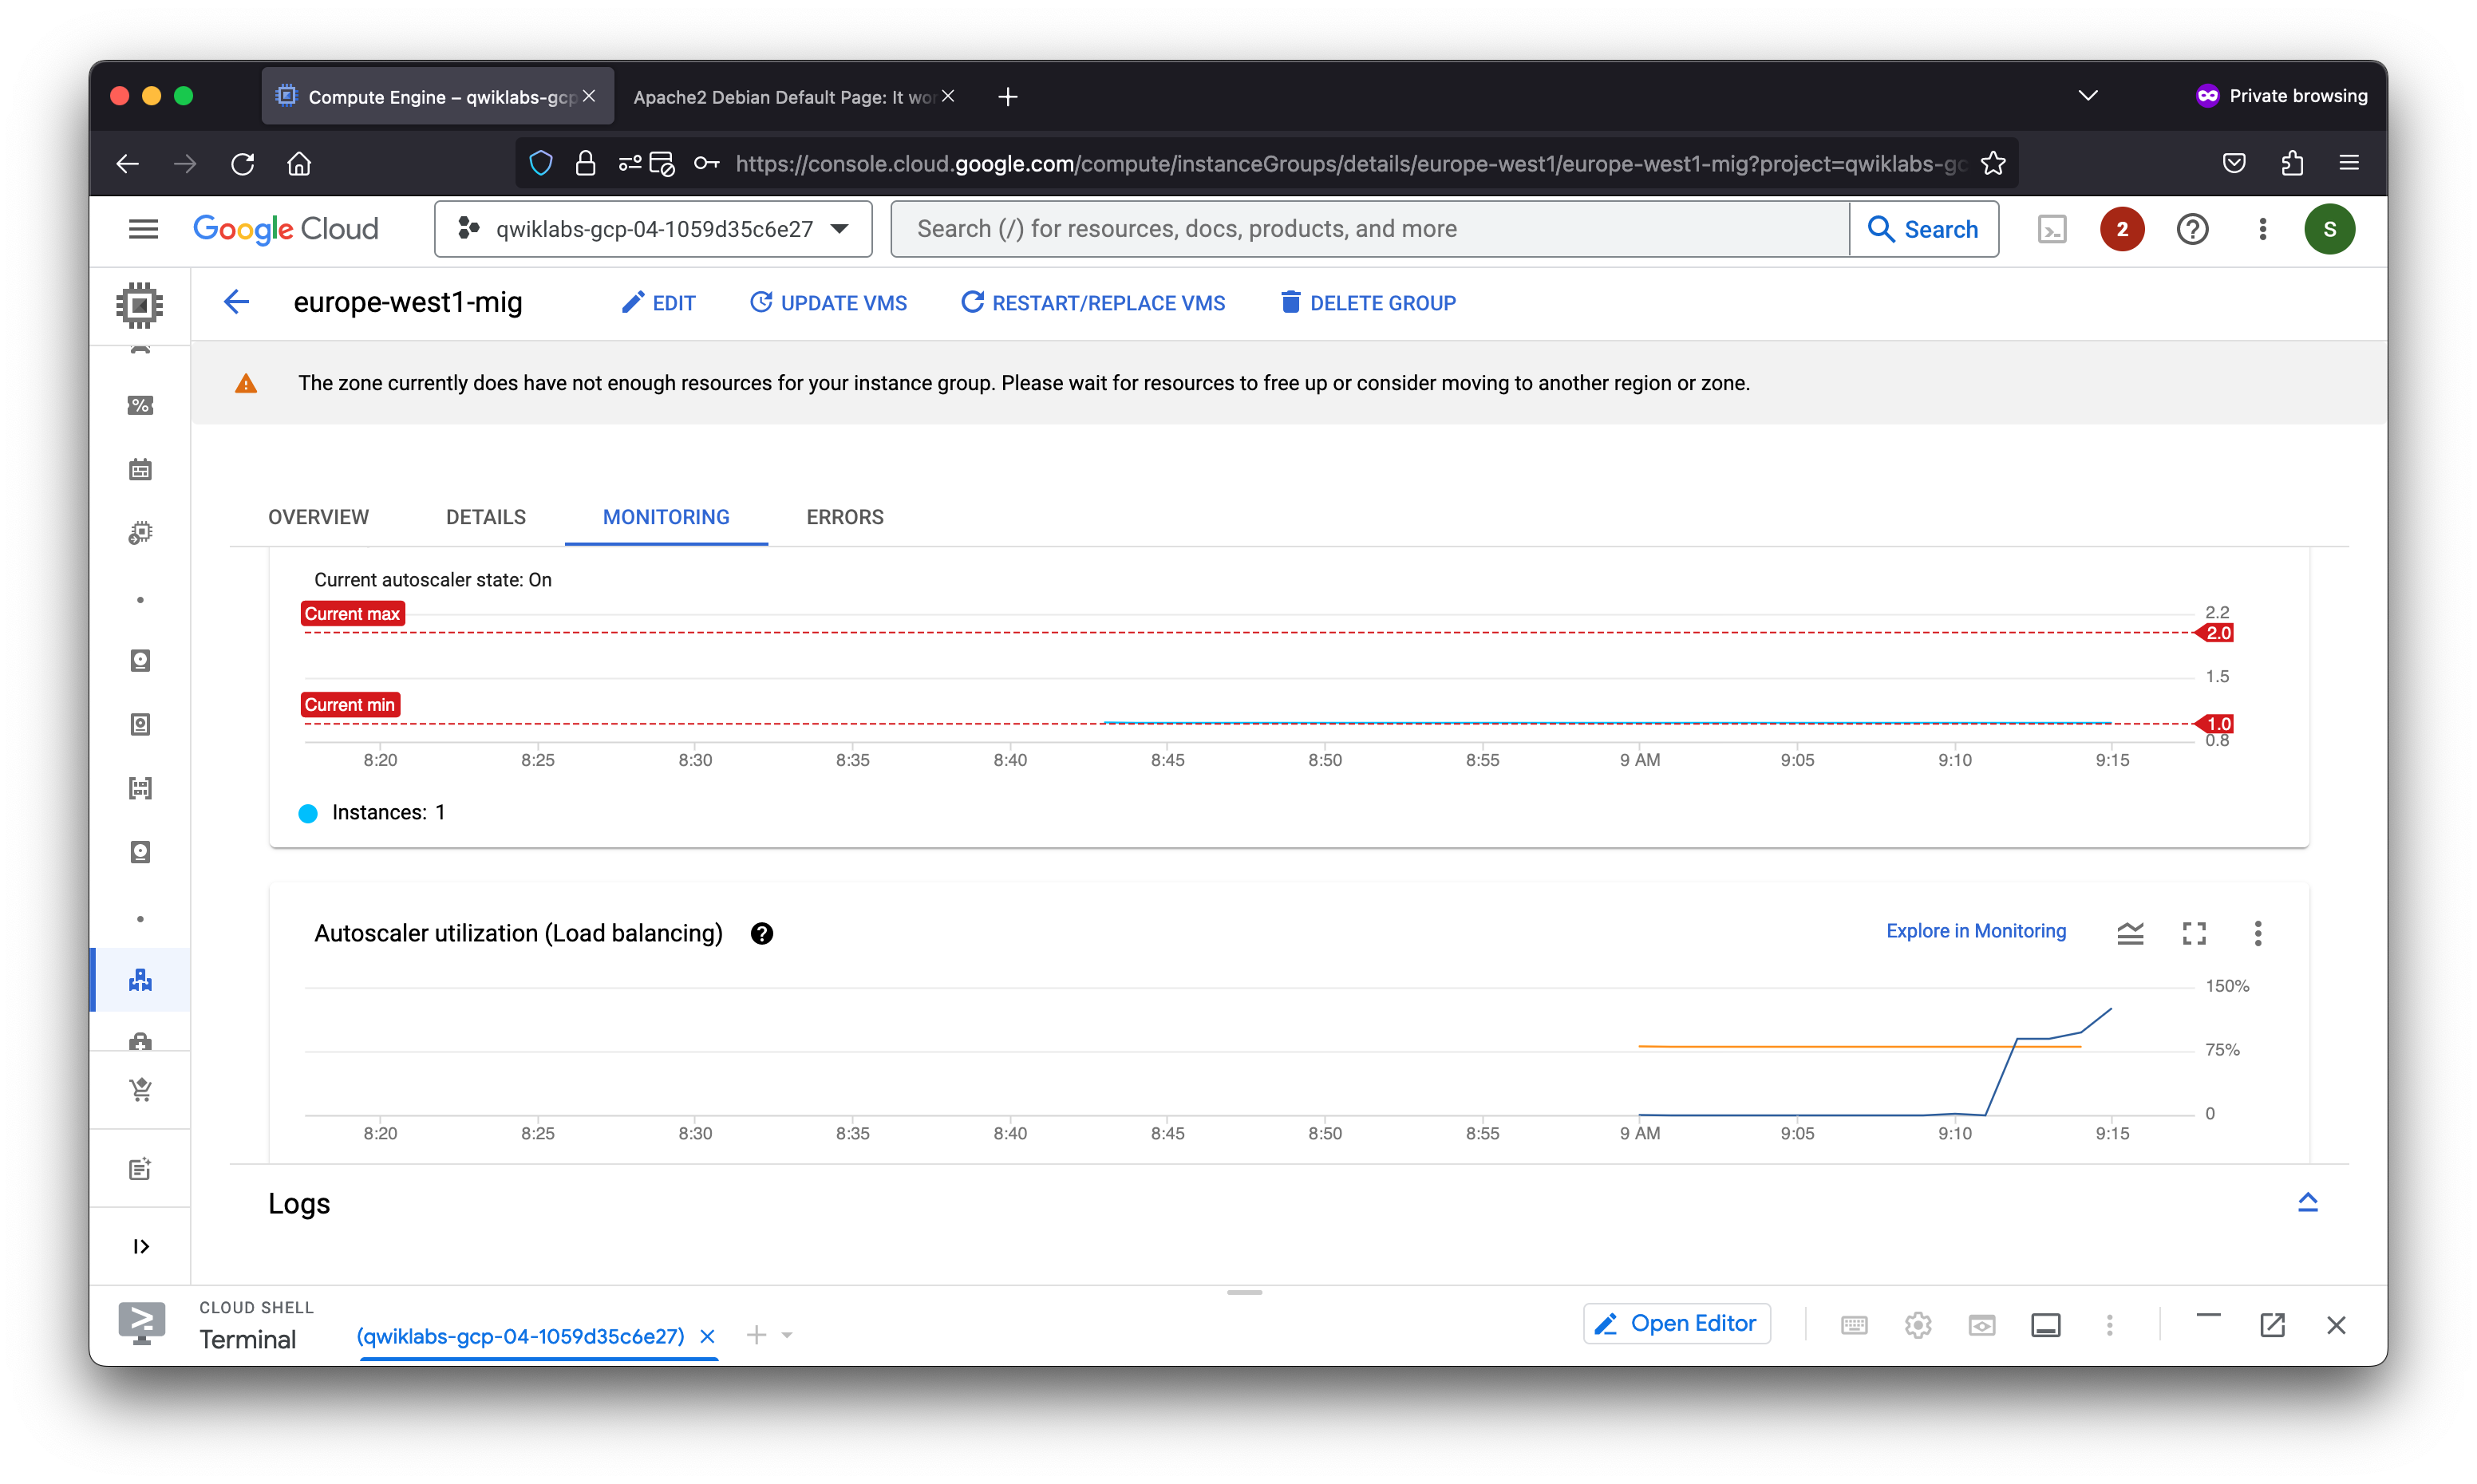
Task 7. Review
In this lab, you configured an HTTP load balancer with backends in us-central1 and europe-west1. Then you stress-tested the load balancer with a VM to demonstrate global load balancing and autoscaling.


