
Juniper Apstra Terraform Provider — Locals
Juniper Apstra Terraform Provider — Locals
According to Terraform documentation, A local value assigns a name to an expression, so you can use the name multiple times within a module instead of repeating the expression.
If you’re familiar with traditional programming languages, it can be useful to compare Terraform modules to function definitions:
Input variables are like function arguments.
Output values are like function return values.
Local values are like a function's temporary local variables.
Declaring a Local Value
A set of related local values can be declared together in a single locals block:
locals {
  device_owners = "JTAC"
  purpose = "For customer issue replication"
}
Using Local Values
Once a local value is declared, you can reference it in expressions as local.<NAME>.
Note: Local values are created by a locals block (plural), but you reference them as attributes on an object named local (singular). Make sure to leave off the “s” when referencing a local value!
Let’s define a resource that creates a Tag in the Apstra Design tab. For name and description of the Apstra Tag, use the local values.
pradeep@juniper apstra-terraform-5 % cat main.tf

terraform {
  required_providers {
    apstra = {
      source  = "Juniper/apstra"
      version = ">= 0.28.0"
    }
  }
  required_version = ">= 1.1"
}

provider "apstra" {
  url = "https://admin:password@10.210.40.194:443"
  tls_validation_disabled = true
  blueprint_mutex_enabled = true
}

locals {
  device_owners = "JTAC"
  purpose = "For customer issue replication"
}

resource "apstra_tag" "example" {
  name        = local.device_owners
  description = local.purpose
}
pradeep@juniper apstra-terraform-5 %
Terraform Init
pradeep@juniper apstra-terraform-5 % terraform init

Initializing the backend...

Initializing provider plugins...
- Finding juniper/apstra versions matching ">= 0.28.0"...
- Installing juniper/apstra v0.42.0...
- Installed juniper/apstra v0.42.0 (signed by a HashiCorp partner, key ID CB9C922903A66F3F)

Partner and community providers are signed by their developers.
If you'd like to know more about provider signing, you can read about it here:
https://www.terraform.io/docs/cli/plugins/signing.html

Terraform has created a lock file .terraform.lock.hcl to record the provider
selections it made above. Include this file in your version control repository
so that Terraform can guarantee to make the same selections by default when
you run "terraform init" in the future.

Terraform has been successfully initialized!

You may now begin working with Terraform. Try running "terraform plan" to see
any changes that are required for your infrastructure. All Terraform commands
should now work.

If you ever set or change modules or backend configuration for Terraform,
rerun this command to reinitialize your working directory. If you forget, other
commands will detect it and remind you to do so if necessary.
pradeep@juniper apstra-terraform-5 %
Terraform Apply
pradeep@juniper apstra-terraform-5 % terraform apply

Terraform used the selected providers to generate the following execution plan. Resource actions are indicated with the following symbols:
  + create

Terraform will perform the following actions:

  # apstra_tag.example will be created
  + resource "apstra_tag" "example" {
      + description = "For customer issue replication"
      + id          = (known after apply)
      + name        = "JTAC"
    }

Plan: 1 to add, 0 to change, 0 to destroy.

Do you want to perform these actions?
  Terraform will perform the actions described above.
  Only 'yes' will be accepted to approve.

  Enter a value: yes

apstra_tag.example: Creating...
apstra_tag.example: Creation complete after 1s [id=ab2424f1-e4b9-40a8-ad69-b4c83fe09833]

Apply complete! Resources: 1 added, 0 changed, 0 destroyed.
pradeep@juniper apstra-terraform-5 %
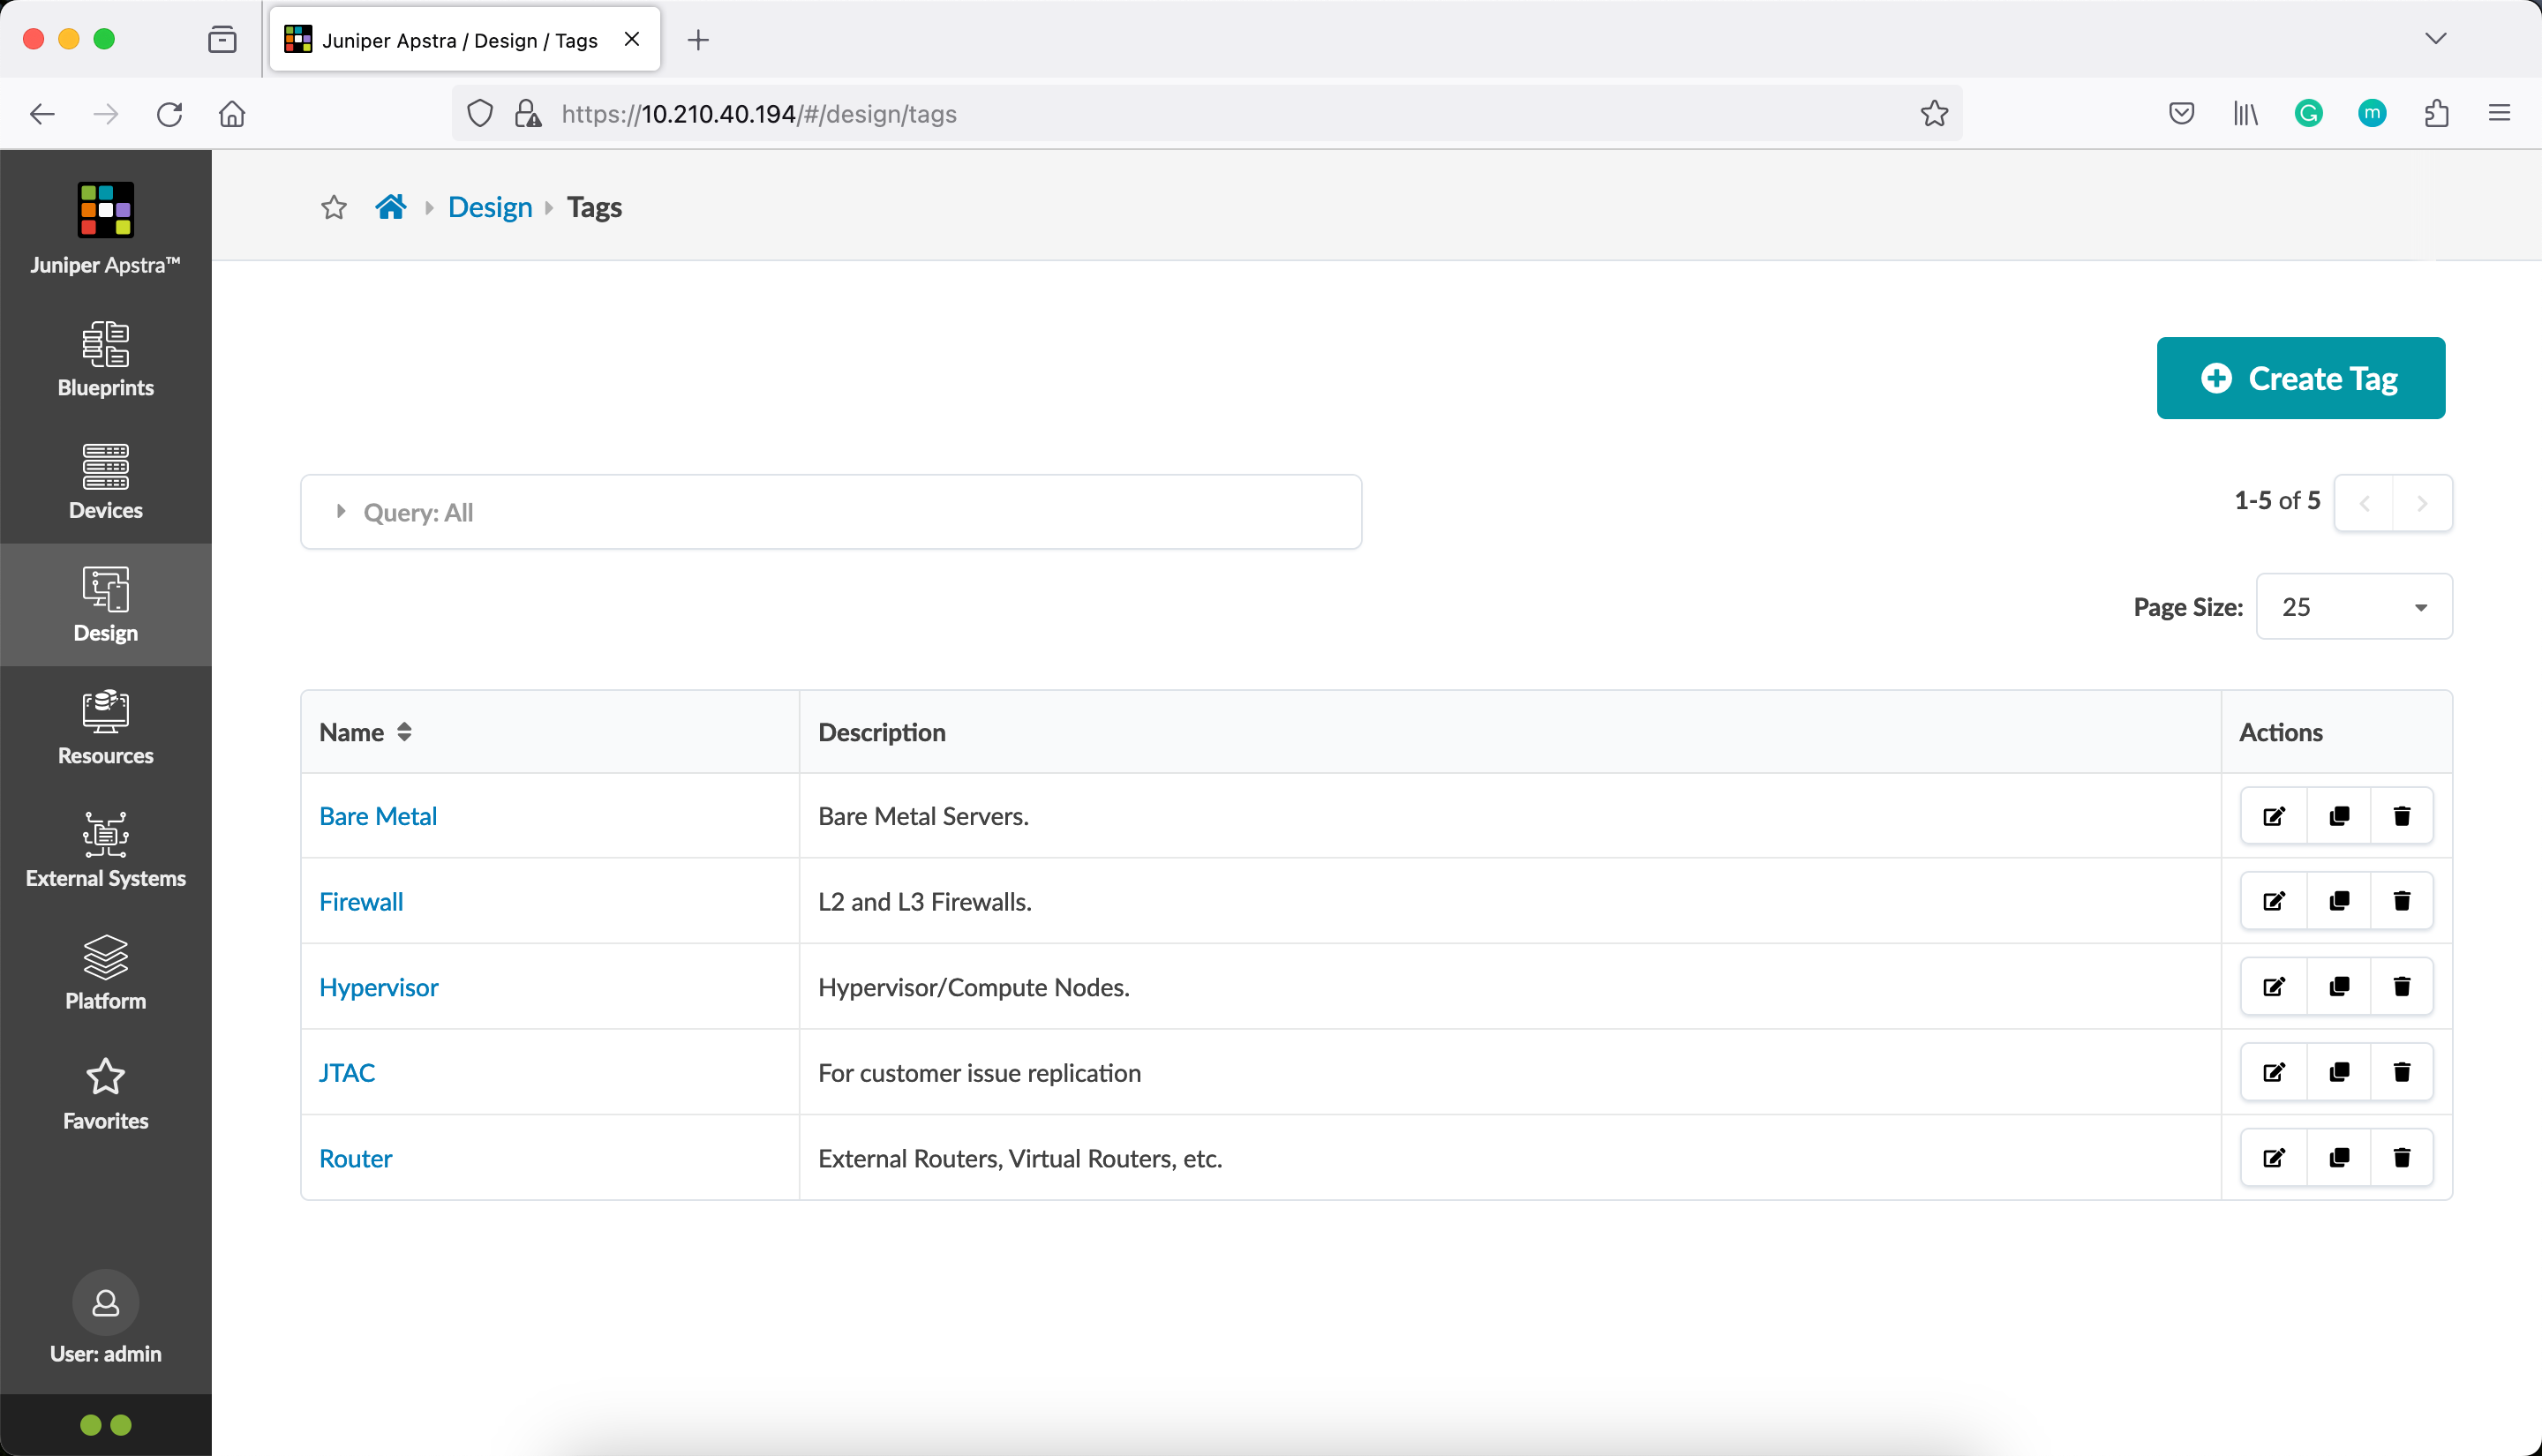
Verify that Apstra Tag is created with these local values.
Let’s take a look at another example, this time with a set of local values.
pradeep@juniper apstra-terraform-6 % cat main.tf
terraform {
  required_providers {
    apstra = {
      source  = "Juniper/apstra"
      version = ">= 0.28.0"
    }
  }
  required_version = ">= 1.1"
}

provider "apstra" {
  url = "https://admin:password@10.210.40.194:443"
  tls_validation_disabled = true
  blueprint_mutex_enabled = true
}


# this example creates a tags named after enterprise teams
# responsible for various data center asset types.
locals {
  device_owners = toset([
    "research",
    "security",
    "app team 1",
    "app team 2",
  ])
}

resource "apstra_tag" "example" {
  for_each    = local.device_owners
  name        = each.key
  description = format("device maintained by %q team", each.key)
}

pradeep@juniper apstra-terraform-6 %
Terraform Init
pradeep@juniper apstra-terraform-6 % terraform init

Initializing the backend...

Initializing provider plugins...
- Finding juniper/apstra versions matching ">= 0.28.0"...
- Installing juniper/apstra v0.42.0...
- Installed juniper/apstra v0.42.0 (signed by a HashiCorp partner, key ID CB9C922903A66F3F)

Partner and community providers are signed by their developers.
If you'd like to know more about provider signing, you can read about it here:
https://www.terraform.io/docs/cli/plugins/signing.html

Terraform has created a lock file .terraform.lock.hcl to record the provider
selections it made above. Include this file in your version control repository
so that Terraform can guarantee to make the same selections by default when
you run "terraform init" in the future.

Terraform has been successfully initialized!

You may now begin working with Terraform. Try running "terraform plan" to see
any changes that are required for your infrastructure. All Terraform commands
should now work.

If you ever set or change modules or backend configuration for Terraform,
rerun this command to reinitialize your working directory. If you forget, other
commands will detect it and remind you to do so if necessary.
pradeep@juniper apstra-terraform-6 %
Terraform Apply
pradeep@juniper apstra-terraform-6 % terraform apply

Terraform used the selected providers to generate the following execution plan. Resource actions are indicated with the following symbols:
  + create

Terraform will perform the following actions:

  # apstra_tag.example["app team 1"] will be created
  + resource "apstra_tag" "example" {
      + description = "device maintained by \"app team 1\" team"
      + id          = (known after apply)
      + name        = "app team 1"
    }

  # apstra_tag.example["app team 2"] will be created
  + resource "apstra_tag" "example" {
      + description = "device maintained by \"app team 2\" team"
      + id          = (known after apply)
      + name        = "app team 2"
    }

  # apstra_tag.example["research"] will be created
  + resource "apstra_tag" "example" {
      + description = "device maintained by \"research\" team"
      + id          = (known after apply)
      + name        = "research"
    }

  # apstra_tag.example["security"] will be created
  + resource "apstra_tag" "example" {
      + description = "device maintained by \"security\" team"
      + id          = (known after apply)
      + name        = "security"
    }

Plan: 4 to add, 0 to change, 0 to destroy.

Do you want to perform these actions?
  Terraform will perform the actions described above.
  Only 'yes' will be accepted to approve.

  Enter a value: yes

apstra_tag.example["app team 1"]: Creating...
apstra_tag.example["security"]: Creating...
apstra_tag.example["research"]: Creating...
apstra_tag.example["app team 2"]: Creating...
apstra_tag.example["security"]: Creation complete after 1s [id=707ba53f-bf13-4a93-b95c-8ea59d893462]
apstra_tag.example["research"]: Creation complete after 1s [id=98d52d0b-f2f8-4ecd-bbd4-42a5e1fbd54d]
apstra_tag.example["app team 2"]: Creation complete after 1s [id=ecf34ca4-dd3d-4291-90c8-8ad6defb882c]
apstra_tag.example["app team 1"]: Creation complete after 1s [id=0a65a898-a1e6-4e1e-af53-57de2abb52f0]

Apply complete! Resources: 4 added, 0 changed, 0 destroyed.
pradeep@juniper apstra-terraform-6 %
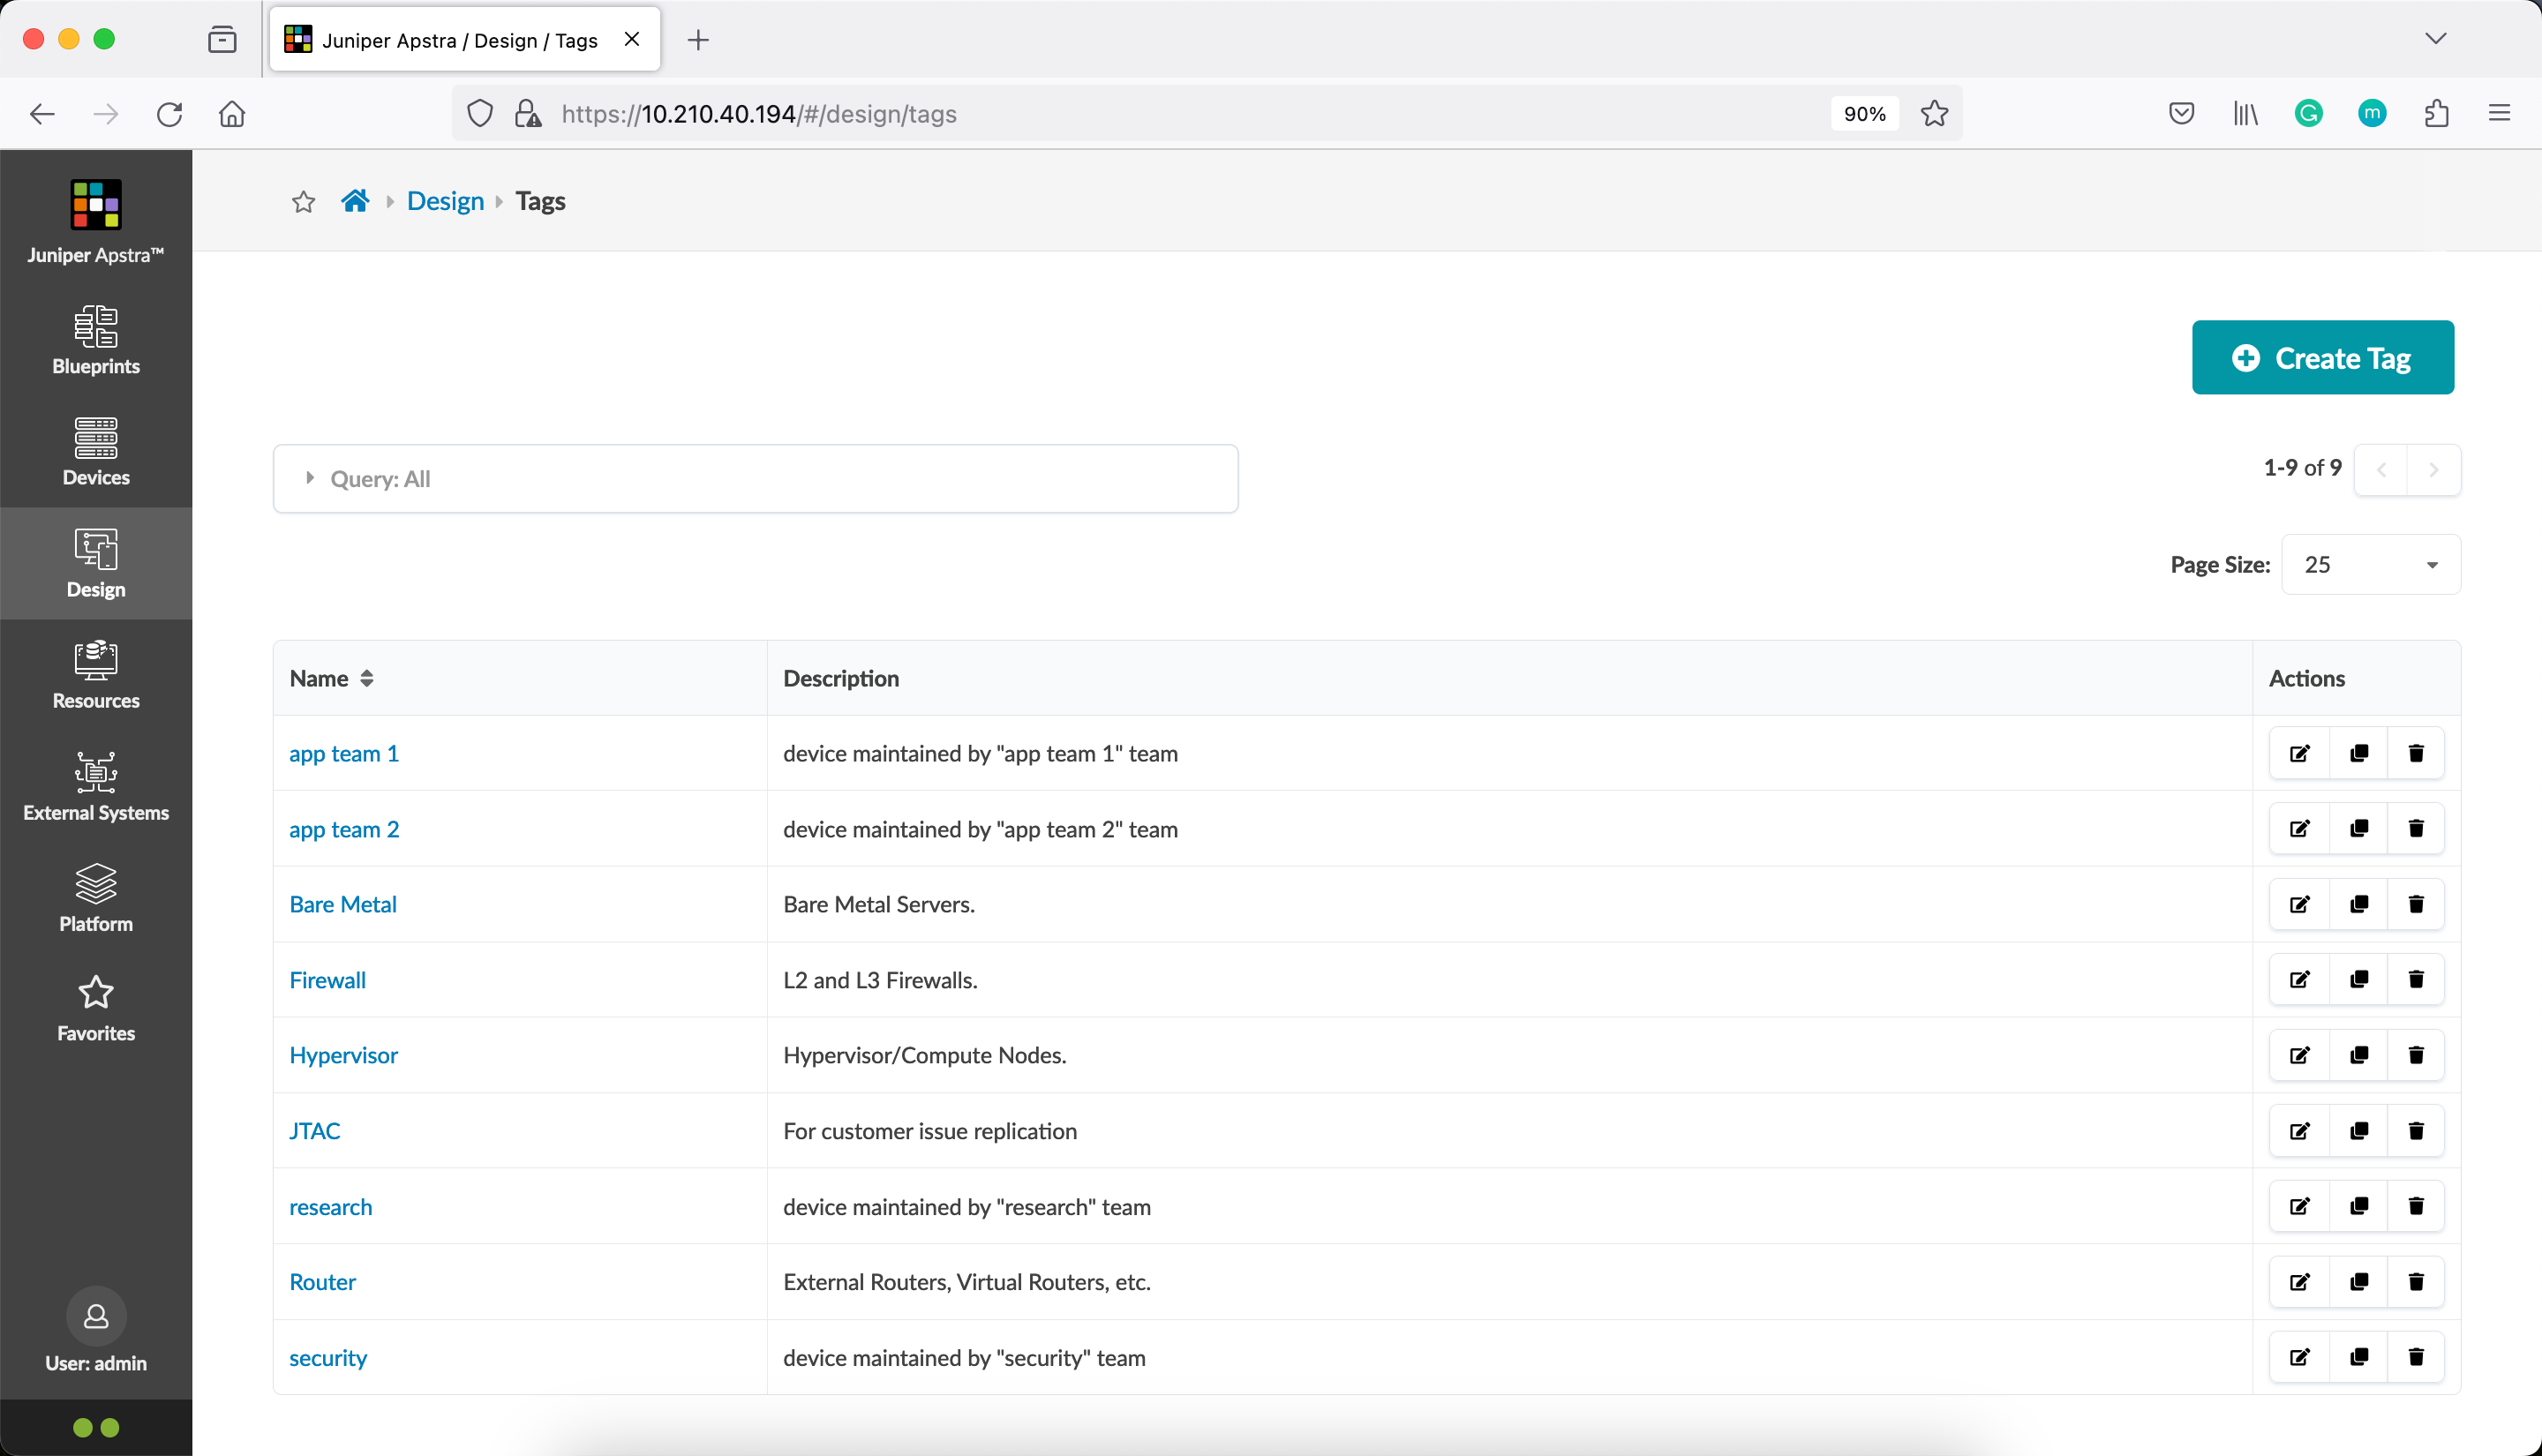
Verify that these 4 tags are created in the Apstra Design tab
Some HCL Features
This example also uses some additional HCL language syntax. Let’s try to understand that.
The for_each Meta-Argument
By default, a resource configures one real infrastructure object. However, sometimes you want to manage several similar objects (like in this case multiple Apstra Tags) without writing a separate block for each one. Terraform has two ways to do this: count and for_each.
If a resource or module block includes a for_each argument whose value is a map or a set of strings, Terraform creates one instance for each member of that map or set.
Note: A given resource or module block cannot use both count and for_each.
Basic for_each Syntax
for_each is a meta-argument defined by the Terraform language. It can be used with modules and with every resource type.
The for_each meta-argument accepts a map or a set of strings, and creates an instance for each item in that map or set. Each instance has a distinct infrastructure object associated with it, and each is separately created, updated, or destroyed when the configuration is applied.
The each Object
In blocks where for_each is set, an additional each object is available in expressions, so you can modify the configuration of each instance. This object has two attributes:
each.key— The map key (or set member) corresponding to this instance.each.value— The map value corresponding to this instance. (If a set was provided, this is the same aseach.key.)
format Function
The format function produces a string by formatting a number of other values according to a specification string. It is similar to the printf function in C, and other similar functions in other programming languages.
pradeep@juniper apstra-terraform-6 % terraform console
> format("Hello, %s!","Pradeep")
"Hello, Pradeep!"
> format("There are %d days in a Year", 365)
"There are 365 days in a Year"
> format("Hello, %q!", "Pradeep")
"Hello, \"Pradeep\"!"
>
> exit
pradeep@juniper apstra-terraform-6 %
The %q converts to string and produces a JSON quoted string representation.
toset Function
toset converts its argument to a set value.
Explicit type conversions are rarely necessary in Terraform because it will convert types automatically where required. Use the explicit type conversion functions only to normalize types returned in module outputs.
Pass a list value to toset to convert it to a set, which will remove any duplicate elements and discard the ordering of the elements.
> toset(["srx","qfx","mx","srx"])
toset([
  "mx",
  "qfx",
  "srx",
])
>
When To Use Local Values
Local values can be helpful to avoid repeating the same values or expressions multiple times in a configuration, but if overused they can also make a configuration hard to read by future maintainers by hiding the actual values used.
Use local values only in moderation, in situations where a single value or result is used in many places and that value is likely to be changed in future. The ability to easily change the value in a central place is the key advantage of local values.


